Finally... I believe a table that many Home assistant users have been searching for!
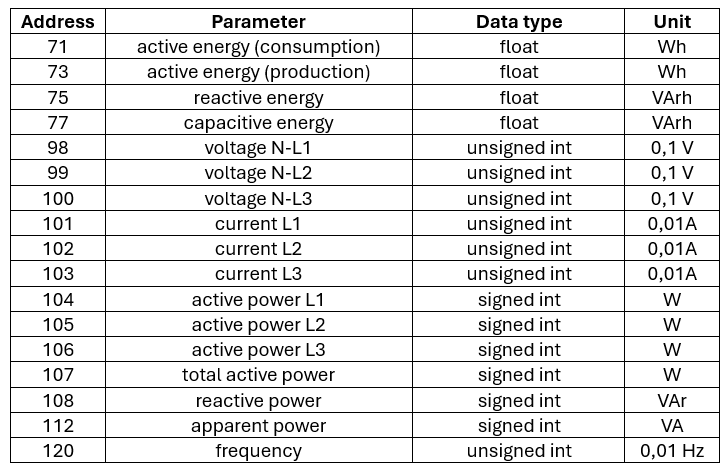
Below is the Goodwe GM3000 Smart Power Meter table of modbus registers (and likely similar or the same for the GW1000 - the single phase version - though untested).
Notes on use:
-
The default modbus/RS485 address of the GW3000 is 3. It is likely changeable in the registers above Decimal 120 - but that is beyond the scope of this post.
-
The correct modbus function code to read the GW3000 is "03 Read Holding Registers (4x)" or equivalent.
-
Check the hints below the code. Ive added a few tips that I trust may help your HA/ESPHome + modbus journey. See below.
-
for your convenience i have added both the ESPHome and Home Assistant code.
-
First, Home Assistant code:
   # this code is lifted straight from the modbus section of a Home Assistant configuration.yaml

- name: "PwrMtr"                    # use your own name for your power meter here
  type: tcp                               # TCP of course! if you are using a serial port, change accordingly
  host: 192.168.xxx.xxx           # LAN IP address of your transparent tcp to RS485 slave
  port: 8899                             # NOTE: the most common default port is 509.
                                               #### adjust your code to match your network####

  delay: 0                                                   # standard settings here, use what suits your network.
  message_wait_milliseconds: 200
  timeout: 5

  sensors:
    # PwrMtr sensors
  - name: "PwrMtr Active Energy Consumption"          # As per table. Change if you wish
    unique_id: PwrMtr_Active_Energy_Consumption
    slave: 3                                   # default address for the GW3000
    address: 0x0047                     # Starting register. Decimal 71.
    input_type: holding
    data_type: float32
    scale: 0.001                                #edit to suit your use
    unit_of_measurement: "kWh"
    precision: 1
    slave_count: 2                            # the first four registers are 32 bit. ie 2 registers give the correct reading
    state_class: total_increasing    # you must use this class for the sensor to read correctly
    scan_interval: 60           # Poll this specific sensor every 60 seconds # See hints below

  - name: "PwrMtr Active Energy Production"
    unique_id: PwrMtr_Active_Energy_Production   # there are four 32 bit registers. seperated here for ease
    slave: 3
    address: 0x0049
    input_type: holding
    data_type: float32
    scale: 0.001
    unit_of_measurement: "kWh"
    precision: 1
    slave_count: 2
    state_class: total_increasing
    scan_interval: 60 # Poll this specific sensor every 60 seconds

  - name: "Reactive Energy"
    unique_id: Reactive_Energy
    slave: 3
    address: 0x004B
    input_type: holding
    data_type: float32
    scale: 0.001
    unit_of_measurement: "kVArh"
    precision: 1
    slave_count: 2
    state_class: total_increasing
    scan_interval: 60 # Poll this specific sensor every 60 seconds

  - name: "Capacitive Energy"
    unique_id: Capacitive_Energy
    slave: 3
    address: 0x004D
    input_type: holding
    data_type: float32
    scale: 0.001
    unit_of_measurement: "kVArh"
    precision: 1
    slave_count: 2
    state_class: total_increasing
    scan_interval: 60 # Poll this specific sensor every 60 seconds


  - name: "PwrMtr 5"                   # remaining tabled registers can be read with one query.
    unique_id: PwrMtr_5              # Enter separately if you want to name directly from modbus
    slave: 3
    address: 0x0061
    input_type: holding
    scale: 0.1
    unit_of_measurement: "°C"
    precision: 1
    slave_count: 22
    state_class: measurement
    scan_interval: 60 # Poll this specific sensor every 60 seconds
- Now for the ESPHome yaml code
## The following code is from a Kincony KC868 v3 wifi unit. it is not the complete code, retaining only the sections required for RS485 and the GW3000. with only a few modifications it runs the excellent Waveshare ESP32-S3 8 relay wifi unit. this code IS for wifi, change as necessary if using ethernet.

esphome:
  name: kincony-board                    # match to your board
  friendly_name: S1HControl              # use your name for this device
  platformio_options:
    board_build.extra_flags:
      # WIFI_CONTROL_SELF_MODE = 0
      # WIFI_CONTROL_SELF_MODE = 1
      - "-DWIFI_CONTROL_SELF_MODE=1"

external_components:
  - source:                                       # use the correct links for your device
      type: git
      url: https://github.com/hzkincony/esphome-tuya-wifi-mcu
      ref: v1.3.1

esp32:
  board: esp32-s3-devkitc-1           # all specific to your board - use the correct details!!
  framework:
    type: arduino

api:
  encryption:
    key: "xxxxxxxxxxxxxxxxxxxxxxxxxxxxxxxxxxxxxxxxxxxxxxxxxxxxxx="   #ESPHome will specify this key

ota:
  - platform: esphome                  # required for OTA (Over The Air) updates to your code

logger:

#ethernet:                 # ethernet disabled here. adjust together with wifi to match your network.
#  type: W5500
#  clk_pin: GPIO1
#  mosi_pin: GPIO2
#  miso_pin: GPIO41
#  cs_pin: GPIO42
#  interrupt_pin: GPIO43
#  reset_pin: GPIO44

wifi:
  ssid: !secret wifi_ssid
  password: !secret wifi_password

  manual_ip:                         # set for your network. suggest you do use a static IP
    static_ip: 192.168.xx.xx
    gateway: 192.168.xx.xx
    subnet: 255.255.255.0
    dns1: 192.168.xxx.xxx
  ##use_address: 192.168.xxx.xxx    # not relevant to GW3000. Use when reprogramming board to a new IP
    #dns2: The backup DNS server to use.

i2c:                                  # configure for your board
   - id: bus_a
     sda: 8
     scl: 18
     scan: true
     frequency: 400kHz

pcf8574:    # this is an extension board mounted on the KC838. # configure for your board
  - id: 'pcf8574_hub_out_1'  # for output channel 0-7| input channel 8-15
    i2c_id: bus_a
    address: 0x22
    pcf8575: true

uart:
  - id: uart_1    #RS485
    tx_pin: 39
    rx_pin: 38
    baud_rate: 9600                            # baud rate is pretty standard on code ive seen....
      #  dummy_receiver: true              # you must add data bits, parity and stop bits
      #  after:
      #  timeout: 10ms
    data_bits: 8
    parity: NONE
    stop_bits: 1

modbus:
  - id: modbus1
    uart_id: uart_1

modbus_controller:
  - id: S1H_Temps            # I left this here so can see how to add another modbus slave
    address: 0x0B   ## (dec 11) address of the Modbus slave device on the bus
    modbus_id: modbus1
    setup_priority: -10

  - id: S1H_PwrMtr
    address: 0x03   ## (dec 5) address of the Modbus slave device on the bus
    modbus_id: modbus1
    setup_priority: -10

#### Actual GW3000 code below #################################################

sensor:
  - platform: modbus_controller               # again, use your names
    modbus_controller_id: S1H_PwrMtr
    name: "S1HPwrMtr Active Energy Cnsmptn."  # S1HPwrMtr is my device name,  and register name abbreviated
                                              # change to your own naming format.
    register_type: holding
    address: 0x47                          ## address of the register
    unit_of_measurement: "kWh"
    value_type: FP32                   # note the 32 bit register
    register_count: 2
    accuracy_decimals: 1              #adjust the scales to suit
    filters:
      - multiply: 0.001

  - platform: modbus_controller
    modbus_controller_id: S1H_PwrMtr
    name: "S1HPwrMtr Active Energy Prod."  # Register name abbreviated
                                           # change to your own naming format.
    register_type: holding
    address: 0x49                          ## address of the register
    unit_of_measurement: "kWh"
    value_type: FP32
    register_count: 2
    accuracy_decimals: 1
    filters:
      - multiply: 0.001

  - platform: modbus_controller
    modbus_controller_id: S1H_PwrMtr
    name: "S1HPwrMtr Reactive Energy"  # Register name abbreviated
                                       # change to your own naming format.
    register_type: holding
    address: 0x4B                      ## address of the register
    unit_of_measurement: "kVArh"
    value_type: FP32
    register_count: 2
    accuracy_decimals: 1
    filters:
      - multiply: 0.001

  - platform: modbus_controller
    modbus_controller_id: S1H_PwrMtr
    name: "S1HPwrMtr Cap. Energy"          # Register name abbreviated
                                           # change to your own naming format.
    register_type: holding
    address: 0x4D                          ## address of the register
    unit_of_measurement: "kVArh"
    value_type: FP32
    register_count: 2
    accuracy_decimals: 1
    filters:
      - multiply: 0.001

    #### below, the registers numbered  decimal  98 thru 120 only yields 13 useful values. despite being able to query the full 22 register series using modbus, ESPHome requires query for each register.

    #### IMPORTANT NOTICE: THE GW3000 REGISTERS numbered dec 98 THRU 120 ON THE MANUFACTURERS TABLE ARE ACTUALLY 97 THRU 119. YOU MUST SUBTRACT decimal 1 FROM EVERY REGISTER IN THAT RANGE ....####

    #### Grey and half bald from ripping your hair out? Join the ESPHome Home Assistant Modbus Sufferers Club. Where we expect incompatibility, non functionality, non-interchangeability, change of compatibilities and namings and reinvent the same wheel several times over, required many focused searches, until we find the required code in a dark shady corner of the internet, Happy because the sensor finally works, not so happy  because irreparably, early heart failure has already made its dark mark on the DNA of the believing.. And with all due respects, if HA and ESPHome dont achieve the goal of removing your hair and sanity, the device manufacturers are in cahoots and will finish the job on behalf of the afore-mentioned.   :(  \  :(  [sword fight]   :p  [some hair]   X|  [no hair, potentially DOA]. Please forgive one's morbid outlook. I love all you volunteer guys and stand in absolute awe of of your incalculable efforts. HA, ESPHome have never been better, but the adoption of slightly more technical devices is challenging ####

    #### All comments without prejudice or presonal accusation, purely constructive criticism ####

    ####  Right, thats out of the way, moving right on.....####

  - platform: modbus_controller
    modbus_controller_id: S1H_PwrMtr
    name: "S1HPwrMtr L1-N Voltage"         # Register name abbreviated
                                           # change to your own naming format.
    register_type: holding
    address: 0x61                          ## address of the register
    unit_of_measurement: "V"
    #value_type: FP32                      # all these are 16 bit. you should need value_type at all
    register_count: 1                      # read 8 registers
    accuracy_decimals: 1
    filters:
      - multiply: 0.1

  - platform: modbus_controller
    modbus_controller_id: S1H_PwrMtr
    name: "S1HPwrMtr L2-N Voltage"         # Register name abbreviated
                                           # change to your own naming format.
    register_type: holding
    address: 0x62                          ## address of the register
    unit_of_measurement: "V"
    #value_type: FP32                      # all these are 16 bit. you should need value_type at all
    register_count: 1                      # read 8 registers
    accuracy_decimals: 1
    filters:
      - multiply: 0.1

  - platform: modbus_controller
    modbus_controller_id: S1H_PwrMtr
    name: "S1HPwrMtr L3-N Voltage1"        # Register name abbreviated
                                           # change to your own naming format.
    register_type: holding
    address: 0x63                          ## address of the register
    unit_of_measurement: "V"
    #value_type: FP32                      # all these are 16 bit. you should need value_type at all
    register_count: 1                      # read 8 registers
    accuracy_decimals: 1
    filters:
      - multiply: 0.1

  - platform: modbus_controller
    modbus_controller_id: S1H_PwrMtr
    name: "S1HPwrMtr L1 Current"           # Register name abbreviated
                                           # change to your own naming format.
    register_type: holding
    address: 0x64                          ## address of the register
    unit_of_measurement: "A"
    #value_type: FP32                      # all these are 16 bit. you should need value_type at all
    register_count: 1                      # read 8 registers
    accuracy_decimals: 1
    filters:
      - multiply: 0.01

  - platform: modbus_controller
    modbus_controller_id: S1H_PwrMtr
    name: "S1HPwrMtr L2 Current"           # Register name abbreviated
                                           # change to your own naming format.
    register_type: holding
    address: 0x65                          ## address of the register
    unit_of_measurement: "A"
    #value_type: FP32                      # all these are 16 bit. you should need value_type at all
    register_count: 1                      # read 8 registers
    accuracy_decimals: 1
    filters:
      - multiply: 0.01

  - platform: modbus_controller
    modbus_controller_id: S1H_PwrMtr
    name: "S1HPwrMtr L3 Current"           # Register name abbreviated
                                           # change to your own naming format.
    register_type: holding
    address: 0x66                          ## address of the register
    unit_of_measurement: "A"
    #value_type: FP32                      # all these are 16 bit. you should need value_type at all
    register_count: 1                      # read 8 registers
    accuracy_decimals: 1
    filters:
      - multiply: 0.001

  - platform: modbus_controller
    modbus_controller_id: S1H_PwrMtr
    name: "S1HPwrMtr L1 ActPwr"            # Register name abbreviated
                                           # change to your own naming format.
    register_type: holding
    address: 0x67                          ## address of the register
    unit_of_measurement: "kW"
    #value_type: FP32                      # all these are 16 bit. you should need value_type at all
    register_count: 1                      # read 8 registers
    accuracy_decimals: 2
    filters:
      - multiply: 1

  - platform: modbus_controller
    modbus_controller_id: S1H_PwrMtr
    name: "S1HPwrMtr L2 ActPwr"            # Register name abbreviated
                                           # change to your own naming format.
    register_type: holding
    address: 0x68                          ## address of the register
    unit_of_measurement: "kW"
    #value_type: FP32                      # all these are 16 bit. you should need value_type at all
    register_count: 1                      # read 8 registers
    accuracy_decimals: 2
    filters:
      - multiply: 1

  - platform: modbus_controller
    modbus_controller_id: S1H_PwrMtr
    name: "S1HPwrMtr L3 ActPwr"            # Register name abbreviated
                                           # change to your own naming format.
    register_type: holding
    address: 0x69                          ## address of the register
    unit_of_measurement: "kW"
    #value_type: FP32                      # all these are 16 bit. you should need value_type at all
    register_count: 1                      # read 8 registers
    accuracy_decimals: 2
    filters:
      - multiply: 1

  - platform: modbus_controller
    modbus_controller_id: S1H_PwrMtr
    name: "S1HPwrMtr Total Active Power"
    register_type: holding
    address: 0x6A                          ## address of the register
    unit_of_measurement: "kW"
    #value_type: FP32                      # all these are 16 bit. you should need value_type at all
    register_count: 1                     # read 8 registers
    accuracy_decimals: 1
    filters:
      - multiply: 0.0001

  - platform: modbus_controller
    modbus_controller_id: S1H_PwrMtr
    name: "S1HPwrMtr Reactive Power"
    register_type: holding
    address: 0x6B                          ## address of the register
    unit_of_measurement: "kVAr"
    #value_type: FP32                      # all these are 16 bit. you should need value_type at all
    register_count: 1                     # read 8 registers
    accuracy_decimals: 1
    filters:
      - multiply: 0.01

  - platform: modbus_controller
    modbus_controller_id: S1H_PwrMtr
    name: "S1HPwrMtr Apparent Power"
    register_type: holding
    address: 0x6F                          ## address of the register
    unit_of_measurement: "kVA"
    #value_type: FP32                      # all these are 16 bit. you should need value_type at all
    register_count: 1                     # read 8 registers
    accuracy_decimals: 1
    filters:
      - multiply: 0.001

  - platform: modbus_controller
    modbus_controller_id: S1H_PwrMtr
    name: "S1HPwrMtr Frequency"
    register_type: holding
    address: 0x77                          ## address of the register
    unit_of_measurement: "Hz"
    #value_type: FP32                      # all these are 16 bit. you should need value_type at all
    register_count: 1                     # read 8 registers
    accuracy_decimals: 2
    filters:
      - multiply: 0.01

#### Actual GW3000 code above #################################################

### the below registers are not relevant to the GW3000, included as an example of reading the second slave noted above, in this case an 8 channel temperature acquisition device.

  - platform: modbus_controller
    modbus_controller_id: S1H_Temps
    name: "S1H Temp 3"
    register_type: read
    address: 0x0192    ## address of the register inside the Modbus slave device
    unit_of_measurement: "C"
    value_type: U_WORD
    accuracy_decimals: 1
    filters:
      - multiply: 0.1

  - platform: modbus_controller
    modbus_controller_id: S1H_Temps
    name: "S1H Temp 4"
    register_type: read
    address: 0x0193    ## address of the register inside the Modbus slave device
    unit_of_measurement: "C"
    value_type: U_WORD
    accuracy_decimals: 1
    filters:
      - multiply: 0.1
  - platform: modbus_controller
    modbus_controller_id: S1H_Temps
    name: "S1H Temp 5"
    register_type: read
    address: 0x0194    ## address of the register inside the Modbus slave device
    unit_of_measurement: "C"
    value_type: U_WORD
    accuracy_decimals: 1
    filters:
      - multiply: 0.1
  - platform: modbus_controller
    modbus_controller_id: S1H_Temps
    name: "S1H Temp 6"
    register_type: read
    address: 0x0195    ## address of the register inside the Modbus slave device
    unit_of_measurement: "C"
    value_type: U_WORD
    accuracy_decimals: 1
    filters:
      - multiply: 0.1
  - platform: modbus_controller
    modbus_controller_id: S1H_Temps
    name: "S1H Temp 7"
    register_type: read
    address: 0x0196    ## address of the register inside the Modbus slave device
    unit_of_measurement: "C"
    value_type: U_WORD
    accuracy_decimals: 1
    filters:
      - multiply: 0.1
  - platform: modbus_controller
    modbus_controller_id: S1H_Temps
    name: "S1H Temp8"
    register_type: read
    address: 0x0197    ## address of the register inside the Modbus slave device
    unit_of_measurement: "C"
    value_type: U_WORD
    accuracy_decimals: 1
    filters:
      - multiply: 0.1

web_server:
  port: 80

font:
  - file: "gfonts://Roboto"
    id: roboto
    size: 20

display:
  - platform: ssd1306_i2c
    i2c_id: bus_a
    model: "SSD1306 128x64"
    address: 0x3C
    lambda: |-
      it.printf(0, 0, id(roboto), "KinCony kinconyboard");
Suggestions and hints for bringing modbus devices online with either Home Assistant or ESPHome:
-
DO bench test your device before installing. Get a usb to serial conversion device - cheap from your local electronics store. Connect this on your PC, have a power supply handy and get your device live. Then use a program like Modbus Poll to connect direct from the PC to the device. This exercise can be exceptionally frustrating to get your PC and device talking, particularly when you are new to Home Assistant, modbus, how to read modbus tables. Believe me, its much easier to troubleshoot , record required functions, then test your yaml at your desk than when the device is installed in roof space and your desk is two floors lower. once communicating you can check each function so you are 100% certain the device is working. (Disclaimer: I get no kickbacks from the Modbus Poll software writers
 I am the biggest software scrooge there is and greatly appreciate the inestimable efforts of the open source/freeware community, but the small cost for Modbus Poll is one of the best investments you will make)
 -
Use Modbus Poll to work through all the expected functions of your slave devices. note the device address, register addresses, which function is needed for each register. Having this information will be useful for when you are writing your YAML
-
Finally write your YAML for the device and live operate/read all functions. because once the device is in the field and your trying to connect via wifi, you soon find ESPHome and Home Assistant have none of the useful tools to operate the device that Modbus Poll has. Modbus Poll is also very useful for once in a lifetime operations like changing the device address.
-
You will find google to be a good friend in finding the right code for a particular operation - it even generates YAML code - take care though, the code will usually not work straight off - it will need tweaking for your specific. Google does generate some ESPHome code that used Home Assistant modbus expressions and actions. Sometimes there not even a direct comparison from one code to the other, which is actually very frustrating. Train yourself to be a logically thinking detective, the code you need will be out there. Keep looking until you find it.
-
the GW3000 has many more registers numbering up from 120. there is likely a lot of extra functionality available, one of which would be to change the default address from 3. Most people would only be looking for the imported / exported power registers for their energy page in HA.
-
Modbus use on Home assistant. its excellent ..... up to a certain level of concurrent usage. Beyond that action becomes delayed or missed, and if pushed far enough will actually stop communicating altogether. If that happens you will lose control of your slave devices. If you only have a few slave devices congestion is unlikely to be an issue. Personally i had six wifi-RS485 server devices (the EW11A is cheap and the best of the entire line-up if you want a recommendation) with access to 3 or 4 RS485 slaves on each bus. The slaves were temp sensors, DO and DI, and a VSD/VFD motor drive. I was trying to query 8 temps and the 10 status registers on the VSD 10 seconds. Very Bad Idea. I had to back the temp timing to 20 seconds, and the VSD to 60 seconds. ESP32 devices on ESPHome are proving more efficient.
-
When using a any modbus device, your top priority will be to get the genuine modbus table for that device. There are far too many variables in modbus for you to try to guess the register addresses and function codes.
-
carefully connect your RS485 modbus wiring, be sure to use twisted pair cable - shielded if running near heavy electrical mains. Modbus Poll mainly connects as per the manufacturers modbus tables. It the event that you cannot get communication working try/check the following points:
a. try switching the A and B wires. For unknown reasons some devices work correctly when wired with A and B switched. When benchtesting record this anomaly for that device - you will need to wire it with A and B reversed in your final bus.
b. if you have several slave devices on one bus, make sure you connect them in series - a daisy chain. If some of your slave devices wont work, the easiest method to troubleshoot is disconnect the bus after the the closest device to your ESPhome /serial / tcp-modbus server, and get that device working correctly first. The add the remaining devices one by one ensuring functionality after each addition.
c. ensure all slaves powered with correct voltage and polarity
d. ensure the RS485/modbus wires have terminated at every connection correctly.
e. ensure all slave devices have a unique address numbered 1-247. The do not need to be sequentially numbered but must be unique.
f. The A and B may need switching. I have had different brands of devices exhibit different operation than when benchtested once the devices were daisy chained.
g. Remember - you can also you modbus poll to test the daisy chained devices. The is very useful to determine if the lack of functionality is related to the bus of devices, or whether its incorrect YAML
h. note FYI that the esphome / serial / tcp-modbus server device bus address is 0. in exceptionally rare circumstances that may need to be actually coded on your YAML. a fact to file away in the back of your memory, just in case. You will likely never need to action this. -
Before you sit down to work out you modbus devices, get a heavy duty dose of patience. You will need it!