Preface
I’ve got a few guides that look fairly similar to this: Blue Iris with Pushover and Blue Iris with iOS. Why? I’m hesitant to nuke old content and there is no easy way to update them since I’ve changed the setup a few times, along with underlying components changing on me. This is the latest iteration of the process I’m using for image detection and notifications.
You’ll find copypasta from my previous guides just to avoid reinventing the wheel.
Summary
This demonstrates how you can integrate Blue Iris, Amazon Rekognition, and Pushover to do person detection with Blue Iris. Best of all, it’ll send inline snapshots from the camera when a person is detected using Pushover. This is less about writing a de facto guide and more about providing the process so it can be adapted as components change over time.
Platform
I’m running Hassio.io under Ubuntu for the additional horsepower. This is also much easier than maintaining all of the stand-alone docker containers that I was previously using.
Components
- Node-RED. All of the automations are done through here.
- Pushover. This is done natively through Node-RED. The stock Pushover component for Home Assistant hasn’t been updated to support image attachments, but the Node-RED module seems to be actively maintained and supports everything we’ll need. Simply go to Manage palette, click on Install, search for node-red-contrib-pushover, and install the module. You’ll need to restart Node-RED after installing it.
- Blue Iris. This provides you with the steps of integrating Blue Iris with Home Assistant. Yes, it’s paid software that requires Windows, but I have yet to find anything remotely close to the functionality for the price.
- Amazon Rekognition. I’ve given up on the native image processing in Home Assistant. They all have nuances and dependencies, e.g. TensorFlow not working on a Hass.io install. The custom component is pretty damn seamless and the Rekognition processing is as fast as native processing.
Implementation
Step #1: Configure the Cameras in Blue Iris and Home Assistant
This is based on my previous guide. Home Assistant pulls the camera feeds directly from Blue Iris instead of the PoE camera. I have a separate yaml file for each of the 4 PoE cameras. I’d highly recommend !secret here but I’ll show you a mock-up of what it looks like. In the configuration.yaml file I have this:
camera: !include_dir_merge_list cameras
In the camera directory I have a yaml for each camera, with most looking like this, e.g. bdc.yaml:
- platform: mjpeg
  mjpeg_url: http://bi.home.local:23456/mjpg/BDC
  name: BDC
  username: insert_username
  password:  insert_password
  authentication: basic
Again, one yaml per camera. BI makes it easy to access them with the short names. The 23456 port was one I selected for the built-in BI web server. Keep the naming scheme consistent: you’ll understand why later in the guide. I just use 3-letter acronyms for the camera, e.g. BYC for Back Yard Camera, FDC for Front Door Camera, etc.
Step #2: Configure Amazon Rekognition
Just follow the instructions to get this up and running. As far as configuration, I have this in my configuration.yaml file:
image_processing: !include_dir_merge_list image_processing
There is also a image_processing directory in the root configuration directory, i.e. /usr/share/hassio/homeassistant/image_processing on my Hass.io Ubuntu installation. In that directory I have one yaml file for each camera that I’m pulling. In this case we’ll be using amazon_rekognition_fdc.yaml as a reference point, but there’s also amazon_rekognition_bdc.yaml, amazon_rekognition_byc.yaml, etc. The contents of the file look like this:
- platform: amazon_rekognition
  aws_access_key_id: !secret aws_access_key
  aws_secret_access_key: !secret aws_secret_key
  region_name: us-east-1
  confidence: 90
  targets:
    - person
  scan_interval: 604800
  save_file_folder: /config/www/amazon_rekognition
  source:
    - entity_id: camera.fdc
You’ll also need to create that snapshot directory. In my instance that would be done with the following:
mkdir -p /usr/share/hassio/homeassistant/www/amazon_rekognition
Note that each instance references a corresponding camera, e.g. camera.fdc. The rest of them are identical minus the camera. You’ll need to restart Home Assistant after adding the custom component. After it’s restarted, you should see a new entity for each one you created, e.g. image_processing.rekognition_person_fdc. If you look at the entity details, it’ll list out every object that was detected along with a level of confidence. However, since we specified targets: person, it’ll just return a value that is the number of people detected in the image.
The scan_interval is intentionally kept high since we’re using this on-demand and don’t want to send a non-stop stream of images to the camera. This will all make more sense later in the Node-RED integration. Well, hopefully it’ll make sense :).
Step #3: Building the Automation in Node-RED
This is probably the most complex part but shouldn’t be too difficult. In the previous guide I’d figured out how to create a single flow that covers all of the cameras. This saves the pain of creating a separate flow for each one, and is part of the reason you’ll want to keep the camera naming scheme consistent. It’ll be leveraging the motion detection of Blue Iris from the previous step in the guide.
Rather than paste an ugly code dump from Node-RED, I’ll include screenshots of each node in the flow and explain what is being done. The only one I won’t cover directly is the Pushover node: it only requires the token and user API keys. The data is fed to it with a function node, which I’ll explain further in the guide. This is what the flow looks like:

Camera Motion Node
The first node is an event state node, listed as Camera Motion. This will be looking for MQTT alerts from Blue Iris on motion.

Remember what I’d mentioned keeping a consistent naming scheme for the cameras? This is why. We can use a single regex expression to match all of them at once. In this case we’re using binary_sensor.\w{3}_motion to match anything with 3 letters, e.g. binary_sensor.fdc_motion. The flow will continue when the state is on, i.e. motion has been detected.
Convert Node
The next node listed as Convert is change node that will modify the details in the payload. I’m not going to delve into the logic behind it, but it’s basically adding or changing a bunch of values to reflect the 3-letter name of the camera and the corresponding image detection components. This was by far the most difficult part to get correct when I was building this. It looks like this:

Please note that you’ll need to specify JSONata for the to field. I’ll paste these in order:
DELETE:
payload

SET:
data.base_id
$match(topic, /binary_sensor.(\w{3})_motion/).groups[0].$string()

SET:
data.camera
"camera." & $.data.base_id

SET:
data.image_processing
"image_processing.rekognition_" & $.data.base_id

SET:
payload.entity_id
"image_processing.rekognition_" & $.data.base_id
Rekognition Node
Pivot back to the call service node labeled Rekognition.

These are the values you’ll be plugging into the node:
DOMAIN:
image_processing

SERVICE:
scan

DATA:
{"entity_id":"{{data.image_processing}}"}
Ensure Use alternative template tags for the Data field is unchecked and that Output Location is set to None.
Person Check Node
The next one is easy: it’s just a current state node that checks the output to see if any people were detected. It looks like this:

Please look at the connection after this and notice we’re using the top output from the node in the flow, i.e. the logic is true. The logic is simple: generate an alert if there is more than “0” people detected in the image. Be sure to specify the value as numeric instead of a string.
Payload Node
The next is a function node labeled Payload. This formats the final msg file to include values needed by the Pushover node. The Pushover node itself only needs the API keys and received all of the values from the msg file that we’re going to modify.

This is the function listed in the node:
msg.payload = "Sensor: " + msg.data.new_state.attributes.friendly_name + "\n";
msg.topic = "Person Detected";
msg.device = "YourPushoverDeviceName";
msg.priority = 1;
msg.image = "/config/www/amazon_rekognition/rekognition_" + msg.data.base_id + "_latest.jpg"
return msg;
Alert Node
This then gets fed to Pushover, which sends out a notification directly from Node-RED using the values from above. There is no configuration needed here except the API values in the node.

That’s It!
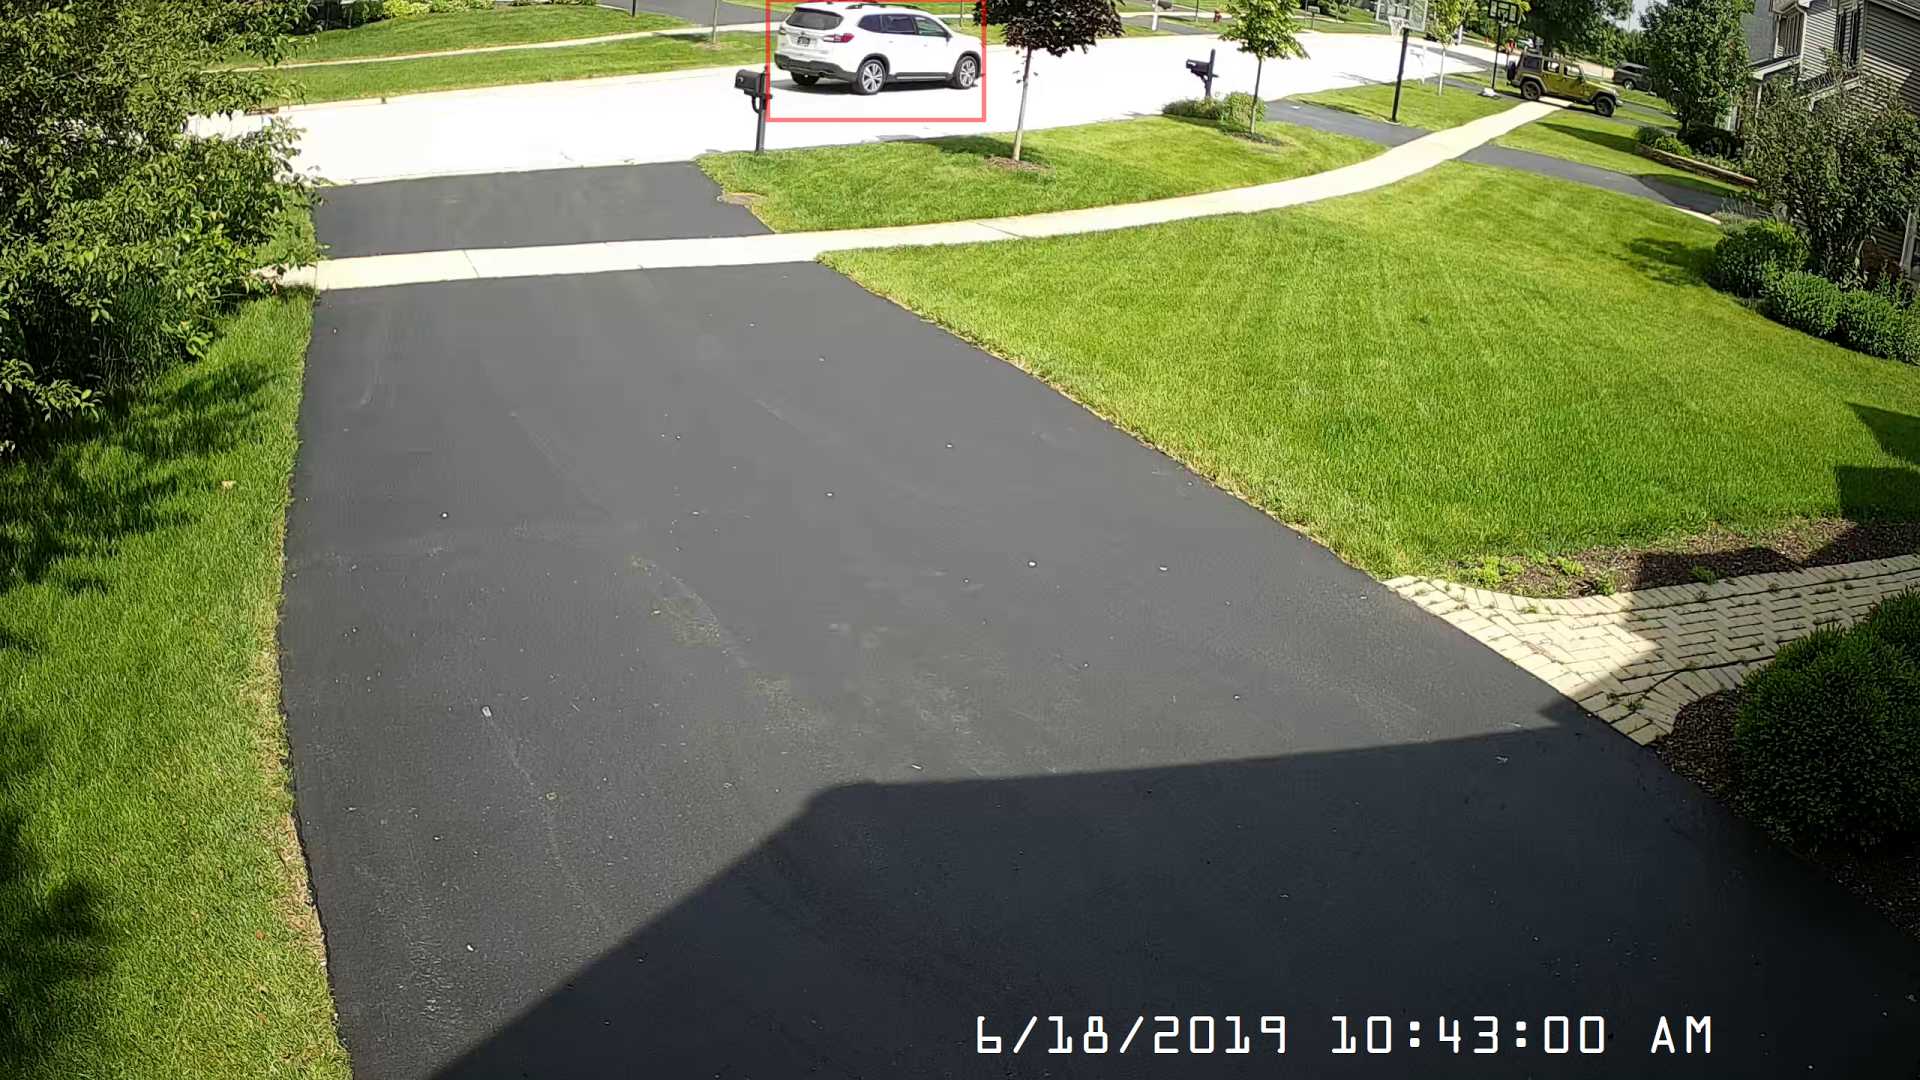
I’ve also got logic built into my flow to check if everyone is home, factor in the time, etc. You can place this into the flow as needed. The end result is a nice alert with an image when it’s triggered:

Hope this helps everyone!