Using 433.92 Yale Security devices (HSA 6000 \ 3000 Series ) with Home Assistant and RFLink

I have an archaic Yale alarm system which uses 433.92mhz sensors.
I have already built a security system using HA.
I would like to be able to link HA to the sensors directly so I don’t have to redecorate every place where there are sensors. Its a mixture of PIR and Reed Switch sensors.
Is it possible to do this as from what I understand every company uses different protocols so is there a way of picking up the signals universally which I can use as triggers?
I know you can do it with Infrared remotes but I’m thinking the 433.92 might be really challenging.
Has anyone experience of doing this? What hardware did you use (or do you use)

Many thanks in advance

Have you looked into a USB RTL-SDR device and rtl_433 software? Using it here for a number of rf devices.

Not yet… will get one from Amazon in case I end up feeling clueless :blush:

So I eventually decided to order an RFLink 433…92 unit seems like the ideal unit to link all my sensors.

Seems there was already an integration for it too! RFLink - Home Assistant

Are you sure that RF link supports the protocol needed for your Yale alarm system? To know it is 433.92 MHz may not be enough…

Thanks to https://www.rflink.nl/ and https://www.nodo-shop.nl/en who make the actual radio board and supply a complete kit which you can buy either unsoldered or soldered

It does. Took me an entire day to work out how to use the RF Link and to work out every sensor code

Best to flash the firmware and whilst connected to the PC test it by using debug mode to see if you can see signals.

As you can see from my config.yaml file it was tough going.
I now need to work out how each item can have an entity id so that I can move them into a group.

Any idea on how this would be achieved.


# RF link

rflink:

  port: /dev/serial/by-id/usb-Arduino__www.arduino.cc__0042_75130303735351A042D1-if00

light:

  - platform: rflink

    automatic_add: true

switch:

  - platform: rflink

    automatic_add: true

    devices:

      yw_sensor_b714dc_01:

        name: Office Window

      yw_sensor_11d737_03:

        name: Office PIR

      yw_sensor_b82d81_01:

        name: Lounge Window

      yw_sensor_113562_03:

        name: Kitchen PIR

      yw_sensor_b71837_01:

        name: Entrance Door

      yw_contact_b817f0_01:

        name: Kitchen Window

      yw_secu_a923b3_0f:

        name: Panic Button Upstairs

      yw_sensor_12ddc1_03:

        name: Front Bedroom PIR

      yw_pir_11f188_03:

        name: Back Bedroom PIR

      yw_secu_179935_00:

        name: Alarm Fob

      yw_sensor_a127b3_01:

        name: Back Door

sensor:

  - platform: rflink

    automatic_add: true

logger:

  default: error

  logs:

    rflink: debug

    homeassistant.components.rflink: debug

They can’t. Only option is through group in config file:

Regards.

So this is what I ended up with but still the items are not showing under a group called Yale Sensors
Any idea what I have done wrong:

**


**

The configuration is not correct (you have mixed RFLink and group configuration).
It would be something like:


# RF link
rflink:
  port: /dev/serial/by-id/usb-Arduino__www.arduino.cc__0042_75130303735351A042D1-if00

light:
  - platform: rflink
    automatic_add: true

switch:
  - platform: rflink
    automatic_add: true
    devices:
      yw_sensor_b714dc_01:
        name: Office Window
      yw_sensor_11d737_03:
        name: Office PIR


# Example configuration.yaml entry
group:
  yale_sensors:
    name: Yale Sensors
    entities:
      - switch.yw_sensor_b714dc_01
      - switch.yw_sensor_11d737_03
      - switch.yw_sensor_b82d81_01
      - switch.yw_sensor_113562_03
      - ...

The group definition can be elsewhere, like in your groups.yaml file

1 Like

I tried the groups, it added the items to a group but then I’m getting “entity not available” message image
Bearing in mind that the actual entities don’t exist in the developer tools > states
The only thing that exists in there is group.yale_sensors

Actually thinking this is not possible with RFLink devices. I have found other people on this forum with issues like mine. I suspect that I will have to wait for maybe a proper integration to the RFLink as at present whilst it does work it takes a lot of legwork to set up and doesn’t create permanent entities.

I am not clear what you are trying to achieve.
RFLink entities can be added to a group, but the display you are showing seems to have nothing to do with the entity group.
Entity groups are displayed in HA as follows:

Therefore I suspect that your problem has nothing to do with groups.
Could it be that what you want is to know the entity_id of each device?

If that is the case, the procedure is to correctly configure the RFLink integration:

rflink:
  port: /dev/serial/by-id/usb-Arduino__www.arduino.cc__0042_75130303735351A042D1-if00

light:
  - platform: rflink
    automatic_add: true

sensor:
  - platform: rflink
    automatic_add: true

As RFLink receives signals from each device, it will add it to HA. This can be verified in the HA traces or by consulting the config/entities view (filtering by RFLink).

Once you have the IDs of each entity, you can add and configure them in HA.

It is not a very friendly procedure, but I am sorry to tell you that I do not think it will change in the short term.

According to this :

Your group would be:

# Example configuration.yaml entry
group:
  yale_sensors:
    name: Yale Sensors
    entities:
      - switch.office_window
      - switch.office_pir
      - switch.lounge_window
      - switch.kitchen_pir
      - ...

You take the name you gave them, convert to lower case and replace space with _ to find the entity.

2 Likes

Thanks @francisp I had litterally tried everything converting the actual names to lower case and adding the underscore worked :slight_smile:

#example groups.yaml
yale_sensors:

  name: Yale Sensors

  entities:

    - switch.office_window

    - switch.office_pir

    - switch.lounge_window

    - switch.kitchen_pir

    - switch.entrance_door

    - switch.kitchen_window

    - switch.panic_button_upstairs

    - switch.panic_button_downstairs

    - switch.front_bedroom_pir

    - switch.back_bedroom_pir

    - switch.alarm_fob

    - switch.back_door

In addition to the final configuration I had to create this automation as once a yale device triggers the state remains as on infinitely

alias: Change status back to no motion (Yale Sensors)
description: ''
trigger:
  - platform: state
    entity_id: switch.entrance_door
    from: 'off'
    to: 'on'
    for:
      hours: 0
      minutes: 1
      seconds: 0
  - platform: state
    entity_id: switch.back_door
    from: 'off'
    to: 'on'
    for:
      hours: 0
      minutes: 1
      seconds: 0
  - platform: state
    entity_id: switch.kitchen_window
    from: 'off'
    to: 'on'
    for:
      hours: 0
      minutes: 1
      seconds: 0
  - platform: state
    entity_id: switch.office_window
    from: 'off'
    to: 'on'
    for:
      hours: 0
      minutes: 1
      seconds: 0
  - platform: state
    entity_id: switch.lounge_window
    from: 'off'
    to: 'on'
    for:
      hours: 0
      minutes: 1
      seconds: 0
  - platform: state
    entity_id: switch.office_pir
    from: 'off'
    to: 'on'
    for:
      hours: 0
      minutes: 1
      seconds: 0
  - platform: state
    entity_id: switch.kitchen_pir
    from: 'off'
    to: 'on'
    for:
      hours: 0
      minutes: 1
      seconds: 0
  - platform: state
    entity_id: switch.back_bedroom_pir
    from: 'off'
    to: 'on'
    for:
      hours: 0
      minutes: 1
      seconds: 0
  - platform: state
    entity_id: switch.front_bedroom_pir
    from: 'off'
    to: 'on'
    for:
      hours: 0
      minutes: 1
      seconds: 0
  - platform: state
    entity_id: switch.panic_button_upstairs
    from: 'off'
    to: 'on'
    for:
      hours: 0
      minutes: 1
      seconds: 0
  - platform: state
    entity_id: switch.panic_button_downstairs
    from: 'off'
    to: 'on'
    for:
      hours: 0
      minutes: 1
      seconds: 0
condition: []
action:
  - service: switch.turn_off
    target:
      entity_id:
        - switch.back_bedroom_pir
        - switch.back_door
        - switch.entrance_door
        - switch.front_bedroom_pir
        - switch.kitchen_pir
        - switch.kitchen_window
        - switch.lounge_window
        - switch.office_pir
        - switch.panic_button_upstairs
        - switch.panic_button_downstairs
        - switch.office_window
mode: single

Just to share what I found out about compatibility with the RFLink and yale sensors

Yale HSA 6400 \ 3800
PIR Sensors - Work
Door\ Window Contacts - Work
Panic Buttons (EF-PB Type) - Work
Remote control (Easy fit Type with rounded bottom) Arm & Disarm buttons work, Panic does not and Home Arm does not)
Siren Unit (Square box) (not working… YET)

Once you get the device’s ID, you could configure in HA as another device type.

For example, it seems clear to me that that yw_sensor_b714dc_01 (Office Window) must be a binay sensor and not a switch:

So, you need to configure in HA as:

# Example configuration.yaml entry
binary_sensor:
   - platform: rflink
     devices:
       yw_sensor_b714dc_01:
         name: Office Window
         device_class: window
         off_delay: 5
       yw_sensor_11d737_03:
         name: Office PIR
         device_class: motion
         off_delay: 5
       .../...

Thank you @javicalle now got everything working smoothly thanks to everyone in this group.

Some of the things I spent several hours looking for. I didn’t realise that I could just change the entity name :slight_smile:

Didn’t have to spend £200 on a new yale “smart alarm” didn’t have to redecorate and actually the RFLink looks cool in my lounge :slight_smile:

Hi daknightuk
I came across your post as I was looking to see if it would be possible to use my home’s existing Yale HSA sensors in a Home Assistant based alarm system. It looks like you have been successful in achieving the same.
I am new to Home Assistant, so I’m on a very steep learning curve at the moment, but I do have a background in programming and electronics, so am quite up for the challenge.
Anything you feel able to share about your own project would be much appreciated.

Absolutely, you can achieve all of this and more with determination and the right tools. The possibilities are endless when you set your mind to it.

Start by acquiring the Yale HSA sensors, which will be the foundation of your home automation journey. Don’t be discouraged by the technical details; remember, every expert was once a beginner too.

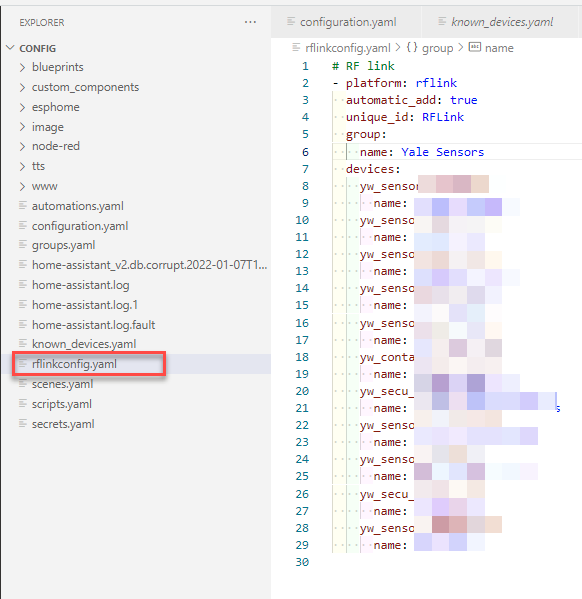
The first step is obtaining the necessary hardware, like the RFLink device. It’s your key to unlocking the potential of Yale’s 433.92 frequency, which isn’t encrypted – meaning you have the power to control it.

Once you have the device, you’ll need to flash it with the RFLink software. Think of it as infusing life into your setup; it’s like giving it wings to fly.

Your RFLink device will become a 2-way USB radio receiver, opening up a world of possibilities. Now, integrate it with Home Assistant, using the provided link. It might take a bit of troubleshooting, but remember, every challenge is an opportunity to learn and grow.

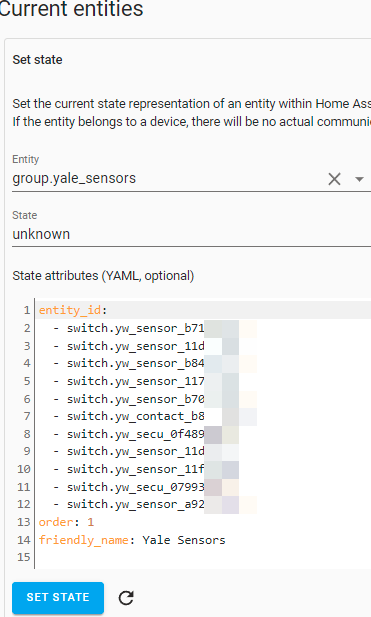
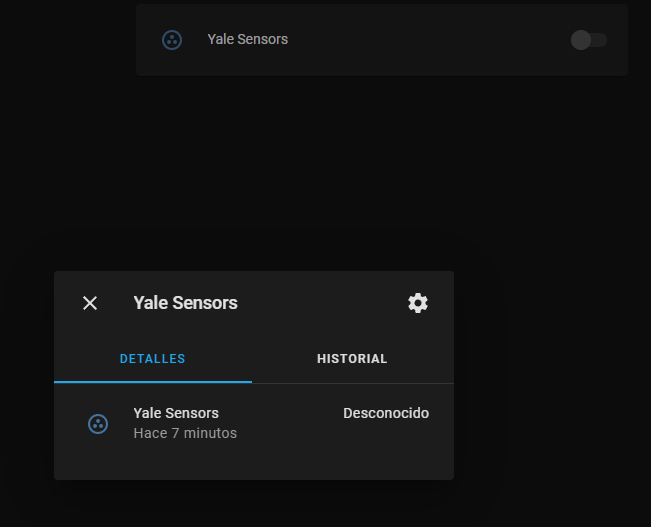
The sensors will reveal themselves as entities in Home Assistant once detected, and you’ll find the IDs in the logs. It’s like uncovering hidden treasures in your home.

You might encounter some hiccups with certain sensors, but don’t let that deter you. With perseverance, you can make them all work seamlessly.

You’re not limited to just Yale PIR sensors and door/window switches; you can expand your setup with creativity. Combine different 433.92 sensors and devices to craft a comprehensive home security system. Check this list RFLink Gateway - HomeAutomation

Keep your Yale alarm panel too; it’s a valuable ally for monitoring low batteries and serving as a secondary alarm. Harmony between your Yale panel and Home Assistant is achievable.

Even 433.92 remote controls can be integrated with Home Assistant. But if status changes don’t update just write automations to change them back.

With a HA alarm the possibilities are endless. Imagine having voice announcements through Alexa, or even adding a siren for added security – all within your grasp.

Explore further by incorporating SMS and telephone call notifications using Twilio. Your home will become smarter and more secure.

Don’t forget about backup power – ensure your Raspberry Pi and router stay operational even in the face of a power outage.

Your journey might have its challenges, but remember, every obstacle is an opportunity. With dedication, creativity, and a touch of tech-savvy, you can build a robust and functional home alarm system. The sky’s the limit, and your efforts will yield a home that’s safer, smarter, and more secure. Good luck, and may your home automation dreams come true!

Link for radio unit RFLink 433.92 / Arduino / Antenne / USB kabel
RFLink software (available from https://www.rflink.nl/)
Integration RFLink - Home Assistant to get it working in home assistant. You have to then check the home assistant logs to find out the ID’s for each sensor.

If you get stuck just ask as I may be able to share some examples of code etc.

Hi daknightuk,

Just wanting to add my note of thanks for sharing this project.
I followed the original instructions at the start of the thread some months ago and this has been an excellent addition to home assistant using my Yale HSA series alarm system.
It is working with PIR’s and Door contacts and links into ALARMO as a great extension.
Quite impressed at the rf range detection as well, some sensors are quite a distance from the antenna.
Thanks for sharing. I’d highly recommend this to anyone with a Yale HSA series alarm.

1 Like

@daknightuk; I’m just wondering if you have been able to control the Yale HSA6000 sirens with home assistant (alarmo)?
I would like to remove everything (key pad, sensors) and keep the sirens.
I’m trying to replace all the Yale sensors with ZigBee alternative but the ZigBee siren that I’ve purchased is not loud enough. That’s why I would like re-use the old Yale sirens…

I was looking to use an olimex ESP32 POE board with a 433.92mhz transmitter/receiver.