I got an ESP-based smart plug today, and added it to HA through Integrations > Add Integration > ESPHome > {device IP} which worked fine. The new plug however doesn’t show up in the ESPHome add-on web UI. Is this expected?
I do not have the ability to use mDNS currently (IoT VLAN) and would have to do some painful work to get that going anyway (I still use .local from years gone by before becoming aware of mDNS). I have previously configured my other ESP devices for temp and humidity through the add-on UI and use ping for status. These were done by USB flashing so admittedly a different scenario.
How do I manually add the plug to the ESPHome add-on for updates and config modification? Or can I not do this? The plug works normally otherwise.
Yes, that is to be expected. The ESPHome Addon needs to have the device yaml in its folder for you to be able to update/modify the configuration.
Sometimes you’re able to ‘Adobt’ the device in the Addon, however the device has to be prepared for this and will then automatically be discovered by the addon.
Thanks for the info. Is it normal then to forgo adopting ESP devices into ESPHome itself unless they meet specific criteria i.e. they are actual raw ESP boards rather than just ESP-based devices?
I don’t know about normal. I’m probably not normal, as I tend to take such devices apart and flash ESPHome on it - if at all possible - using the UART port on the device.
Thanks, they do provide it but they don’t say what to do with it. Do I add the YAML to a new file in /homeassistant/esphome? I don’t see any documentation relating to dashboard imports on Guides — ESPHome.
Thanks I appreciate it, that wasn’t clear and isn’t mentioned anywhere particularly as the New Device button prompts for a different set of steps none of which mention any kind of dashboard import. I guess that’s why everyone says “dashboard import” in quotes as it isn’t a real concept.
Click on “Install”.
When asked: " How do you want to install…" select “Manual Download”
ESPHome will now compile your binary file and put it into your Downloads folder.
How you flash the device depends on the device. Specifically, how do you put it into the flash mode?
I use ESPHomeFlasher. You can try the ESPHome Downloader, but I can’t help you because I’ve always just used ESPHomeFlasher.
Note- If you haven’t set up your Secrets file, ESPHome will ask you for your WiFi SSID and Password on first install. If you click on “Secrets” at the top of the page, ESPHome will have created the Secrets file for you. It will look something like this:
#  wifi password and ssid
wifi_ssid: XXX
wifi_password: XXX
This allows you to share your configuration on the forum and not expose your SSID and Password.
For anyone coming across this, here is how I set things up without mDNS.
Set up your plug normally (plug in, connect to its hotspot and navigate to 192.168.4.1, set up on your WiFi)
Once on your WiFi, navigate to Home Assistant and add it as a device via Integrations > + Add Integration > ESPHome > {Device IP}. Rename it all now.
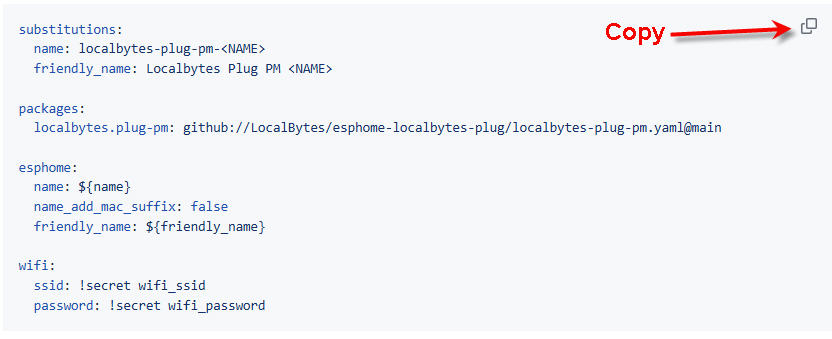
Open your ESPHome add-on and click the + New Device button, name it the same as your new plug, then click SKIP THIS STEP then select any board to generate a YAML file.
Click EDIT on your new device, and paste the contents of the Manual Addition code found here. Change the name and friendly-name to match your plug’s name (the same name you’ve given so far)
If you aren’t using mDNS like me, add the following to your file below Wifi using your plug’s (static) IP:
From here you can click INSTALL (wirelesly) and that should be it. The plug is now present and able to be updated/configured via ESPHome. The web UI for the plug (port 80) will no longer be open after this.