O I thought so, but thanks for the clearification. I use ESPEasy in all my Sonoffs and esp8266, I love it really easy and yes I had the rotary tried before but I love to make a real light dimmer out of it but never managed that.
In my setup I used a Wemos mini. and yes I can dim my rgb leds with it same as you did with the Hue.
1 Like
I did this: NodeMCU Dimmer
to achieve more or less the same thing. However my dimmer is not in the wall but in a nightstand so I did not use a sonoff.
I would be interested in you HASS configuration with respect to the dimmer. I find mine quite laggy…
my dimmer transmits its value to a sensor and then I have an automation reacting to the sensor. This is not the most elegant way I suppose
Going to post it later tonight. Stay tuned.
V nice project BTW… wish I saw it before 
I might borrow your code sometime
1 Like
Here is the config for ESPEasy.
I am using ESPEasy v2.0.0-dev12, which is current the latest. I am using the TEST version of the firmware as it is needed for rotary encoder support - ESPEasy_v2.0.0-dev12_test_1024.bin
Unfortunately ESPEasy does not have a way to export config in ASCII - it only has a binary export format - so I will post a bunch of pictures of all the settings.
If you already have ESPEasy up and running, you can use config.dat and rules1.txt to enter these settings automatically. I cannot post them here (file type constraints) but PM me if you want them…
Note that I discovered that some recent Sonoff devices need to be flashed using DOUT mode due to a change in flash chip - this is a nice guide to use Espressif own tool to achieve this:
https://www.letscontrolit.com/forum/viewtopic.php?f=5&t=3386&p=18240#p18240
ESPEasy Config
#1 Config tab
Set the name of the device. This will be used as the 1st token in the MQTT topics:

#2 Controllers Tab
Here you want to add a OpenHab MQTT controller:

Configure the controller with your MQTT server details:

The %% placeholders are:
%sysname% - the name configured in the config tab
%taskname% - the name of the device that generated the mqtt message (see device tab)
%valname% - the name of the value that the device generates
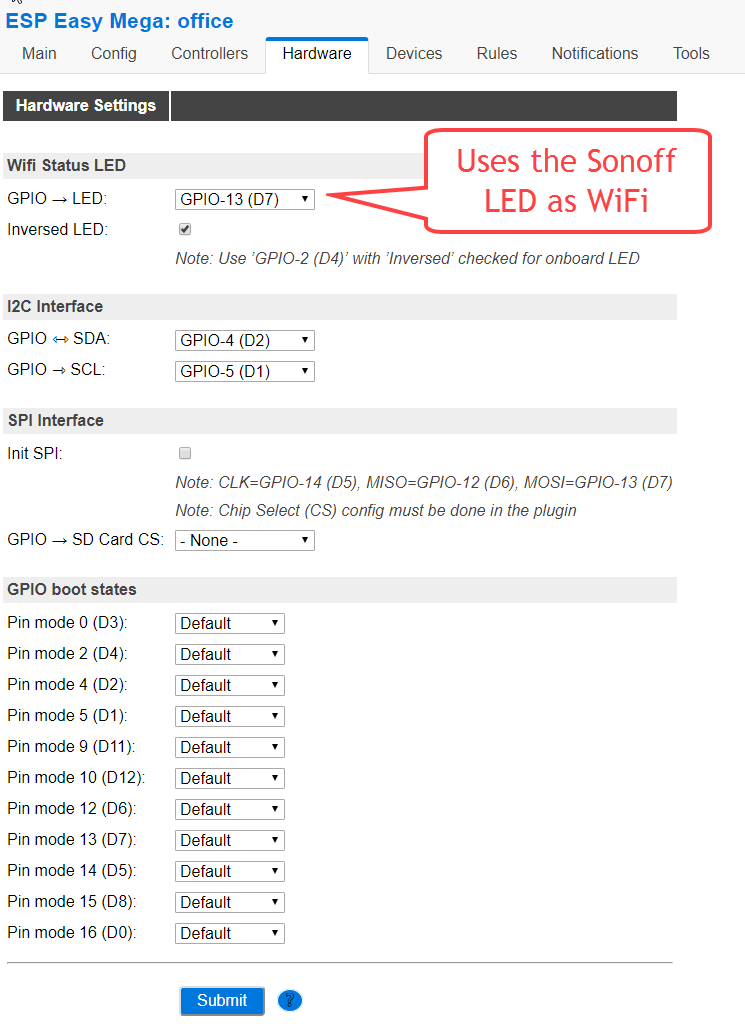
#3 Controllers tab:
Here you can set two things:
- To use the sonoff LED (GPIO 13) as the WiFi activity LED - useful
- The default state of the relay (GPIO12) on boot - I left as-is and it defaults to ON - i.e. any load will be ON after ESPEasy fully boots.
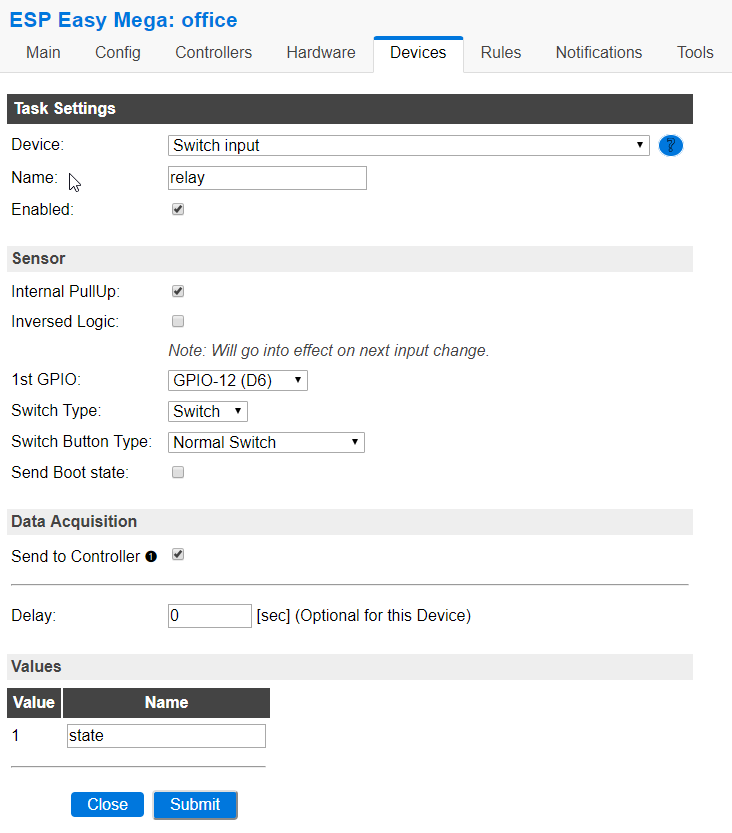
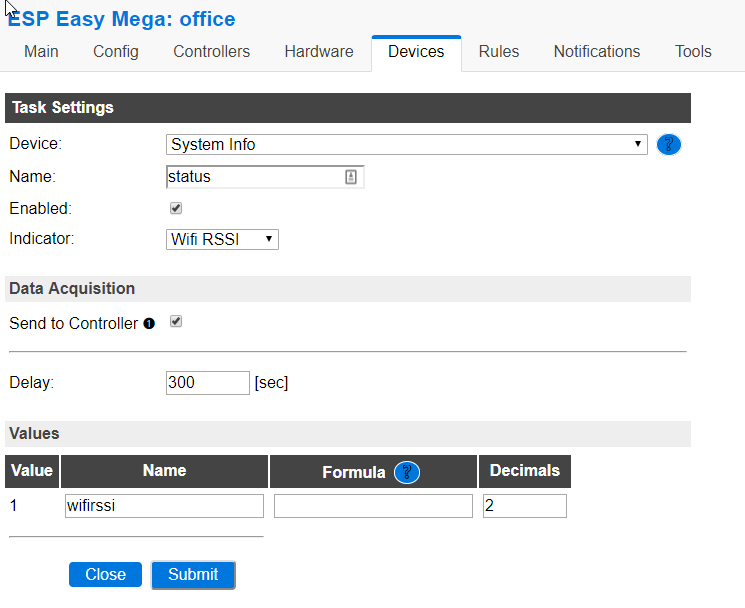
#4 Devices tab
This is where all the buttons, rotary encoder etc are configured.
I also configured devices to periodically send system parameters e.g. WiFi signal strength


This device is for the Sonoff PCB mounted switch:

This is for the relay:
This is for the rotary encoder:
NB GPIO1 & 3 are the UART tx/rx so the 5 pin header of the Sonoff can be used.
I use 4 pulses per cycle - which counts from 0 to 64 in increments of 4 = 16 steps.
In HA I multiply this to scale to 0 to 255, which is the input range of light brightness.

This is for the rotary encoder push button:
The momentary switch is on GPIO14 - the “spare” GPIO on the sonoff header.

The next four are sending the following system stats every 300 seconds (5 mins):
- Free RAM (bytes)
- WiFi RSSI (dBM)
- System load
- Uptime (minutes)


#5 Rules Tab
I have a single rule currently defined, which switches the relay based on the pcb switch being pushed - i.e. to mimic Sonoff OOB behaviour:

I need to define other rules:
- Send IP address on start up (supported by my HA config)
- Detect a long press of the rotary encoder switch to toggle the relay
#6 Tools tab --> Advanced Settings
Set MQTT retain for retention of last value
Also set the delay to 0ms for as low latency as possible on the dimmer events
I set ntp, but this is optional
Also I disabled the serial port because I am reusing GPIO 1 and 3, but it does not seem to matter if you do this. I recommend to do it as best practice.

1 Like
Here is the config for Home Assistant
(apologies in advance if any if the indentation is out… this was pulled together from config, groups, automation etc yamls)
# Sonoff dimmer config:

sensor:
  - platform: mqtt
    state_topic: "office/dimmer/state"
    name: "Office Dimmer Brightness"
    retain: true

  - platform: mqtt
    state_topic: "office/status/ipaddress"
    name: "Office Dimmer IP Address"

  - platform: mqtt
    state_topic: "office/status/uptime"
    name: "Office Dimmer uptime"
    unit_of_measurement: "Minutes"

  - platform: mqtt
    state_topic: "office/status/wifirssi"
    name: "Office Dimmer Wifi RSSI"
    unit_of_measurement: "dB"

  - platform: mqtt
    state_topic: "office/status/freemem"
    name: "Office Dimmer Free Memory"
    unit_of_measurement: "bytes"

  - platform: template
    sensors:
      normalised_office_dimmer_brightness_256:
        value_template: '{{ states.sensor.office_dimmer_brightness.state | multiply (4) | round (0) }}'
        friendly_name: 'Normalised Office Dimmer Brightness'

binary_sensor:
  - platform: mqtt
    state_topic: "office/switch/state"
    name: Office Dimmer Switch
    payload_on: "1"
    payload_off: "0"
    retain: true

switch:
  - platform: mqtt
    name: "Office Dimmer"
    command_topic: "office/gpio/12"
    state_topic: "office/relay/state"
    payload_on: "1"
    payload_off: "0"
    retain: true

automation:
  - alias: Switch office light
    trigger:
      platform: state
      entity_id: binary_sensor.office_dimmer_switch
      to: 'on'
    action:
      service: light.toggle
      entity_id: light.hue_color_lamp

  - alias: Switch office light
    trigger:
      platform: state
      entity_id: binary_sensor.office_dimmer_switch
      to: 'off'
    action:
      service: light.toggle
      entity_id: light.hue_color_lamp

  # On message for dimmer topic update brightness
  - alias: Switch office light
    trigger:
      platform: mqtt
      topic: office/dimmer/state
    action:
      service: light.turn_on
      entity_id: light.hue_color_lamp
      data_template:
        brightness: '{{states.sensor.normalised_office_dimmer_brightness_256.state}}'

group:
 - office_dimmer_switch:
    name: Office Dimmer Switch
    icon: mdi:nest-protect
    entities:
      - binary_sensor.office_dimmer_switch
      - sensor.normalised_office_dimmer_brightness_256
      - switch.office_dimmer
      - sensor.office_dimmer_wifi_rssi
      - sensor.office_dimmer_uptime
      - sensor.office_dimmer_ip_address
      - sensor.office_dimmer_free_memory
      - light.hue_color_lamp
HA config now posted above.
I do the same as you - have sensor for the push switch and the rotary count which then drives automation to toggle the light or set brightness. AFAIK there is not any other way to map a sensor value to a light brightness.
I don’t find it laggy with 16 brightness levels. I am used to a light lag anyway as my analogue dimmers are “soft on” electronic dimmers for good LED support.
BTW I am running HA on an x86 server (hass.io on ubuntu VM on a low end Xeon server running VMWare ESXi) so I guess that the performance of HA is greater than it would be on RPi 3.
@hijinx Thanks. I suppose the lag comes mainly from the fact that I dim 3 HUE lights at once. so it has to send three commands each time. I also did not multiply by four. so I have more dimming levels. But yeah maybe that is a good idea - i might twerk mine.
Looking at your sketch I think you might improve the latency by increasing the step size from 5 to 16 (= 16 steps between 0 and 255)
A Hi!
I’m brand new to this system And have just got it running on my NUC. On the homepage I notice It’s picked up my chromecast audio.
Do you think that the hardware in this thread could be used to be a volume controller for the CCA?
Would be cool to control the speakers with the rotary and maybe play/pause with a press of the dimmer and next track with a double press?
Hi @Jammyb
Absolutely you could use the same approach to control audio volume or any other parameter driven change.
The things you’d need to change are:
- the automation- to control a media player entity volume instead of a lights brightness
- the value template for the brightness mqtt value as I would think that volume is in % rather than 8 bit decimal number (but check this)
- the espeasy config that sends the brightness - this is 0-64 value that gets scaled by x4 - you could send 0-100 direct from the sonoff if that works for you
Also I saw another project posted a few days ago to control volume with a rotary encoder… have s search as that should give you inputs for automation. That project used a pi zero rather than esp8266
This is the other project I mentioned:
Thanks Robin I’ll take a look
1 Like
After a month or so of “soak testing” I’m satisfied with the safety and performance of this solution.
I’ve now finally installed the sonoff in the switch back box and the new faceplate has replaced the old analogue dimmer.
So far its all working great!
Slightly off subject.
Were you able to fit your Sonoff with its case in your light box?
Yes… but it was very tight!
I needed to remove more of the case and use thinner gauge mains flex to extend the wire.

1 Like
If you have a newer build home with stud walls it would probably be easier to pop the box out and hang the sonoff in the void behind box.
Please excuse the electrical noob question: as the lighting circuit is permanently closed (because the hue bulb is doing its own switching internally) why is neutral required at the switch to power the Sonoff?
The lighting circuit is not permanently closed - it’s controlled by relay in the sonoff.
Any mains electrical device requires a L & N to operate.
Where there is only a L at the switch means that the N is supplied to the bulb fitting via another route, but for sure the bulb will have L + N.
You cannot connect a device between L and Earth - it will trip your consumer unit due to earth leakage.
There are other people who posted on the forums who have positioned a sonoff switch by the bulb fitting where there are both L&N supplies.