Found these at LIDL. Infrastructure Alliances helps the Implementation of V:IoT- SES-imagotag
The details are quite vague, not even what protocol is used.
Anyone looked in to it?
“Found these at LIDL”, as in, they are used in the LIDL to show the prices of goods? Or are they selling them?
Used to show prices. Looks like these can display any image, but not clear how we can integrate.
1 Like
Would be great if anyone has a tutorial on how to use these with HA
OpenEpaperlink have developed a custom firmware and protocol for tags based on the ZBS243 chipset. You can pick up these tags second hand on eBay and other e-commerce sites. They mostly seem to come from the person who runs the OpenEpaperlink Discord channel. I picked up 50 of them a few months ago for around EUR120 including delivery to the UK.
OpenEPaperlink has a Home Assistant integration if you want to start quickly - it currently allows for up to 4 lines of easily legible text in landscape mode on a 2.9" display, or 8 lines of tiny text, although there’s a feature request planned for portrait mode too.
The integration accepts templating values so you can easily display the value of any sensor or sensor attribute. The displays are typically red, white and black, so you can highlight concerning values too.
That said, it’s not currently for the faint hearted (you’ll need to either solder some components to make an Access Point, or buy one pre-assembled for c. $40 plus delivery from the project’s creator on Tindie, or use an alternate radio stick and flash it with new firwmare, which will probably also require soldering or a special debug cable, and doesn’t currently have a HA integration).
You will also need to flash firmware to the tags themselves, or pay extra and buy them pre-flashed on Tindie in smaller quantities with your access points. This is trickier than it sounds as it involves either temporarily soldering to tiny contact points on the tags, and then flashing them use an ESP, or printing a 3D programming jig and using tiny “pogo” pins to poke through the holes in the 3D print into the right place on the tags. From experience, the holes are too small for most 3D print mediums, so some drilling is required (you can now also buy a PCB with the holes pre-drilled in exactly the right place).
Disclaimer: I’m not affiliated with OpenEPaperlink, but I have been enthusiastically dotting the displays around the house! I’m also a member of their thriving Discord community.
7 Likes
This looks like a great idea have just ordered an access point and 5 labels from Tindie
Seem ideal to stick on the fridge and replace the sticky notes
3 Likes
Thanks for that link!
I was not aware of that project, seems awesome. Also ordered an access point and 10 displays, will be a nice project to work on 
1 Like
I ended up ordereing this set: OpenEPaperLink Mini-AP v3 / zigbee<->wifi gateway from {Electronics by Nic} on Tindie . I ordered it fully assembled with 5x 2.9" and 5x 1.54" displays.
Getting it up and running in HA was straight forward as there is a supported integration ( jonasniesner/open_epaper_link_homeassistant: Home assistant Integration for the OpenEPaperLink project (github.com) )
The picture shows the first results of me tinkering around with it (yes I know my house is cold )

6 Likes
This looks promising and “easy” to implement and use.
I’ve a trillion ideas but -a trillion time but thank you very much for sharing.
1 Like
I your picture, are they the 2.9" size?
I’m ordering now! I can’t wait to receive them!
I’m going to use one of the 2.9" displays to show my guest WiFi SSID and voucher code. Each time we have guests to stay I generate a new voucher code for my guest WiFi network. I make it valid for 30 days.
Guests are told that their maximum stay is 30 days! I used to print this out onto paper each time the voucher changed but I won’t have to anymore!
this is cool, thanks for sharing.
I was wondering if this can also be easily integrated into an existing Zigbee2MQTT environment? I already have a Sonoff dongle that bridges directly into HA via MQTT and is working with various sensors.
Someone asked for it, but no response to the feature request.
Or is the OpenEPaperLink firmware using non-standard Zigbee features to make these labels work?
Thanks
Not sure, but the site OpenEPaperLink Mini-AP v3 / zigbee<->wifi gateway from {Electronics by Nic} on Tindie says:
“If you just want to tinker with Thread or Zigbee instead, you can make this as a WiFi to Thread/Zigbee gateway, possibly use it together with Zigbee2mqtt. But no software is written for it yet, if you want to use it that way. Looking forward to see some nice implementations!”
So probably nothing for zigbee2mqtt.
Received mime yesterday. Very cool . Custom integration in Home Assistant is neat

Screen updates are very slooooooW so you cannot use it as a clock , Calendar fine. Screen updates via the HA integration are text based . No GUI screen updates via a service call
The openEpaper access point however has a very good interface crammed onto an ESP32
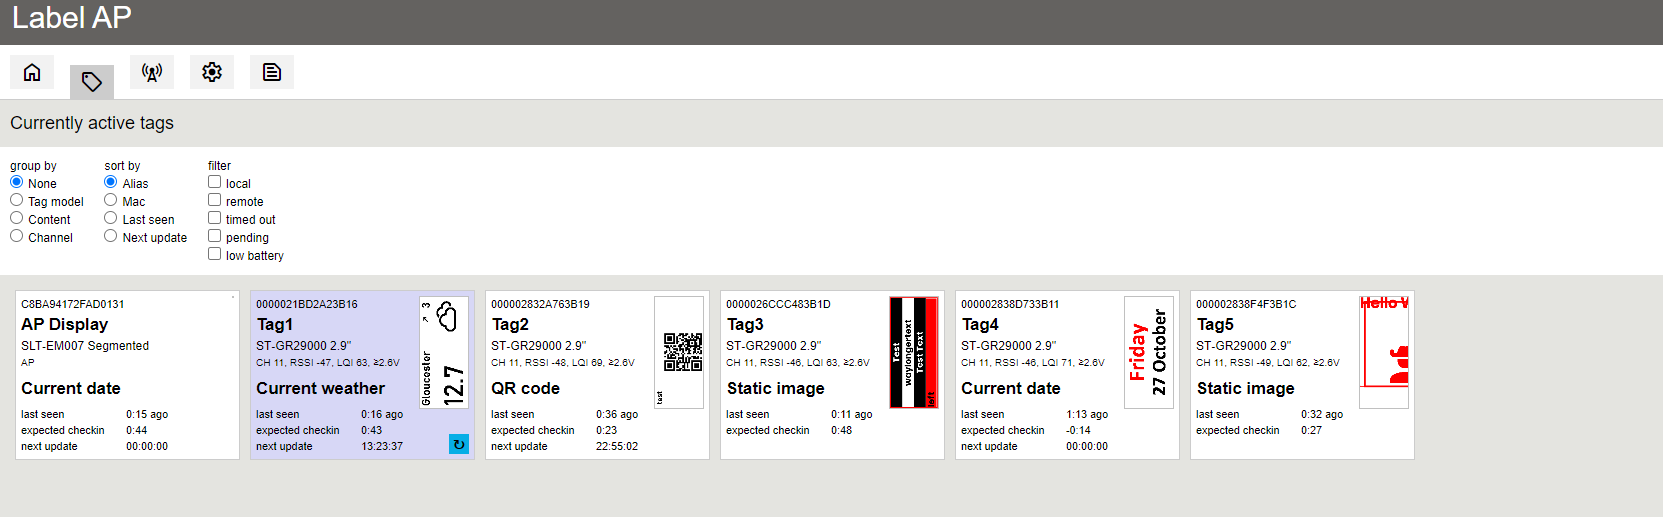
Builtin calendar , QRCode and Weather are very good just a click to setup and will work without Home Assistant
1 Like
wow, nice find.
I had no idea of the webinterface on the AP. Didnt even think about it. Its really nice indeed.
Mine is on order. I’m happy I got in before it went out of stock. I got the pre built kit and a mixture of the eInk sized screens.
I’m trying to get familiar with the onboarding experience before I receive the equipment. I can’t find any docs though on what to do with the Mini-AP v3 out of the box.
How do I get it onto my WiFi? Does anyone know if it supports 5GHz WiFi or will it be going on my 2.4GHz dedicated network?
Thanks!
it is based on an ESP32, so 2.4 GHz only
The instructions will be on the AP display when you turn it on. It quite straight forward. The display will ask you to connect to its Wifi (so the AP will create a hotspot at first). Once you do that, you can then go to the webinterface (the address will also be on the display).
In the webinterface you can configure it to connect to your Wifi. Once that is done, reboot the AP and it will be on your wifi.
Then install the HA integration, add the IP of the AP (which will also be displayed on the AP) and you are set to go.
The most difficult part of the whole setup was actually to understand how to get the batteries out of the displays. But the back is just clicked on, so you can just take it off with a bit of force. Oh yeah and have a paperclip or a bit of wire ready. You need to short the battery contacts for it to reboot.
4 Likes
Used This trick to ensure the Tags boot correctly
1 Like