When I do this kind of project I have found taking the last 10 readings removing the 2 outliers (highest and lowest) and then averaging is the best result.
That would be great but I can’t even get an average working:
Interresting, finally found something usefull for this vibration sensor. Do you mind sharing how your automation works? Do you continuously get vibration data from the sensor and use the no motion as a condition?
You can find the automations and the script here: https://gist.github.com/dnuc/9816782b796c07e5139e95d39306006a
2 Likes
When I did something similar with Arduino and temperature sensor my “averaging” function was to define an integer variable, read 50 or so values adding each to the variable, then just divide by 50 and report that reading. It’s not a true sliding windows, but good enough for this application.
Add a couple of seconds pause between each report to not blow up your mqtt. And be careful to not overrun your integer variable (declare it as a long if necessary).
I finally got windowed averaging working on the ESP. I had to drop monitoring the status and wifi of my sensor though. Hopefully this will will be rectified with an ESPhome update.
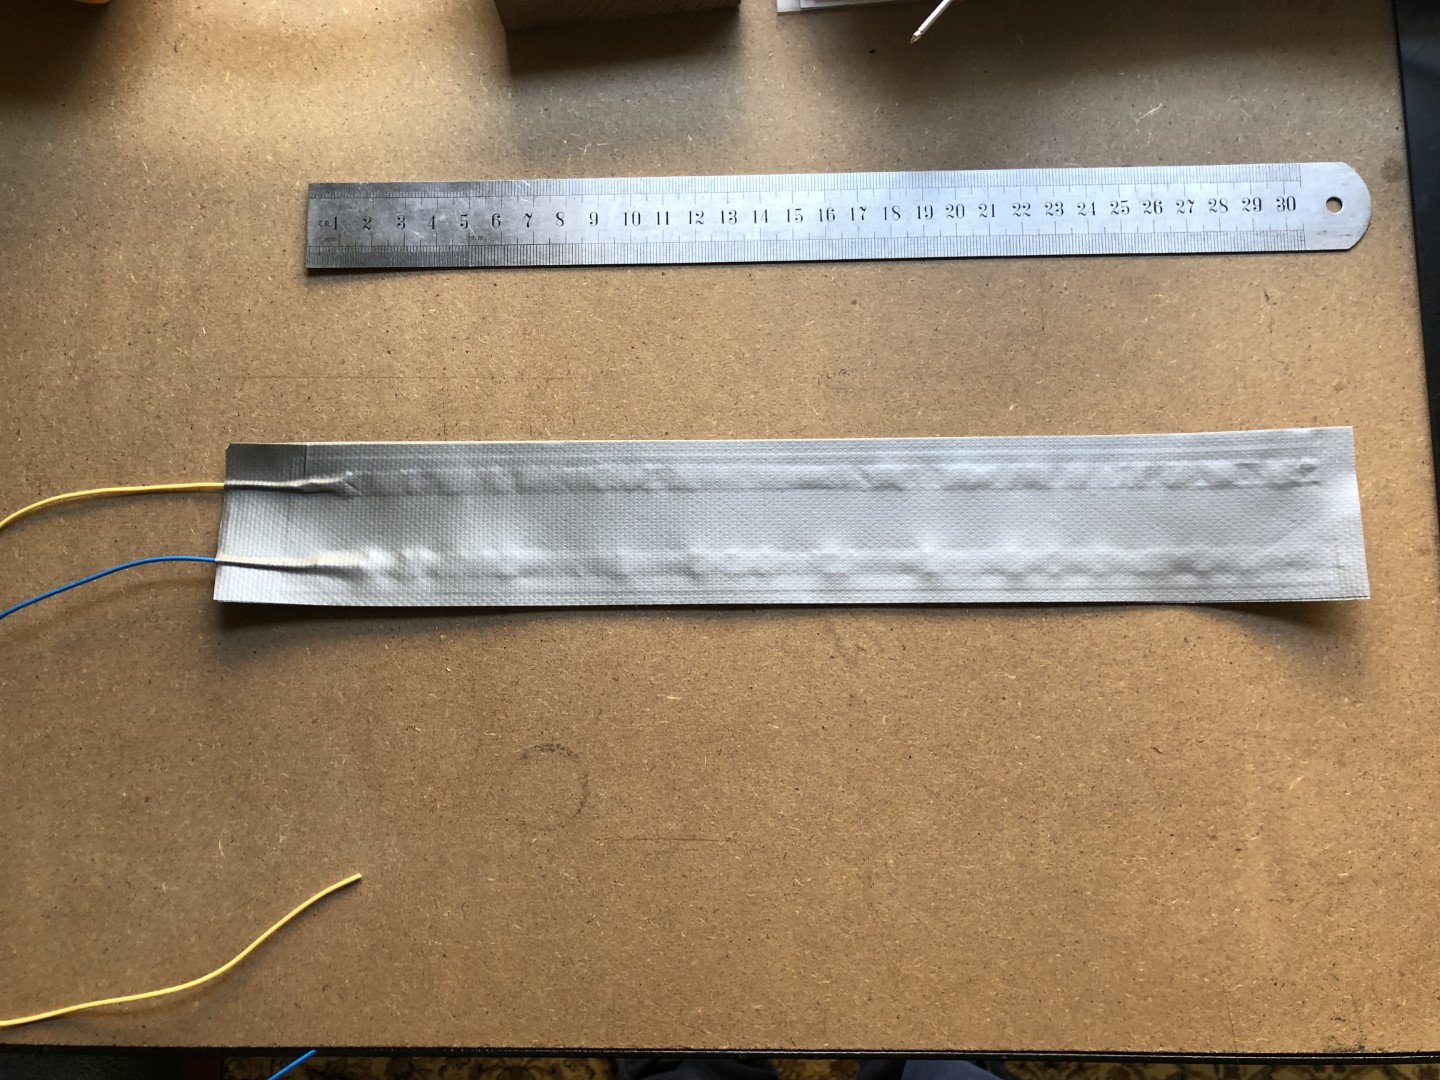
So now I have this, a perfect bed occupancy sensor for less than $15 AUD that is easy to install (no messing about with load cells under bed legs).

When I first tested the filtered sensor I was surprised to see a much bigger difference in signal for in and out of bed. However when I went to bed there was a ‘clunk’ as the slat dropped into its guide correctly and the sensor value difference dropped (see chart above). I worked out that lifting the slat that has the strain gauge fitted above the other slats by 5mm using a shim gave a much better signal as it is taking more weight. This is not noticeable through the innerspring mattress.
Only problem now is that I have no use for my neat DIY Velostat pressure sensor:


I’m not too fussed about this, especially as using it with the strain gauge amplifier would have necessitated a bit of rocket surgery. The sensor operates from about 2K Ohm nominal to 1.2K Ohm when pressed. Where as the strain gauge was 360 Ohm nominal. This means I would have had to replace three 0805 360R resistors with 2K Ohm versions in the module’s Wheatstone bridge. I am set up with a stereo microscope to do this but am glad I don’t have to. I would also have had to make two of these sensors (and use an ESP32 with more than one analogue input) and fit them to either side of the bed - vs only one strain gauge sensor on the slat.
So in summary. Success!
Now I just have to fit another one to the guest bed and work out the convoluted logic for turning everything off at night depending on if I have guests and/or if I am home or not.
5 Likes
Hi, cool stuff. I am very interested in occupancy and pressure sensors.
In 2017 I have designed a simple and not expensive pressure sensor based on a capacitive principle. It was made for Fochica, a device designed to alert parents that unintentionally leave their children in a car.
The article is at: https://blog.yavilevich.com/2017/10/40-cent-diy-pressure-sensor-based-on-a-capacitive-principle/ . LMK if you have feedback or improvements.
I have two HX711 with four Load Cell each, mounted between bed-frame. It works very well so far. Also you can see if you gained weight  (thus some downsides regarding WAF (Woman acceptance factor) - so I converted int a Binary Occupancy Sensor)
I can add some details if someone interested
Yes, please!
UPDATE:
The cheap ebay strain gauge sensor and D1 mini solution has been working perfectly all week.
2 Likes
Using the data from your sensor you could start to calculate time in deep sleep by counting the periods in bed with less fluctuations.
1 Like
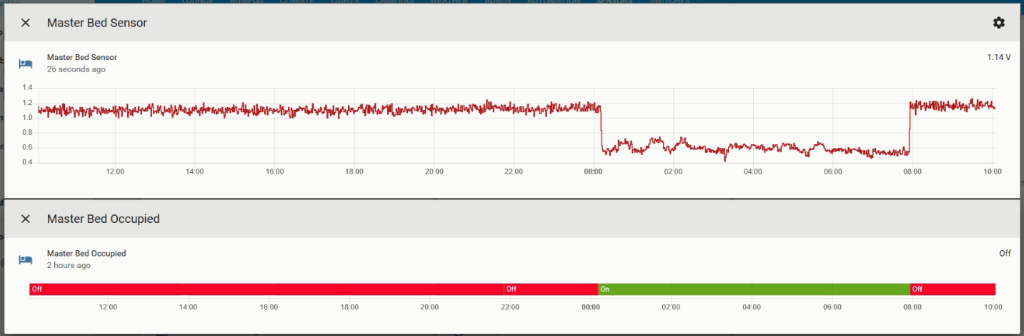
If you look back at the image in this post where I was using the unfiltered data from the strain gauge it’s obvious where the deep sleep periods are.
Unfortunately now that I am filtering the data in the ESP module to get a reliable ‘in bed’ state it’s less obvious where these periods are. And I don’t really have any use for this data.
This is great, I might have a go at this. Seems like a good first project for someone whose only electronics experience so far is flashing sonoffs.
A couple of questions:
- How would this fare in a double bed with two people? And
- Regarding guest beds, is there a question over privacy here as this might indicate when the occupants are doing something other than sleeping?
1 Like
It would register even more clearly. More weight = bigger voltage swing.
Sampling every 4 seconds and averaging 15 samples (as I do) probably would not show that sort of activity.
Perfect (on both counts )
If I go ahead with trying this I may have more questions 
Let me pre-empt a few questions:
-
Make sure you use an ESP module that can handle 3.3V on the ADC input. The Wemos d1 mini for example or NodeMCU-32S with attenuation. Or use a resistive divider.
-
Make sure you use a top quality 5V power supply. Switch mode power supply noise or ripple will affect the readings making it difficult to differentiate in/out of bed.
-
Keep the connecting wires as short as possible.
-
Before gluing to the bed adjust the potentiometer on the sensor to give about 3V out (factory setting is usually ok). The voltage will drop with weight.
-
Make sure you glue the strain gauge in the centre of the slat that takes the most weight (under your bum). Glue it length-wise along the slat (see first photo). Use a small amount of super glue. More will stiffen the sensor, reducing sensitivity. Raise the slat up slightly higher (5mm) than the other slats for added sensitivity.
-
Example ESPhomeyaml below:
esphomeyaml:
  name: master_bed
  platform: ESP8266
  board: d1_mini

wifi:
  ssid: 'WAPLO'
  password: !secret wifi_pwd
  manual_ip:
    static_ip: 10.1.1.71
    gateway: 10.1.1.1
    subnet: 255.255.255.0

mqtt:
  broker: 10.1.1.100
  username: !secret mqtt_usr
  password: !secret mqtt_pwd

logger:
#  level: WARN # enable this once working to reduce unnecessary mqtt messaging

ota:
  password: !secret esp_pwd

binary_sensor:
  - platform: status
    name: "Master Bed Sensor Status"

sensor:
  - platform: wifi_signal
    name: "Master Bed Sensor WiFi Signal"
    update_interval: 3s
    filters:
      - sliding_window_moving_average:
          window_size: 15
          send_every: 15
          send_first_at: 15

  - platform: adc
    pin: A0
    name: "Master Bed Sensor"
    update_interval: 1s
    filters:
      - multiply: 3.3
      - sliding_window_moving_average:
          window_size: 10
          send_every: 10 # 10 second updates @ 1 second scan interval.
          send_first_at: 10
9 Likes
Thank you!
Sorry for the newbie question, how do you convert voltage readings from the sensor to a binary occupied/unoccupied sensor? Is there some missing logic on homeassistant’s side on this or is esphomeyaml able to do this?
I’ve been messing around with load cells (and even velostat), but using a strain gauge seems like a much better option so thanks for this idea!
I do it on the home assistant side. Define a binary template sensor like so:
#################################################################
## Master Bed Occupied Sensor
#################################################################

- platform: template
  sensors:
    master_bed_occupied:
      friendly_name: "Master Bed Occupied"
      entity_id:
        - sensor.master_bed_sensor
      value_template: >-
        {{ states('sensor.master_bed_sensor') | float < 0.895 }}
Adjust the 0.895 level to the average of your in and out of bed readings.
A similar binary sensor could be defined on the ESP but it’s more difficult to adjust.
1 Like
Understand that you didn’t want to work with load cells, in my case i have a boxspring bed so doing it this way is not really an option since it does not have a bending element that much. But it was a lot of work for having 4 load cells, and thats just 1 bed, i have another to do
Does work very nice for me too.