Me neither, it’s similar to this case with the map card, thanks to that I found out that it can be modified directly for a specific element if it has attribute set. ![]()
![]()

Me neither, it’s similar to this case with the map card, thanks to that I found out that it can be modified directly for a specific element if it has attribute set. ![]()
![]()
My reaction to these small tricks is usually like “EUREKA !!!”
haha yes, I know that case ![]()
Needed some help with this if possible (if im on right place)
sofar i did made this card

trough lots of reading and learning…
and im very happy with it for a minor thing to solve…
type: entities
card_mod:
  style: |
    .card-content {
      padding: 2px 2px 2px 0px;
      spacing: -10px;
    }
    :host {
    --paper-item-icon-color:
    {% set beaufort = states('sensor.buienradar_wind_force') | int %}
    {% if 1 <= beaufort <= 2 %} green;
    {% elif 3 <= beaufort <= 4 %} yellow;
    {% elif 5 <= beaufort <= 6 %} orange;
    {% elif 7 <= beaufort <= 8 %} red;
    {% else %} purple;
    {% endif %} !important;
    }
entities:
  - type: custom:multiple-entity-row
    entity: sensor.buienradar_wind_speed
    icon: mdi:windsock
    card_mod:
      style:
        hui-generic-entity-row $: |
          .info {
            display: none;
          }
        .: |
          .entities-row {
           align-items: start !important;
           width: 100%;
           justify-content: space-evenly !important;
          }
    show_state: false
    entities:
      - entity: sensor.buienradar_wind_speed
        name: Windsnelheid 🚩
      - entity: sensor.buienradar_temperature
        name: Temp 🌡
      - entity: sensor.buienradar_wind_force
        name: Bft 🍃
      - entity: sensor.buienradar_wind_direction
        name: Wind 🧭
      - entity: binary_sensor.knmi_waarschuwing
        name: Info ℹ️
      - entity: sensor.knmi_weercode
        name: Weercode 🚨
view_layout:
  column: 4
but im trying to give the name “Groen”
The code below works now with the icon…
In an entity card…
Goal is to use the name…
this code:
        card_mod:
          style: |
            :host {
               --paper-item-icon-color:
               {% if is_state('sensor.knmi_weercode', 'groen') %} #008000;
               {% elif is_state('sensor.knmi_weercode', 'geel') %} #ffd700;
               {% elif is_state('sensor.knmi_weercode', 'oranje') %} #ffa500;
               {% elif is_state('sensor.knmi_weercode', 'rood') %} #ff4500;
               {% else %} #44739e
               {% endif %}
               }
but with trying to inspect it im stummbeling across div…
From there im lost what i need to change
Cause it’s not --paper-item-icon-color
in an normal entites card it works fine with the icon…
lost in space about it…
thank You…and a merry Christmas to ya all…
For this particular part consider using a “mapper” technics, scroll up a bit for an example from Marius.
Not checked your other code.
Hi guys!
I’ve always used this part of card-mod code to color the sensor status in entities card, but with the latest Home Assistant updates the text remains white and is no longer colored.
        card_mod:
          style: |
            .text-content {
              color: #4dae50;
            }
This one works instead, but it also colors the entity name, not just the state (as I need)
    card_mod:
      style: |
        :host {
          color: red;
        }
Thanks
1st post → link at the bottom → Entities
    card_mod:
      style: |
        :host .text-content {
         color: red;
        }
I found this, but it still doesn’t work.
I do not think this is written in the post I suggested you.
yes it is this, I have to change the text part and the code is this. I also looked in the changelog but I did not see any changes to the code I was using before
Sorry, do not want to seem rude, I do not understand what code you used & what code you are using now, but the code posted in the provided link keeps working:

It’s probably a problem with my installation. I tried different codes to color the value, and none of them work.
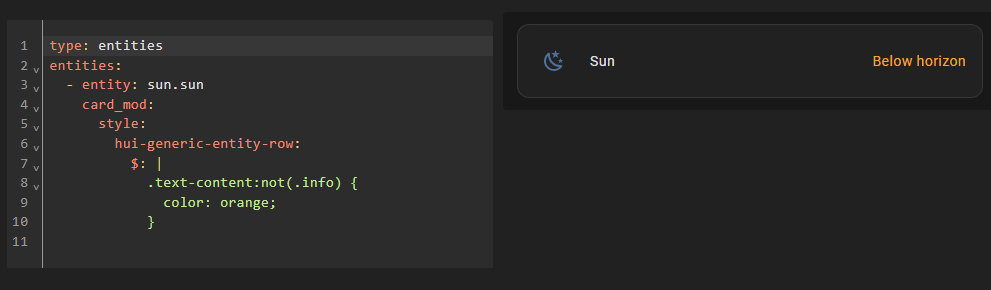
The one you posted is
    style:
      hui-generic-entity-row:
        $: |
          .text-content:not(.info) {
            color: orange;
          }
but in my case it doesn’t work.
Ill Suspect ya refer it like this:
            :host {
                --paper-item-icon-color:
                {% set state = states(config.entity) %}
                {% set color = {'Groen':'green',
                'Geel':'yellow',
                'Oranje':'orange',
				'Rood':'red'} %}
                {{color.get(state,'white')}}
refer from post 6271
Blockquote
or,use a mapper for the equality checks:
{% set state = states(config.entity) %}
{% set color = {'On':'green',
                'Off':'yellow',
                'Auto (off)':'red'} %}
{{color.get(state,'black')}}
it looks like this works on an entity card yes…
prob is how to inject it on my own card > first code…
thnx sofar Ildar_Gabdullin!
Can you test it on a PC?
Mobiles are too small & too unpredicted (safari, webview are much worse than Chrome / FF).

If the code works on PC but does not on a mobile (Companion app) - try cleaning a Frontend cache in a Companion app.
Dear all, I would like to have a badge visible and blinking when the entity assume a specific state. In may case when my car is open. Is it possible? i tried with the fllowing code but does’t work. May I ask a little support?
thank you in advance
type: entity
show_name: false
show_state: true
show_icon: true
entity: binary_sensor.x2_xdrive20d_door_lock_state
color: red
name: Aperta
visibility:
  - condition: state
    entity: binary_sensor.x2_xdrive20d_door_lock_state
    state: "on"
tap_action:
  action: navigate
  navigation_path: /dashboard-test/auto
card_mod:
  style: |
    ha-card {
      {% if is_state('binary_sensor.x2_xdrive20d_door_lock_state', 'unlocked') %}
        animation: blink 2s linear infinite;
      {% endif %}
    }

@keyframes blink {
  0% { opacity: 1; }
  50% { opacity: 0; }
  100% { opacity: 1; }
}
I wouldn’t edit the yaml on the mobile. ![]() Compare your code and the code he sent you. If you find out where the difference is and where it is wrong… and if not, the easiest way is to copy the code from the example and change the entity no?
Compare your code and the code he sent you. If you find out where the difference is and where it is wrong… and if not, the easiest way is to copy the code from the example and change the entity no?
Hi,
I’m tinkering around with my entity card and I am able to adjust icon and colors based on state.
  style: |
    :host {
        --card-mod-icon:
          {% set text = states('sensor.tex_window_w10') %}
          {% set icon =
            {'Gesloten':'window-closed-variant',
             'Open':'window-open-variant',
             'Kipstand':'window-open',
             'Fout!':'alert-circle'} %}
          mdi:{{icon.get(text, 'help-circle')}};
        --card-mod-icon-color:
          {% set color =
            {'Gesloten':'#607d8b',
             'Open':'orange',
             'Kipstand':'#ffc107',
             'Fout!':'red'} %}
          {{color.get(text, 'grey')}};
    }
    ha-tile-icon {
      --tile-color:
        {% set text = states('sensor.tex_window_w10') %}
        {% set tile_color =
          {'Gesloten':'#607d8b',
           'Open':'orange',
           'Kipstand':'#ffc107',
           'Fout!':'red'} %}
        {{tile_color.get(text, 'grey')}} !important;
    }
    ha-card {
      --tile-color:
        {% set text = states('sensor.tex_window_w10') %}
        {% set tile_color =
          {'Gesloten':'#607d8b',
           'Open':'orange',
           'Kipstand':'#ffc107',
           'Fout!':'red'} %}
        {{tile_color.get(text, 'grey')}} !important;
    }
The tile on the left is based on the code above, the tile on the right is the standard one (not touched by card-mod)

If my window is closed (= “Gesloten”) I would like to just show the standard color. I tried blue, grey, some hex-values. But does anyone know what the right “default” color is that is shown on the right?