Discord Image Notification

Well, then we can use the homeassistant automation instead.

What i did was using the local_file integration.
I did first mount the external nas drive in homeassistant, and i can browse it while using MEDIA in Homeassistant.

image

My drive is mounted under MEDIA, in that drive i have a folder named TRIGGERED, in that folder are the FILENAME.jpg images.

Then i have an MQTT entity that posts the filename in an attribute.
for example 202404041200.jpg

it shows like this:

So i know the exact filename what to call when i want it to send to discord.

We need also to setup the local_file entity in your configuration.yaml or like me using packages folder:

image

So when setting up the automation to update the correct file i use this (action) automation.
So for example when the MQTT entity changes it triggers this action to update the last image.

service: local_file.update_file_path
data:
  entity_id: camera.detected_front
  file_path: /media/alerts/triggered/{{states('sensor.ai_front_image')}}

Here is how the local_file entity looks like

after that we need an other automation that sends it to discord.
What this local_file integration does is create a special link to access with a token in an attribute:

service: notify.discord
data:
  message: ""
  target: "YOURCHANNEL ID"
  data:
    embed:
      title: YOUR TITLE
      description: YOUR DESCRIPTION
      url: https://nolink.org
      color: 199363
      author:
        name: Home Security System
        url: YOUR URL U WANT TO USE 
        icon_url: ICONURL
      footer:
        text: © YOUR NAME
        icon_url: https://www.home-assistant.io
      thumbnail:
        url: >-
          https://YOURNABUCASAURL.ui.nabu.casa{{
          state_attr('camera.detected_front', 'entity_picture') }}
      image:
        url: >-
          https://YOURNABUCASAURL.ui.nabu.casa{{
          state_attr('camera.detected_front', 'entity_picture') }}
      fields:
        - name:  WHATEVERUWANT
          value: "{{state_attr('sensor.YOURSENSR, 'ATTRIBUTE') }}"
          inline: time
        - name: WHATEVERUWANT
          value: "{{state_attr('sensor.YOURSENSR, 'ATTRIBUTE') }}"
        - name: what detection
          value: "{{state_attr('sensor.YOURSENSR, 'ATTRIBUTE') }}"
        - name: extra
          value: >-
            {{state_attr('sensor.YOURSENSR, 'ATTRIBUTE') }},{{state_attr('sensor.YOURSENSR, 'ATTRIBUTE') }}
          inline: false
      images:
        - >-
          https://YOURNABUCASAURL.ui.nabu.casa{{
          state_attr('camera.detected_front', 'entity_picture') }}
enabled: true

And if u want to use node-red;

here the state n6de

And this is how the function node looks like:

const entityState = global.get('homeassistant.homeAssistant.states["sensor.ai_front_image"].state');
const imagePath = entityState ? "/media/local/alerts/triggered/" + entityState : null;
const detected = global.get('homeassistant.homeAssistant.states["sensor.ai_front_motion"].state');

const entityAttributes = global.get('homeassistant.homeAssistant.states["camera.detected_front"].attributes');
const entityPicture = entityAttributes ? entityAttributes.entity_picture : null;


node.warn('Image Path: ' + entityPicture);
const newMsg = {};
newMsg.payload = "";
newMsg.embed = {
    payload: '', // Include meaningful content here if needed
    
        "color": 0x0099ff,
        "title": 'CAMERA DETECTIONS',
        "url": 'https://NABUCASAURL.ui.nabu.casa/lovelace/1',
        "author": {
            name: 'AI DETECTIONS',
            icon_url: 'https://assets.stickpng.com/images/584abe7e2912007028bd9330.png',
            url: 'https://NABUCASAURL.ui.nabu.casa/lovelace/1',
        },
        "description": (''),
        "thumbnail": {
            url: `https://static.vecteezy.com/system/resources/previews/016/017/375/original/transparent-background-cctv-camera-icon-free-png.png`, // Correct URL formatting
        },
        "fields": [{
            name: 'Detection',
            value: (detected),
            inline: true,
        },
        {
			name: 'Time',
			value: "1",
			inline: true,
		},
        ],
        "image": {
            url: `https://NABUCASAURL.ui.nabu.casa${entityPicture}`,
	    },
        "timestamp": new Date(),
        "footer": {
            text: (detected),
            icon_url: `https://NABUCASAURL.ui.nabu.casa${entityPicture}`,
        },
   
    
};
newMsg.channel = 'YCHANNELID', // Channel ID where you want to send the message
newMsg.action= 'create', // Default to create if not set
newMsg.message = 'YCHANNELID'
return newMsg;

Thanks for posting! I finally got around to testing and have had mixed results.

I’ve tried this config both with the local_file integration pointing at a snapshot, and directly pointed at my printer’s camera, and it seems to only sometimes work. When manually triggered, it seems to work every time, but more often than not, discord embeds a turd and opening the link results in a 403 Forbidden.


Is there there something I need to do in order to keep the token in the URL valid?

It does work, however discord did change something.
I noticed, when i did not open the image when the notification came in the image shows like a poop emoji, but when i open the notification directly or within some time, it shows up normally.

I will look into it, as i am currently implementing google AI into it as its free anyway to use it.

For now i would suggest telegram, as discord is not save at all.
And i would suggest not using nabu casa url either.

Any Idea how can i send camera snapshot to a discord?
Im moving from telegram and making discord sever with all my notifications.
No way it accepts a URL like this:

http://login:[email protected]/ISAPI/Streaming/channels/0501/picture?videoResolutionWidth=1920&videoResolutionHeight=1080


That is my setup. you can get the notification action from setting up a bot in the discord integration, then you can use the name of that and set it to notify.

it will bring up a menu but go to the yaml editor and use that config.

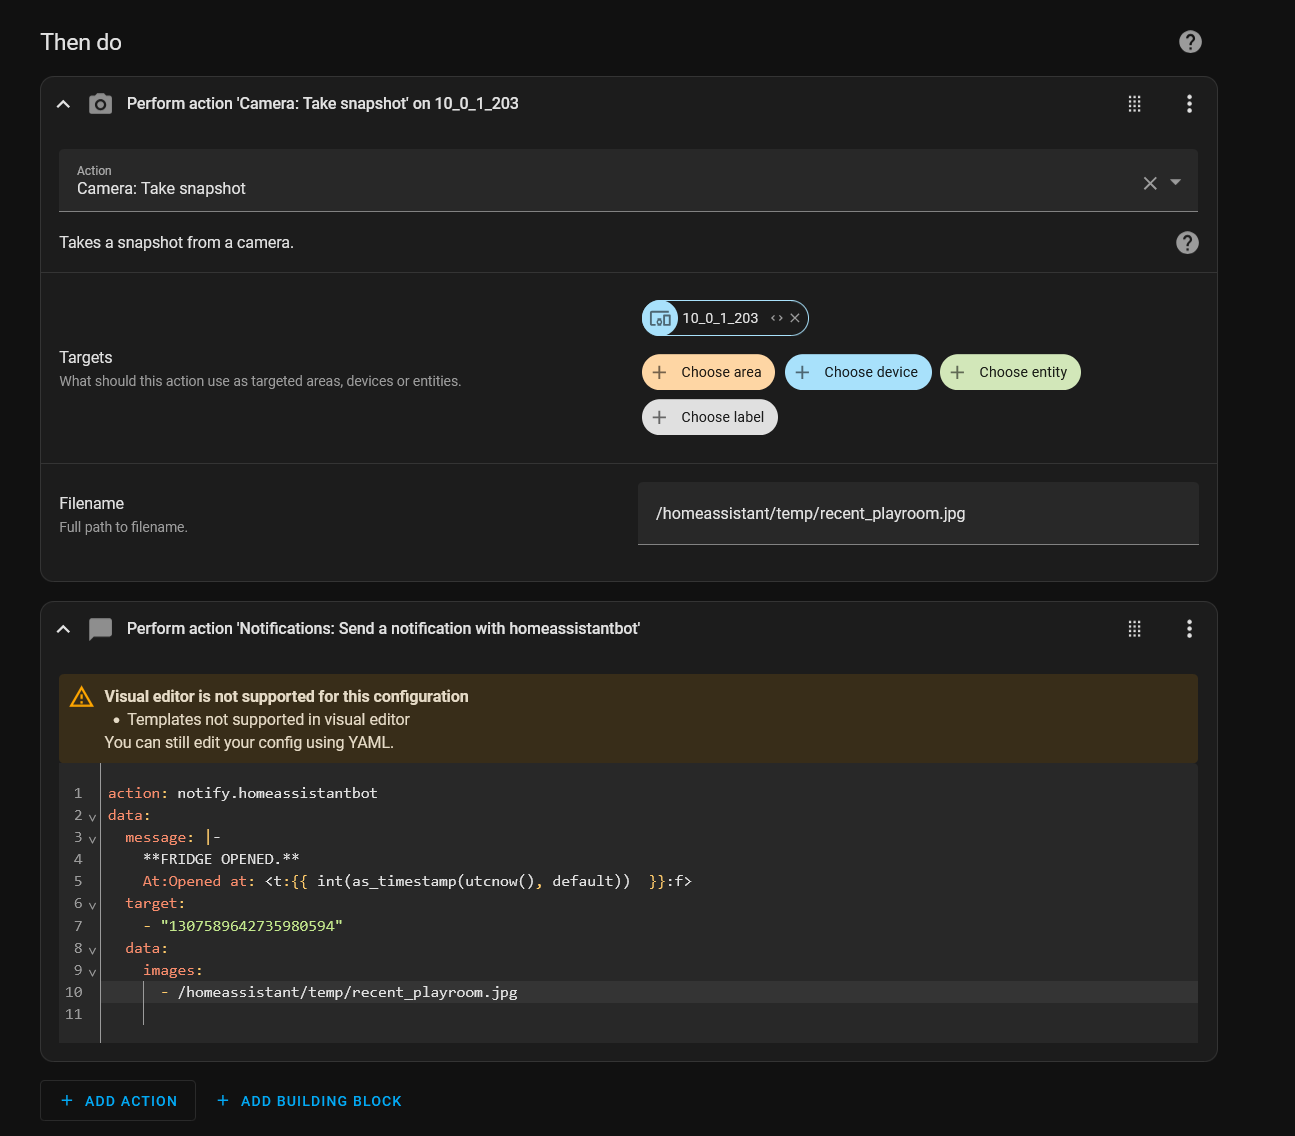
sorry, the directory needs to be /config/temp/ not /homeassistant/temp/

I wanted to do this and I needed to be able to send a snapshot and not have it hosted online, so I found out that you can do this for an action (note that a previous action takes the snapshot and overwrites the image in /tmp)

action: notify.hass_chat
data:
  target: "[redacted]"
  message: ""
  data:
    images:
      - /tmp/3dprinter_snapshot.jpg
    embed:
      title: 3d Print Status Update
      description: "{{ states('sensor.p1s_01p09c462200999_task_name') }}"
      color: 199363
      author:
        name: HassBot
        icon_url: https://wiki.bambulab.com/admin/home/logo-large.png
      footer:
        text: Brought to you by HassBot
        icon_url: https://www.home-assistant.io
      thumbnail:
        url: https://wiki.bambulab.com/admin/home/logo-large.png
      image:
        url: attachment://3dprinter_snapshot.jpg
      fields:
        - name: progress
          value: 51%
        - name: completes in
          value: 51m
        - name: completes on
          value: Today 23:51
        - name: layers
          value: 1/100

The important part to note here is the “images” node under data which sends in the attachment as part of the message and then in the Embed, you can just use:

attachment://[file name]

to show the file.

Note that in my experience the first “images” isn’t shown except in the embed as long as you reference it there. If you attach more than 1 image, it may show the other images above/below the embed.

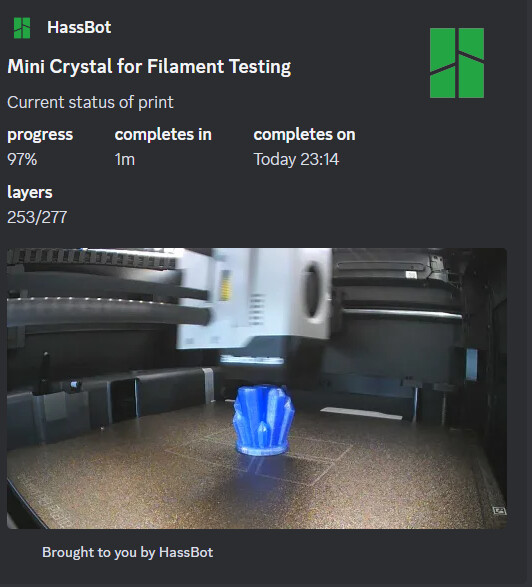
My example above has lots of missing code for the fields, but I just wanted to simplify it. This is what the embed looks like with my above action: