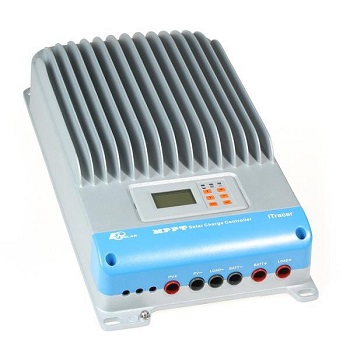
Epever RS485 + Elfin EW11 WiFi Modbus (or MQTT)

:warning: Please test these before plugging it in, because I am only going off of memory and could be wrong.

A regular ethernet cable won’t work. You have to make a custom cable because the pins are not standard and are different on both devices. I need to make another cable, and will try to document it better when I do. Until then, here are my notes on the pins. It has been a few months since I did this, and I don’t remember if I had to make changes when I actually wired it.

Also, this cable only works properly when plugged in a certain direction. Reversing the cable will cause it not to work, and may cause damage.

Correct EW11 - Epever Wiring

A+ White/Blue - Green
B- Green - Blue
VCC + White/Brown - Orange
GND - Brown - Brown

Did you ever work out how to add a Load on/off switch?

Second this, did you manage to get any switching working?

Never did. I do want to get switches working, but in my application I had to add air temperature sensors, and I’m already running the DC switching off ESPHome with a relay.

I have the official Epever wifi adapter waiting at the post office. I’m going to test it on my 2nd charge controller to see if I can figure it out, but I haven’t really messed with this since I originally got it set up.

Hey guys, I’m not a Home Assistant user (I tried it and decided it wasn’t for me) but I have been doing quite a lot of work with these EPEVER solar controllers and I managed to get load switching working for me.

The key thing is that the controller’s load settings have to be set to manual via the controller’s LCD’s front panel controls. These settings are probably the least intuitive and worst documented feature of the controller, but I think the correct settings are 117, 2n

Once it’s in manual mode then you have to write a 1 or a 0 to coil 0x0002 to turn the relay on or off. 0x0002 is the HEX address, and it seems that HA uses decimal addresses for the registers, but 2 is the same in HEX and Decimal, so that bit should be easy :slightly_smiling_face:

From what I’ve seen above about how you’d do this in HA, I guess it will be a register_type: output command with register: 2.
The bit I can’t tell from the posts above, is how you get HA to output the 1 or 0 values to turn the load on or off, but I’m guessing you guys can figure that bit out.

I’m communicating with my controllers using a Wemos D1 Mini and an RS485 converter, which serves as a Modbus to MQTT bridge. The problem I have at the moment is that one of my controllers, which is in Spain (I’m in the UK) has gone rogue and is trying to fry my batteries!
My attempts to remotely command my controller to shut down have been unsuccessful, so I’m currently turning on the load (garden lighting) as soon as the panel starts outputting anything, in an attempt to slow down the battery charging rate.

Anyone who has a solar system ought to put some time into working-out how they would deal with this scenario, and experiment with adjusting parameters like Battery temperature warning upper limit. It seems from my remote monitoring that my batteries are hitting 70 Celsius before the controller is shutting off, which worries me a little! :fire:

Pete.

2 Likes

I wanted to connect my EPever Triron N to Home Assistant with an Elfin EW11 and I am grateful for all your infos. Could not have managed without. Regarding the custom cable I had to add half a usb cable to get power to the EW11 (none provided by my RS485 plug). I have cut a standard RJ45 in halfes and connected the three cables like the list shows below. worked with modbus / home assistant. I hope this might help others with the custom cable

Used:

RJ45-Nr Elfin EPever USB
1 - - -
2 - - -
3 - - -
4 - blue -
5 whiteblue - -
6 green green -
7 whitebrown - red
8 brown brown black

Connections:

B- green (6) Elfin to blue (4) EPEver
A+ whiteblue (5) Elfin to green (6) EPever
VCC +5V whitebrown (7) Elfin to red USB
GND all 3 connected Elfin brown (8), EPever brown (8), black USB

1 Like

I now have a working ebox-WIFI-01 in addition to the EW11. I’m doing some early tests, but my main thing at this point would be to get switches working.

Modbus Switches

Official HA Documentation for Modbus Switches

Example configuration.yaml entry

modbus:
  - name: hub1
    type: tcp
    host: IP_ADDRESS
    port: 502
    switches:
      - name: Register1
        address: 11
        command_on: 1
        command_off: 0

Test configuration.yaml

(based on info from @Peterkn )

modbus:
  - type: tcp
    host: IP_ADDRESS
    port: 502
    name: hub1
    switches:
      - name: EPEver Load Switch
        address: 2
        input_type: coil
        command_on: 1
        command_off: 0

Result: Fails

1 Like

I got this working for my 3 epever charge controllers by putting it into my Switch config like this:

switch:
  - platform: modbus
    scan_interval: 10
    coils:
    - name: Solar Load Switch 1
      hub: epever
      slave: 1
      coil: 2
    - name: Solar Load Switch 2
      hub: epever
      slave: 2
      coil: 2
    - name: Solar Load Switch 3
      hub: epever
      slave: 3
      coil: 2
4 Likes

Thank you @Brynn. That worked for me on the first try. Just had to swap in hub: hub1 instead of hub: epever to match my config from a year ago.

That’s great news.

This config is broken as of core 8.6 (probably 7 also, but I skipped a version). Working on tweaking it for the new modbus syntax, but would be happy to see example configs if others have already gone through that process.

Here’s a sample config for the connection and sensors working in core 8.6. I don’t have switches converted to the new structure that was a breaking change as of 7.1.

This is with the EW11 running into an EPEver charge controller on Bank/Array 1 and EPEver eBox-Wifi-01 on Bank/Array 2. They work great together. After working with and using them both for a few months, I prefer the EW11. The configuration in the device may appear more complex, but I’ve found it to be more reliable and straightforward to work with than the eBox. It’s also cheaper. The one downside to the EW11 is that it seems a little harder to get outside of AliExpress.

modbus:
  - type: tcp
    name: "ew11"
    host: ew11.lan
    port: 502
    close_comm_on_error: false
    timeout: 9
    retry_on_empty: true
    retries: 10
    sensors:
      - name: "Battery 1"
        address: 13082
        data_type: uint
        slave: 1
        unit_of_measurement: V
        input_type: input        
        scale: 0.01
        precision: 2
        scan_interval: 10
      - name: "Array 1 Power"
        address: 12546
        slave: 1
        data_type: uint
        input_type: input
        unit_of_measurement: W
        scale: 0.01

  - type: rtuovertcp
    name: "epever"
    host: epever.lan
    port: 8088
    close_comm_on_error: false
    retry_on_empty: true
    retries: 10
    timeout: 9
    sensors:
      - name: "Battery 2"
        address: 13082
        data_type: uint
        slave: 1
        unit_of_measurement: V
        input_type: input        
        scale: 0.01
        precision: 2
        scan_interval: 10
      - name: "Array 2 Power" 
        address: 12546
        slave: 1
        data_type: uint
        input_type: input
        unit_of_measurement: W
        scale: 0.01

NOTES:

  1. Lines like precision and scale might be redundant. I haven’t messed around with them too much, and things got a little more complex with the new data__type variable, which seemed to be necessary.

  2. Not sure what’s necessary and/or best practice with close_comm_on_error, timeout, retry_on_empty, retries. I messed with all of those first, and it seemed like data_type, and input_type were what was actually breaking the config.

  3. Depending on your local network, you may want to use IPs rather than hostnames for the host setting. It’s less flexible if something changes on the network, but does rely on properly structured hostnames.

1 Like

I received my Elfin EW11a a couple days ago. Appreciate all your help especially @jetatomic for giving so much input and knowledge on how to configure this.

After careful planning and looking at this forums as my main guide, below is what i did from scratch to make it work:

1. Purchased EW11A + Cable + Din mount bracket

2. Prepare the cable to connect with my Epever Charge Controller (Tracer1210AN)

  • UTP Straight Cable base on below color coding, factory crimped preferred (refer picture below)
  • Do note on the orientation of the RJ-45 Head and the Pin Number
  • Cut it to your preferred length (so you can have an exposed UTP cable on the other end)
  • Expose the 4 cable as shown below (Blue, Brown White, Orange, Green respectively) Again take note on the orientation
  • Done Part 1

3. Prepare the configuration.yaml in the Home Assistant

modbus:
  - type: tcp
    name: "ew11"
    host: 172.16.0.18
    port: 502
    close_comm_on_error: false
    timeout: 9
    retry_on_empty: true

#Solar Battery
    sensors:
      - name: "Solar Battery Voltage"
        address: 13082
        data_type: uint
        slave: 1
        unit_of_measurement: V
        input_type: input        
        scale: 0.01
        precision: 2
        scan_interval: 10

#Solar Panel
      - name: "Solar Panel Watt"
        address: 12546
        slave: 1
        data_type: uint
        input_type: input
        unit_of_measurement: W
        scale: 0.01
        precision: 2
        scan_interval: 10   
      - name: "Solar Panel Amp"
        address: 12545
        slave: 1
        data_type: uint
        input_type: input
        unit_of_measurement: A
        scale: 0.01
        precision: 2
        scan_interval: 10
      - name: "Solar Panel Volt"
        address: 12544
        slave: 1
        data_type: uint
        input_type: input
        unit_of_measurement: V
        scale: 0.01
        precision: 2
        scan_interval: 10

#Solar Load
      - name: "Solar Load Watt"
        address: 12558
        slave: 1
        data_type: uint
        input_type: input
        unit_of_measurement: W
        scale: 0.01
        precision: 2
        scan_interval: 10

4. Here is the final picture

Due to the limitation of me being a new user, i have several restriction on uploading pictures or sharing links. Please refer below code instead for the pic

https://ibb.co/WyPjksG - Purchased EW11A + Cable + Din mount bracket
https://ibb.co/KKT5h4X - UTP Straight Cable base on below color coding
https://ibb.co/zFGb5pB - Expose the 4 cable as shown
https://ibb.co/kVZjZRW - Expose the 4 cable as shown
https://ibb.co/T4W2hPq - Here is the final picture
_______________________________________________________

https://ibb.co/L50byHv - EW11 Status
https://ibb.co/2KhDM3b - EW11 Serial Port Settings
https://ibb.co/DwFcjRX - EW11 Communication Settings
https://ibb.co/C6yY3f5 - Home Assistant

2 Likes

Just an update if anyone interested on the full register address as below:

  1. The configuration is in my modbus.yaml
####################################################
#                                                  #
#                     START                        #
#                                                  #
####################################################

#https://community.home-assistant.io/t/epever-rs485-elfin-ew11-wifi-modbus-or-mqtt/211137/32
#https://www.home-assistant.io/integrations/modbus

- type: tcp
  name: "ew11"
  host: 172.16.0.18
  port: 502
  close_comm_on_error: false
  timeout: 9
  retry_on_empty: true
  retries: 10

#Solar Charge Controller
  sensors:
    - name: "Solar Charge Controller Temperature"
      address: 12561
      slave: 1
      data_type: uint
      input_type: input
      unit_of_measurement: °C
      precision: 1
      scale: 0.01
      scan_interval: 10
    - name: "Solar Charge Controller Charging Equipment Status"
      address: 12801
      slave: 1
      data_type: uint
      input_type: input
      scale: 0.01
      precision: 3
      scan_interval: 10
    - name: "Solar Charge Controller Discharging Equipment Status"
      address: 12802
      slave: 1
      data_type: uint
      input_type: input
      scale: 0.01
      precision: 3
      scan_interval: 10
    - name: "Solar Charge Controller Rated Charging Current"
      address: 12293
      slave: 1
      data_type: uint
      input_type: input
      unit_of_measurement: A
      scale: 0.01
      precision: 3
      scan_interval: 10

#Solar Battery
    - name: "Solar Battery Voltage"
      address: 13082
      data_type: uint
      slave: 1
      unit_of_measurement: V
      input_type: input        
      scale: 0.01
      precision: 3
      scan_interval: 10
    - name: "Solar Battery Amp Low"
      address: 13083
      slave: 1
      data_type: uint
      input_type: input
      unit_of_measurement: A
      scale: 0.01
      precision: 3
      scan_interval: 10
    - name: "Solar Battery Amp High"
      address: 13084
      slave: 1
      data_type: uint
      input_type: input
      unit_of_measurement: A
      scale: 0.01
      precision: 3
      scan_interval: 10
    - name: "Solar Battery Maximum Voltage Today"
      address: 13058
      data_type: uint
      slave: 1
      unit_of_measurement: V
      input_type: input        
      scale: 0.01
      precision: 3
      scan_interval: 10
    - name: "Solar Battery Minimum Voltage Today"
      address: 13059
      data_type: uint
      slave: 1
      unit_of_measurement: V
      input_type: input        
      scale: 0.01
      precision: 3
      scan_interval: 10
    - name: "Solar Battery Rated Current"
      address: 12293
      slave: 1
      data_type: uint
      input_type: input
      unit_of_measurement: A
      scale: 0.01
      precision: 3
      scan_interval: 10
    - name: "Solar Battery Rated Voltage"
      address: 12573
      data_type: uint
      slave: 1
      unit_of_measurement: V
      input_type: input        
      scale: 0.01
      precision: 3
      scan_interval: 10
    - name: "Solar Battery Temperature"
      address: 12560
      slave: 1
      data_type: uint
      input_type: input
      unit_of_measurement: °C
      precision: 1
      scale: 0.01
      scan_interval: 10
    - name: "Solar Battery Remaining Capacity"
      address: 12570
      slave: 1
      data_type: uint
      input_type: input
      unit_of_measurement: '%'
      scale: 0.01
      precision: 3
      scan_interval: 10
    - name: "Solar Battery Status"
      address: 12800
      slave: 1
      data_type: uint
      input_type: input
      scale: 0.01
      precision: 3
      scan_interval: 10

#Solar Panel
    - name: "Solar Panel Watt Low"
      address: 12546
      slave: 1
      data_type: uint
      input_type: input
      unit_of_measurement: W
      scale: 0.01
      precision: 3
      scan_interval: 10
    - name: "Solar Panel Watt High"
      address: 12547
      slave: 1
      data_type: uint
      input_type: input
      unit_of_measurement: W
      scale: 0.01
      precision: 3
      scan_interval: 10      
    - name: "Solar Panel Amp"
      address: 12545
      slave: 1
      data_type: uint
      input_type: input
      unit_of_measurement: A
      scale: 0.01
      precision: 3
      scan_interval: 10      
    - name: "Solar Panel Voltage"
      address: 12544
      slave: 1
      data_type: uint
      input_type: input
      unit_of_measurement: V
      scale: 0.01
      precision: 3
      scan_interval: 10
    - name: "Solar Panel Generated Energy Today Low"
      address: 13068
      slave: 1
      data_type: uint
      input_type: input
      unit_of_measurement: kWh
      scale: 0.01
      precision: 3
      scan_interval: 10
    - name: "Solar Panel Generated Energy Today High"
      address: 13069
      slave: 1
      data_type: uint
      input_type: input
      unit_of_measurement: kWh
      scale: 0.01
      precision: 3
      scan_interval: 10
    - name: "Solar Panel Generated Energy Month Low"
      address: 13070
      slave: 1
      data_type: uint
      input_type: input
      unit_of_measurement: kWh
      scale: 0.01
      precision: 3
      scan_interval: 10
    - name: "Solar Panel Generated Energy Month High"
      address: 13071
      slave: 1
      data_type: uint
      input_type: input
      unit_of_measurement: kWh
      scale: 0.01
      precision: 3
      scan_interval: 10
    - name: "Solar Panel Generated Energy Year Low"
      address: 13072
      slave: 1
      data_type: uint
      input_type: input
      unit_of_measurement: kWh
      scale: 0.01
      precision: 3
      scan_interval: 10
    - name: "Solar Panel Generated Energy Year High"
      address: 13073
      slave: 1
      data_type: uint
      input_type: input
      unit_of_measurement: kWh
      scale: 0.01
      precision: 3
      scan_interval: 10
    - name: "Solar Panel Generated Energy Total Low"
      address: 13074
      slave: 1
      data_type: uint
      input_type: input
      unit_of_measurement: kWh
      scale: 0.01
      precision: 3
      scan_interval: 10
    - name: "Solar Panel Generated Energy Total High"
      address: 13075
      slave: 1
      data_type: uint
      input_type: input
      unit_of_measurement: kWh
      scale: 0.01
      precision: 3
      scan_interval: 10    

#Solar Load
    - name: "Solar Load Watt Low"
      address: 12558
      slave: 1
      data_type: uint
      input_type: input
      unit_of_measurement: W
      scale: 0.01
      precision: 3
      scan_interval: 10
    - name: "Solar Load Watt High"
      address: 12559
      slave: 1
      data_type: uint
      input_type: input
      unit_of_measurement: W
      scale: 0.01
      precision: 3
      scan_interval: 10
    - name: "Solar Load Amp"
      address: 12557
      slave: 1
      data_type: uint
      input_type: input
      unit_of_measurement: A
      scale: 0.01
      precision: 3
      scan_interval: 10
    - name: "Solar Load Voltage"
      address: 12556
      slave: 1
      data_type: uint
      input_type: input
      unit_of_measurement: V
      scale: 0.01
      precision: 3
      scan_interval: 10
    - name: "Solar Load Consumed Energy Today Low"
      address: 13060
      data_type: uint
      slave: 1
      unit_of_measurement: kWh
      input_type: input        
      scale: 0.01
      precision: 3
      scan_interval: 10
    - name: "Solar Load Consumed Energy Today High"
      address: 13061
      data_type: uint
      slave: 1
      unit_of_measurement: kWh
      input_type: input        
      scale: 0.01
      precision: 3
      scan_interval: 10
    - name: "Solar Load Consumed Energy Month Low"
      address: 13062
      data_type: uint
      slave: 1
      unit_of_measurement: kWh
      input_type: input        
      scale: 0.01
      precision: 3
      scan_interval: 10
    - name: "Solar Load Consumed Energy Month High"
      address: 13063
      data_type: uint
      slave: 1
      unit_of_measurement: kWh
      input_type: input        
      scale: 0.01
      precision: 3
      scan_interval: 10
    - name: "Solar Load Consumed Energy Year Low"
      address: 13064
      data_type: uint
      slave: 1
      unit_of_measurement: kWh
      input_type: input        
      scale: 0.01
      precision: 3
      scan_interval: 10
    - name: "Solar Load Consumed Energy Year High"
      address: 13065
      data_type: uint
      slave: 1
      unit_of_measurement: kWh
      input_type: input        
      scale: 0.01
      precision: 3
      scan_interval: 10
    - name: "Solar Load Consumed Energy Total Low"
      address: 13066
      data_type: uint
      slave: 1
      unit_of_measurement: kWh
      input_type: input        
      scale: 0.01
      precision: 3
      scan_interval: 10
    - name: "Solar Load Consumed Energy Total High"
      address: 13067
      data_type: uint
      slave: 1
      unit_of_measurement: kWh
      input_type: input        
      scale: 0.01
      precision: 3
      scan_interval: 10
    - name: "Solar Load Rated Current"
      address: 12302
      slave: 1
      data_type: uint
      input_type: input
      unit_of_measurement: A
      scale: 0.01
      precision: 3
      scan_interval: 10    

####################################################
#                                                  #
#                      END                         #
#                                                  #
####################################################

  1. Some of the sensor required Templating, reside in my sensor.yaml
#Solar Sensor
- platform: template
  sensors:
    solar_battery_watt:
      friendly_name: "Solar Battery Watt"
      unit_of_measurement: 'W'
      value_template: >
        {% set A = states('sensor.solar_battery_amp_low') | float %}
        {% set V = states('sensor.solar_battery_voltage') | float %}
        {{ (A * V) | round(3) }}

- platform: template
  sensors:
    solar_battery_capacity:
      friendly_name: "Solar Battery Capacity"
      device_class: battery
      value_template: "{{ states.sensor.solar_battery_remaining_capacity.state | float * 100 }}" 
      unit_of_measurement: '%'
2 Likes

I’m not using the Epever but I am using the PZEM-016 and I believe I’ve figured out the MQTT part of the Elfin EW11.

To send a request, send a buffer type Modbus TCP command configured per the Modbus TCP protocol to the subscribe topic you configured it to in the EW11, in my case down/EW11

This website Modbus TCP Protocol with Command Examples is a great guide for creating your “buffer” message.

For example, for my device, I wanted 10 registers 0x0000 -0x0009 with command 0x04. Given Modbus TCP Protocol it looked like this:

0x01 0x02 0x00 0x00 0x00 0x06 0x01 0x04 0x00 0x00 0x00 0x0A

With labeling for understanding the structure:

[0x01 0x02] Trans ID (see website for others)
[0x00 0x00] Protocol Id (always the same)
[0x00 0x06] Message Length - bytes count beyond these bytes, 6 in my case
[0x01]      Unit Id/Slave Address
[0x04]      Function Code
[0x00 0x00] Starting Register Address
[0x00 0x0A] Register Count -in this case 10 (hex 0A)

I use node red so in a function node I did the following and sent it to the MQTT node with the topic set to down/EW11

msg.payload  =   Buffer.from('01020000000601040000000A', 'hex');
return msg;

After sending the command the response will come through on the publish topic, in my case up/EW11

The response will have the following structure (based on my use case)

0x01 0x02 0x00 0x00 0x00 0x17 0x01 0x04 0x14 0x00 0x00 0x00 0x00 0x00 0x00 0x00 0x00 0x00 0x00 0x00 0x00 0x00 0x00 0x00 0x00 0x00 0x00 0x00 0x00

Response with labeling for understanding the structure (zeros for register values are dummy values for demonstration purposes):

[0x01 0x02] Trans ID (see website for others)
[0x00 0x00] Protocol Id (always the same)
[0x00 0x17] Message Length - bytes count beyond these bytes (hex17 in my case)
[0x01]      Unit Id/Slave Address
[0x04]      Function Code
[0x14]      Number of bytes more (based on request, in my case Hex 14, or Dec 20)
[0x00 0x00] Register value for address 0x0000
[0x00 0x00] Register value for address 0x0001
[0x00 0x00] Register value for address 0x0002
[0x00 0x00] Register value for address 0x0003
[0x00 0x00] Register value for address 0x0004
[0x00 0x00] Register value for address 0x0005
[0x00 0x00] Register value for address 0x0006
[0x00 0x00] Register value for address 0x0007
[0x00 0x00] Register value for address 0x0008
[0x00 0x00] Register value for address 0x0009

For converting the buffer values returned I use node-red. In my case for the integer values I do the following in a function node (23 is just a dummy value in this case):

return { payload: msg.payload.readInt16BE(23)} ; // 23 is the buffer byte number offset 

For larger numbers that cover multiple registers, it is a bit more complex. A function node with two outputs could look as follows (19, 21 are just dummy values in this case for demonstrating multiple registers):

var rawData = new ArrayBuffer(4);
var intView = new Uint16Array(rawData);
var fltView = new Uint32Array(rawData);

intView[0] = msg.payload.readInt16BE(19); // low # is byte number offset
intView[1] = msg.payload.readInt16BE(21); // high # is byte number offset

msgA = { payload: fltViewA[0]}; // four byte integer with no decimal
msgB = { payload: (Math.round((fltView[0]*.1) * 10) / 10)}; // Converts to Float with one decimal
return [ msgA, msgB ];

I hope that helps anyone who’s been mystified by the MQTT part of the EW11 as much as I have been!

Edit: It’s also worth noting that no matter the source of the Modbus Command up/EW11 always returns the response as well.

2 Likes

I cannot get mine to work. I have an Epever ET6415BND and i have connect the Elfin EW11 but the no power coming in.

My connection

RS485 port (labeled 8) on my epever

Not sure what i am missing.

Does your controller look like this? I don’t see the RS485 port.

img_7014_z1

Yes it is the same. You have to open the blue part

Gotcha. What does the connector look like? Under the blue panel? The others have an RJ45 which is wired differently than a standard ethernet cable. You didn’t show that in your first picture. On mine, I don’t have a second green connector where you have the brown and blue wires. Rather, the ethernet cord is wired directly to the green connector you have on the left. But without knowing how you have that part of the connector crossed over from the controller, we can’t see the wiring.

Somewhere up the thread I think there’s a pinout for the RJ45 plug.

However you have that wired, you can check for voltage at the RJ45 plug on the EW11 end. The main thing is that the Elfin pinouts and Epever pinouts are definitely different, and you have to wire it accordingly.

I don’t have RJ45 on my Epever, just the terminal kind below

I also followed the instruction i got from EW11 manual