That does make sense @LiQuid_cOOled. Thank you!
Don’t hesitate to reach out if you have additional questions…
I did find an alternative solution that works but is not very elegant:
state_display: >-
  [[[ return '<font size=5 color=red>' +
  states['sensor.entity_with_string'].state + '</font>' ]]]
This does show how flexible button-card is!
PS. Sometimes I’m wondering if they should make button-card a standard feature in HA.
Honestly, it’s an incredibly flexible card. It has some quirks, but there are so many ways to format the CSS to suit your needs.
My main dashboard is 95% button based!!
You can imbed other card types inside a main button which opens up so many possibilities .
1 Like
If you want to import a colour into a Custom Button Card using a sensor see below. This does turn the background to the colour set in the macro.
I have noticed that after restart a white sheen can be see on the colour Just needs a quick refresh to appear properly. I believe this is because button card is using Java but home assistant is using Jinja.

CARD
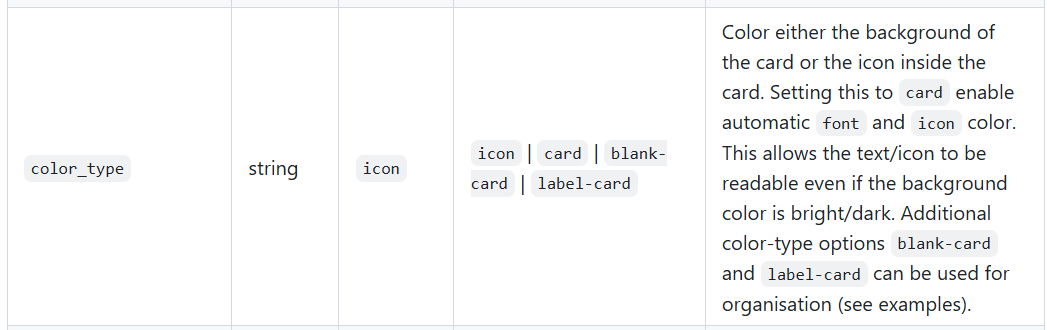
NOTE: color: auto & color_type: card as the color is set by styles: card:
                      - type: custom:button-card
                        name: Outer Ring Limits
                        show_name: false
                        show_icon: false
                        aspect_ratio: 1/1
                        color: auto
                        color_type: card
                        style:
                          right: 4.5%
                          top: 50%
                          height: 45%
                          width: 45%
                        styles:
                          card:
                            - border-radius: 50%
                            - border-width: 2.5px
                            - border-color: rgba(255,255,255,1)
                            - background: >-
                                [[[ return
                                states["sensor.sac_dewpoint_colour_living_room"].state
                                ]]]
TEMPLATE SENSOR
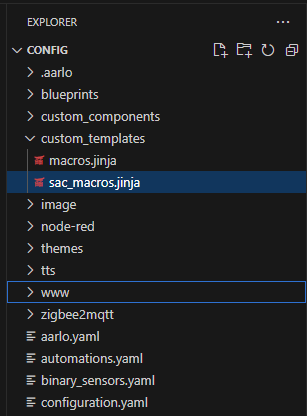
NOTE: This template calculates from a macro sac_macros.jinga located in config/custom_templates folder. The sensor itself is place in config/configuration.yaml
template:
  - sensor:
      # Template Simple Air Comfort Card - Dewpoint Colour - Outer Ring Limits - Living Room
      - name: "sac_dewpoint_colour_living_room"
        unique_id: c6639b18-ac02-441f-badd-815c6c810254
        state: >-
          {% from 'sac_macros.jinja' import calculate_dewpoint_colour_outer_ring_limits %}
          {{ calculate_dewpoint_colour_outer_ring_limits('sensor.sac_text_dewpoint_comfort_living_room') }}
MACRO
config/custom_templates/sac_macros.jinja. If you want to test create a new file under config/custom_templates/sac_macros.jinja
{# SAC Card Element Outer Ring Limits #}
{% macro calculate_dewpoint_colour_outer_ring_limits(entity) %}
  {% if is_state(entity, 'Unknown') %}
    {% set dewpoint_color = 'radial-gradient(circle, dimgray, 55%, rgba(100, 100, 100, 0.15), rgba(100, 100, 100, 0.15)) !important;' %}
  {% elif is_state(entity, 'Unavailable') %}
    {% set dewpoint_color = 'radial-gradient(circle, dimgray, 55%, rgba(100, 100, 100, 0.15), rgba(100, 100, 100, 0.15)) !important;' %}
  {% elif is_state(entity, 'Very Dry') %}
    {% set dewpoint_color = 'radial-gradient(circle, deepskyblue, 55%, rgba(100, 100, 100, 0.15), rgba(100, 100, 100, 0.15)) !important;' %}
  {% elif is_state(entity, 'Dry') %}
    {% set dewpoint_color = 'radial-gradient(circle, mediumaquamarine, 55%, rgba(100, 100, 100, 0.15), rgba(100, 100, 100, 0.15)) !important;' %}
  {% elif is_state(entity, 'Pleasant') %}
    {% set dewpoint_color = 'radial-gradient(circle, limegreen, 55%, rgba(100, 100, 100, 0.15), rgba(100, 100, 100, 0.15)) !important;' %}
  {% elif is_state(entity, 'Comfortable') %}
    {% set dewpoint_color = 'radial-gradient(circle, yellowgreen, 55%, rgba(100, 100, 100, 0.15), rgba(100, 100, 100, 0.15)) !important;' %}
  {% elif is_state(entity, 'Sticky Humid') %}
    {% set dewpoint_color = 'radial-gradient(circle, yellow, 55%, rgba(100, 100, 100, 0.15), rgba(100, 100, 100, 0.15)) !important;' %}
  {% elif is_state(entity, 'Muggy') %}
    {% set dewpoint_color = 'radial-gradient(circle, gold, 55%, rgba(100, 100, 100, 0.15), rgba(100, 100, 100, 0.15)) !important;' %}
  {% elif is_state(entity, 'Sweltering') %}
    {% set dewpoint_color = 'radial-gradient(circle, orange, 55%, rgba(100, 100, 100, 0.15), rgba(100, 100, 100, 0.15)) !important;' %}
  {% elif is_state(entity, 'Stifling') %}
    {% set dewpoint_color = 'radial-gradient(circle, crimson, 55%, rgba(100, 100, 100, 0.15), rgba(100, 100, 100, 0.15)) !important;' %}
  {% endif %}

  {# Apply gradient #}
  {{ dewpoint_color }}
{% endmacro %}
1 Like
It’s definitely a cool and flexible card.
Great respect to @RomRider and other developers for their hard work!
Like many people here, I use the card extensively in the dashboard.
That’s how I implemented an alternative to the previously used “flex-horseshoe-card” in the form of a “thermometer-hygrometer-battery_level”.
Picture just to show the card’s capabilities “in dynamics.”
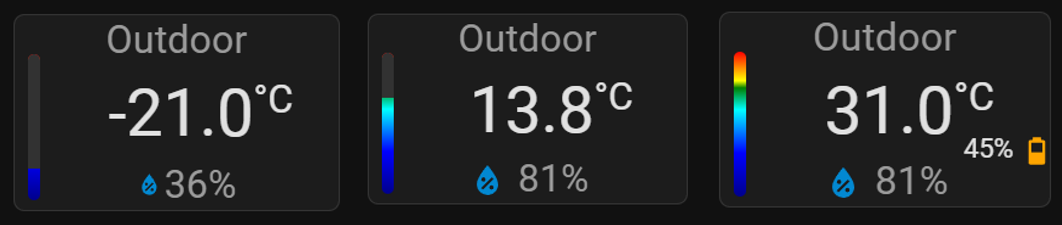
3 Likes
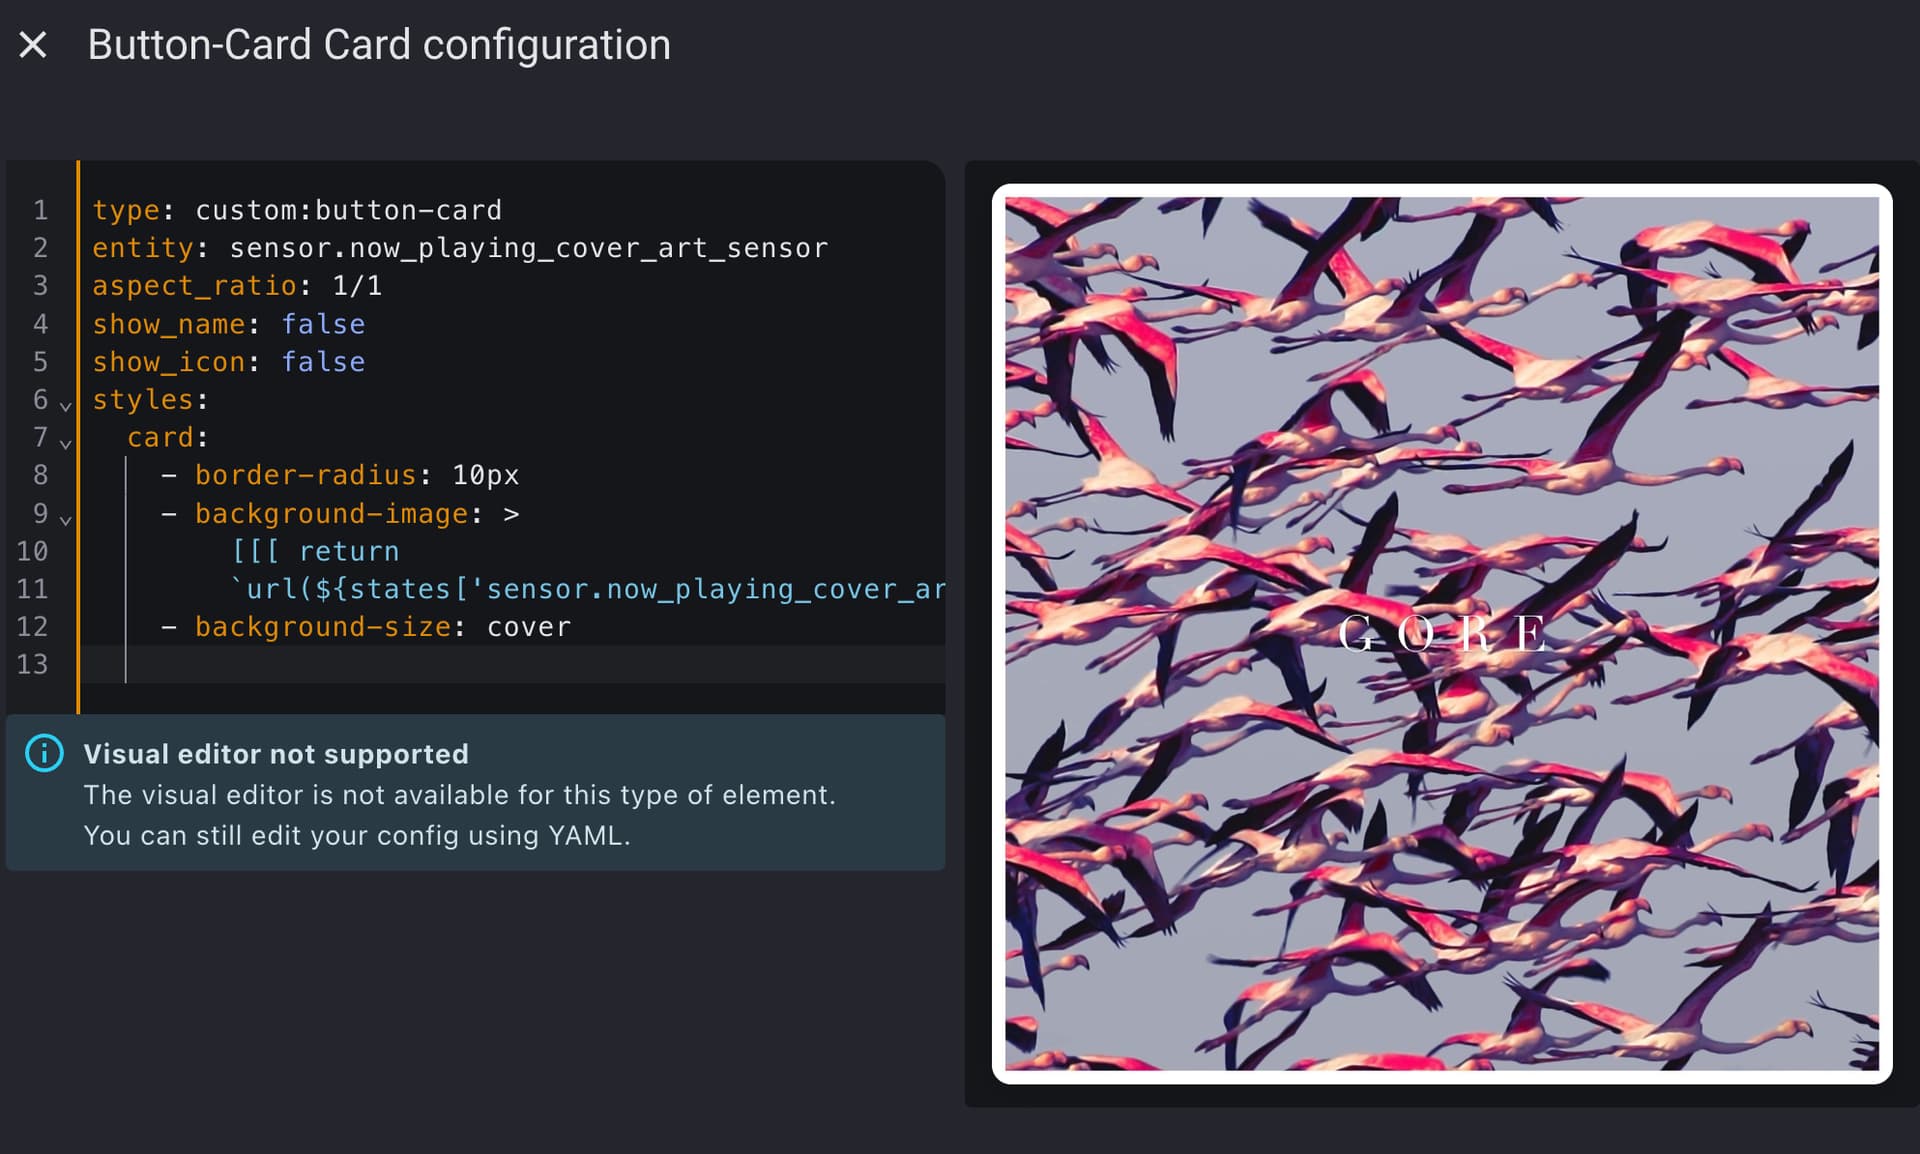
Hoping for some help with a card I am working on. I made a template sensor that gets the URL for the currently playing artwork on a media player entity and displays it dynamically in a custom:button-card. That’s all working fine, but I can’t figure out how to get the inside corners (the actual image corners) to display with a radius to match the card. Any thoughts? Thanks in advance!
type: custom:button-card
entity: sensor.now_playing_cover_art_sensor
aspect_ratio: 1/1
show_name: false
show_icon: false
styles:
card:
- border-radius: 10px
- background-image: >
        [[[ return
        `url(${states['sensor.now_playing_cover_art_sensor'].state})`; ]]]
- background-size: cover

Do you get the same results if you reference the picture directly?
Like this…
- background-image: url('/local/pics/white.png')
This will help determine if it’s related to the sensor’s image.
1 Like
Well, I don’t know what happened but I came back to this and it’s now working how I wanted/expected it to. I guess all it really takes sometimes is to ask someone else and then like magic it’s fine ![]()
So, for anyone else who comes across this with a similar idea, the code above works just fine. ![]()
1 Like
Your browser most likely needed refreshed.
You can also use the sensor in the entity_picture field
An example
type: custom:button-card
entity: sensor.shield_input
aspect_ratio: 2/1
show_name: false
show_icon: false
show_entity_picture: true
styles:
  card:
    - border-radius: 10px
    - background-image: url('/local/pics/white.png')

I use it for my Shield inputs
     shield_input:
       friendly_name: "Shield Input"
       unique_id: shield_input
       value_template: |
         {% set channel = state_attr('media_player.shield_cast', 'app_name')  %}

       entity_picture_template: >-
          {% set channel = state_attr('media_player.shield_cast', 'app_name')  %}
          {% set path = "/local/pics/" %}
          {% set ext = ".svg"%}
          {{[path,channel,ext]|join("")}}
It’s truly weird. I definitely refreshed the browser several times. Thanks!
Maybe you can help with a different thing I want to try. I would like to make this dynamic media art the background for a dashboard. I tried creating a theme with card-mod, but no luck. I thought to try with just the static url from my sensor to see if it worked. It did not.
covers:
  card-mod-theme: covers
  card-mod-view: |
    ha-masonry-view {
      background: center / cover no-repeat fixed url("https://is1-ssl.mzstatic.com/image/thumb/Music126/v4/56/7b/7b/567b7bb8-70b8-0205-9473-6af9de2b523a/28599.jpg/3000x3000bb.jpg");
    }
I also set the theme in the raw configuration on my dashboard
views:
  - type: panel
    path: test
    title: Test
    icon: mdi:test-tube
    theme: covers
    cards:
      - type: heading
        heading: New section
Any advice on this? It’s driving me crazy. I saw some older posts where this worked, so maybe somethng fundamentally has changed in HA that makes it impossible? Hope not.
Start with a test theme
test:
  card-mod-theme: test
  card-mod-view-yaml: |
    .: |
      hui-masonry-view, hui-sidebar-view, hui-panel-view,
      masonry-layout, horizontal-layout, vertical-layout {
        background-image: url('https://is1-ssl.mzstatic.com/image/thumb/Music126/v4/56/7b/7b/567b7bb8-70b8-0205-9473-6af9de2b523a/28599.jpg/3000x3000bb.jpg');
      }
This is the thread you want to review
1 Like
Will try this out, thanks! Yeah, I have looked through that thread a bunch. I find it funny that back in 2020 he said the documentation was somewhat lacking. It still is ![]()
Hi everyone
Can someone help me out with helpers.formatTime24h(time)?
I’m trying to change the background color when certain conditions are met, but I cant get the time variable working ![]()
On Github, there are no examples for the helpers unfortunately and also here, I could not find a helper-time example…
On the below example, everything works except the comparison to the time 9:00. I’m assumig its because its a string and therefore, it might not even be possible? I was also trying with 'now().hour' >= 9, but no luck either.
- background-color: >-
        [[[ if ((states[entity.entity_id].attributes.current_position >= 49 &&
        states[entity.entity_id].attributes.current_position <= 51 &&
        states[entity.entity_id].attributes.current_tilt_position >= 49 &&
        states[entity.entity_id].attributes.current_tilt_position <= 51) ||
        (entity.state == "closed" &&
        states[entity.entity_id].attributes.current_tilt_position >= 99 &&
        'helpers.formatTime24h(time)' >= "9:00")) return "orange"; else return
        "" ]]]
Thank you! ![]()
Try the easy way…
- background-color: >
    [[[
      let currentTime = new Date().getHours();
      return currentTime >= 9 ? 'orange' : '';
    ]]]
- background-color: >-
    [[[
      let s = states[entity.entity_id].attributes;
      let state = entity.state;
      let currentTime = new Date().getHours();

      if (
        (
          s.current_position >= 49 && s.current_position <= 51 &&
          s.current_tilt_position >= 49 && s.current_tilt_position <= 51
        ) ||
        (
          state === "closed" &&
          s.current_tilt_position >= 99 &&
          currentTime >= 9
        )
      ) return "orange";
      else return "";
    ]]]
Thank you, your code worked ![]()
I still tried to include “your” Date().getHours() in my initial script, but that does not work either - do you know why?
- background-color: >-
        [[[ if ((states[entity.entity_id].attributes.current_position >= 49 &&
        states[entity.entity_id].attributes.current_position <= 51 &&
        states[entity.entity_id].attributes.current_tilt_position >= 49 &&
        states[entity.entity_id].attributes.current_tilt_position <= 51) ||
        (entity.state == "closed" &&
        states[entity.entity_id].attributes.current_tilt_position >= 99 &&
        'Date().getHours()' >= 9 )) return "orange"; else return
        "" ]]]
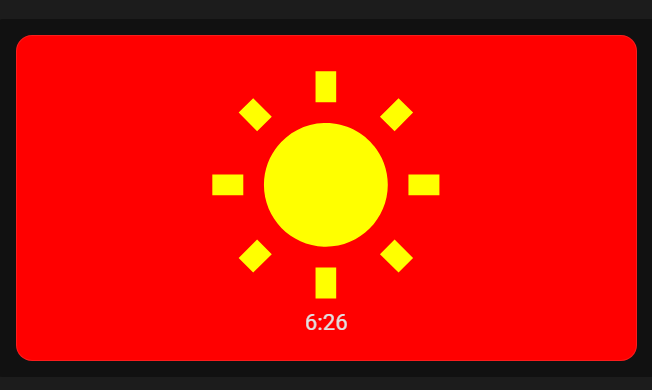
His code is solid
type: custom:button-card
entity: sun.sun
name: |
  [[[
  return( helpers.formatTime24h(states['sun.sun'].attributes.next_rising))
   ]]]
styles:
  card:
    - background-color: >
        [[[ let currentTime = new Date().getHours(); return currentTime >= 9 ?
        'orange' : 'red'; ]]]
  icon:
    - color: >
        [[[
        return( helpers.formatTime24h(states['sun.sun'].attributes.next_rising))
        > 1 ?
        'red' : 'yellow';
           ]]]
It is working, as I stated above. I’m just trying to understand why I cant use Date().getHours() directly, instead it must be put in a variable first, before it can be used with a compare function…?
It is just a more elegant way of writing the code.