Thanks! That looks great. I’ll try to implement that and will report back.
It is another custom component to accumulate time (week/month) faster without database query. In this case the total time each tap is open.
It is not mandatory
Thanks. Could you please tell me where to get it? Googled it, but it doesn’t give any results.
At the same place 
Copy this folder to your place and then try to remove what is not needed
Sorry. My fault. The most obvious was not my first thought. 
I guess I’m making progress, but i have no clue what value to enter here:
m_temp_celsius: 26 #fill from here https://www.holiday-weather.com/[your location]/averages/
m_temp_hours: 12 #fill from here https://www.holiday-weather.com/[your location]/averages/
If i enter VIENNA for example, it give 19C for July and -1C for January. Same goes for sunshing which is 2h in January and 9h on July. Should i sum up all monthes and divide by 12? Or take the hottest only? Or …
Did i mention that i totally LOVE that component and i really appreciate your work and your effort of posting it here!!
Btw: I’m also struggeling with the automation stuff. I saw you’re using appdaemon and apps. I don’t use appdaemon at all. So how can i still use the automation stuff - as far as i understand it that’s the BRAIN behind all of it?!
You should take the August average day temperatures (the hottest for Vienna and Israel) - in your case it is 26 and 11 hours of day light. It is used to calculate the maximum evaporation.
The total week time of irrigation (automation yaml) should match this period of time (August) - in my case for p2 it is 60 min in August.
If you already have a working AppDaemon, it shouldn’t be a problem to copy the automation code and YAML and make it work.
Let me know what does not work you
Since so many things have changed from my initial configuration post, from July 2017 Garden Irrigation I thought I’d post an update for those who want to configure their irrigation timers.
Significant changes affected:
- Front end with the intruduction of Lovelace UI
- New
input_datetimecomponent - WUnderground that I updated to DarkSky
Withput much further ado here is the final look of the timer component in the standard view

and in a config view, after clicking the Config Timer button.
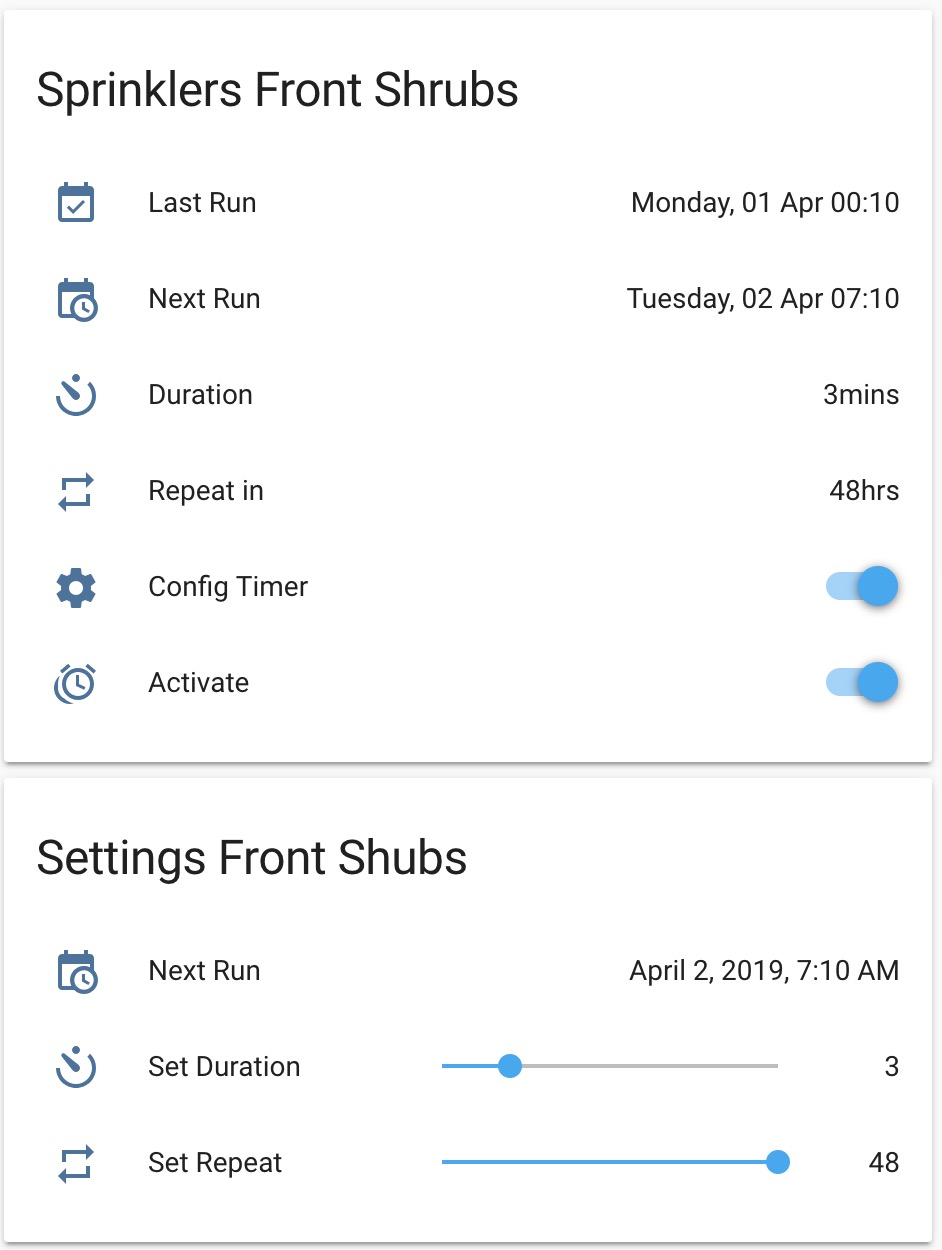
clicking on Next Run opens up a modal view of the input_datetime component, such as this

For the UI, I’m using Lovelace yaml config.
configuration.yaml
lovelace:
  mode: yaml
ui-lovelace.yaml
title: Home
views:
  - type: vertical-stack
    cards:
    - type: entities
      title: Sprinklers Front Shrubs
      show_header_toggle: false
      entities:
        - sensor.last_run_front_shrubs
        - sensor.next_run_front_shrubs
        - sensor.duration_front_shrubs
        - sensor.repeat_front_shrubs
        - input_boolean.config_front_shrubs
        - automation.activate_front_shrubs_timer
  - type: conditional
    conditions:
      - entity: input_boolean.config_front_shrubs
        state: "on"
    card:
      type: entities
      title: Settings Front Shubs
      show_header_toggle: false
      entities:
        - input_datetime.next_run_front_shrubs
        - input_number.duration_front_shrubs
        - input_number.repeat_front_shrubs
There are a few sensor components that are not strictly needed. But I prefer to have a non-editable sensors on the day-to-day view screens, showing the next run and last run, rather than exposing their input_datetime and input_number components. These sensors purely mirror their editable counterparts.
and this is the config for these sensors (please note they need to be indented under a sensor component)
configuration.yaml
- platform: template
    sensors:
## Front Shrubs
      next_run_front_shrubs_time:
        value_template: '{{as_timestamp(states.input_datetime.next_run_front_shrubs.state) | timestamp_custom("%H:%M")}}'
        friendly_name: "Time"
      next_run_front_shrubs:
        friendly_name: "Next Run"
        value_template: '{{as_timestamp(states.input_datetime.next_run_front_shrubs.state) | timestamp_custom("%A, %d %h %H:%M")}}'
      last_run_front_shrubs:
        friendly_name: "Next Run"
        value_template: '{{as_timestamp(states.input_datetime.last_run_front_shrubs.state) | timestamp_custom("%A, %d %h %H:%M")}}'
      time_delta_front_shrubs:
        friendly_name: "Front Shrubs Timedelta"
        value_template: '{{states.input_number.repeat_front_shrubs.state|int * 3600}}'
      duration_front_shrubs:
        value_template: '{{states.input_number.duration_front_shrubs.state | int}}mins'
        friendly_name: "Duration"
      repeat_front_shrubs:
        value_template: '{{ "{:02d}".format(states.input_number.repeat_front_shrubs.state|int)}}hrs'
        friendly_name: "Repeat in"
For completeness here are input_number components that I keep in
input_numbers/front_shrubs.yaml
duration_front_shrubs:
  name: "Set Duration"
  initial: 3
  min: 0
  max: 15
  step: 1
  icon: mdi:camera-timer
repeat_front_shrubs:
  name: "Set Repeat"
  initial: 48
  min: 0
  max: 48
  icon: mdi:repeat
And the new input_datetime components.
input_datetime/front_shrubs.yaml
next_run_front_shrubs:
  name: Next Run
  has_date: true
  has_time: true
last_run_front_shrubs:
  name: Last Run
  has_date: true
  has_time: true
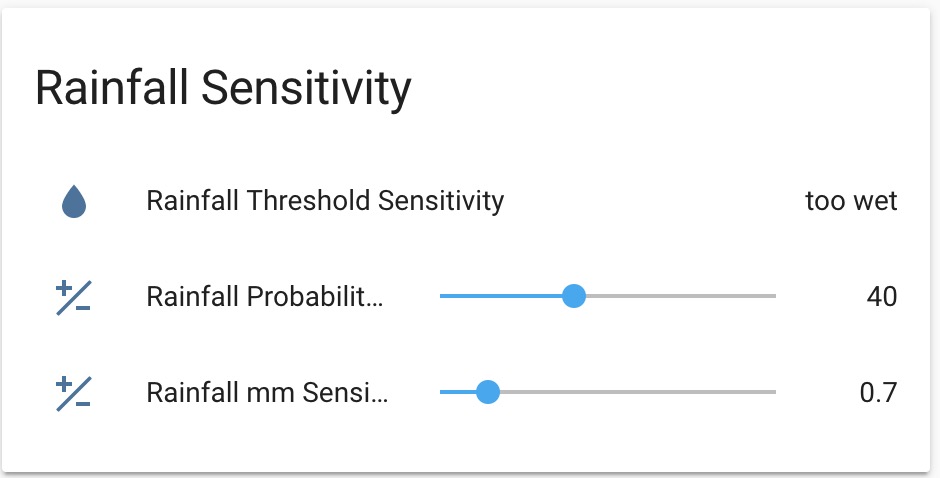
There’s one more sensor that I use to modify wet or dry condition that will show later in automation. It takes rain probability and rain intensity from DarkSky and allows me to override it. Setting hard values has not worked for me, as sun intensity after a brief shower dried up the ground quickly, yet my sensor was still in “too wet” condition. So I can manually tweak it, so on the next scheduled irrigation, that can be on the same day the irrigation does kick in.
The view is:
UI code in ui-lovelace.yaml
- type: entities
  title: Rainfall Sensitivity
  show_header_toggle: false
  entities:
    - sensor.rain_sensor
    - input_number.dark_sky_precip_probability_sensitivity
    - input_number.dark_sky_precip_intensity_sensitivity
The code for the logic (I’m not showing the darksky component)
input_number:
  dark_sky_precip_intensity_sensitivity:
    name: "Rainfall mm Sensitivity"
    initial: 0.1
    min: 0
    max: 5
    step: 0.1
    icon: mdi:contrast
  dark_sky_precip_probability_sensitivity:
    name: "Rainfall Probability Sensitivity"
    initial: 40
    min: 0
    max: 100
    step: 10
    icon: mdi:contrast

sensor:
  - platform: template
      sensors:
        rain_sensor:
          friendly_name: "Rainfall Threshold Sensitivity"
          value_template: >-
            {% if (states.sensor.dark_sky_precip_probability.state | float) <= (states.input_number.dark_sky_precip_probability_sensitivity.state | float) and (states.sensor.dark_sky_precip_intensity_0.state | float) <= (states.input_number.dark_sky_precip_intensity_sensitivity.state | float) %}
              dry
            {% else %}
              too wet
            {% endif %}
Automations and scripts.
In automation we are converting all values to timestamps, so we can calculate future, past or equality conditions. This part is quite tricky, as there’s very strict requirement for the values to be in a particular format. Please see https://www.home-assistant.io/components/input_datetime/ for details. Also very good article that covers datetime calculations is at The EPIC Time Conversion and Manipulation Thread!
automation:
  - alias: "Activate Front Shrubs Timer"
    trigger:
      - platform: time_pattern
        minutes: '/1'
    condition:
      condition: and
      conditions:
      - condition: template
        value_template: '{{as_timestamp(now().strftime("%Y-%m-%d %H:%M")) == as_timestamp(states.input_datetime.next_run_front_shrubs.state)}}'
      - condition: state
        entity_id: sensor.rain_sensor
        state: 'dry'
    action:
      - service: script.turn_on
        entity_id: script.activate_irrigation_front_shrubs


  - alias: "Extend Front Shrubs Timer When Wet"
    trigger:
      - platform: time_pattern
        minutes: '/1'
    condition:
      condition: or
      conditions:
        - condition: template
          value_template: '{{as_timestamp(now().strftime("%Y-%m-%d %H:%M")) > as_timestamp(states.input_datetime.next_run_front_shrubs.state)}}'
        - condition: and
          conditions:
            - condition: template
              value_template: '{{as_timestamp(now().strftime("%Y-%m-%d %H:%M")) == as_timestamp(states.input_datetime.next_run_front_shrubs.state)}}'
            - condition: state
              entity_id: sensor.rain_sensor
              state: 'too wet'
    action:
      - service: script.turn_on
        entity_id: script.update_front_shrubs_next_run_timer
And lastly my script part.
script:
  activate_irrigation_front_shrubs:
    alias: "Activate Irrigation Front Shrubs"
    sequence:
      - service: script.turn_on
        entity_id: script.update_front_shrubs_next_run_timer
      - service: script.turn_on
        entity_id: script.update_front_shrubs_last_run_timer
      - service: switch.turn_on
        entity_id: switch.front_shrubs_switch
      - delay:
          minutes: "{{ (states.input_number.duration_front_shrubs.state | int) }}"
      - service: switch.turn_off
        entity_id: switch.front_shrubs_switch

  update_front_shrubs_next_run_timer:
    alias: "Update Front Shrubs Next Run Timer"
    sequence:
    - service: input_datetime.set_datetime
      entity_id: input_datetime.next_run_front_shrubs
      data_template:
        date: >
          {{(as_timestamp(now())+(states.sensor.time_delta_front_shrubs.state)|int) | timestamp_custom("%Y-%m-%d", true)}}
        time: >
          {{(as_timestamp(now())+(states.sensor.time_delta_front_shrubs.state)|int) | timestamp_custom("%H:%M:%S", true)}}

  update_front_shrubs_last_run_timer:
    alias: "Update Front Shrubs Last Run Timer"
    sequence:
    - service: input_datetime.set_datetime
      entity_id: input_datetime.last_run_front_shrubs
      data_template:
        date: >
          {{(as_timestamp(now())) | timestamp_custom("%Y-%m-%d", true)}}
        time: >
          {{(as_timestamp(now())) | timestamp_custom("%H:%M:%S", true)}}
That should be about all that’s to it. As it stands it should work for you.
I’m still hoping to work on the scripts to pass variables programatically, as I have about eight irrigation timers and don’t wish to have eight copies of near duplicate code.
If you copy and paste, please make sure you have your indentations right depending how you keep your components separated or not. Indentations tend to be the most common problem when the logs are full of errors.
Any questions, please ask.
8 Likes
Am just in the process of redoing my garden and patios, and am planning on adding some raised beds for herbs/vegetables. I have read this thread with interest, as I would like to create a smart irrigation system for the beds.
Current thoughts based on reading:
An ezyvalve 4 valve box: https://www.easygardenirrigation.co.uk/products/ezyvalve-4-solenoid-valve-box-24v - with 24v AC power supply.
Sonoff 4Ch Pro to control the solenoids.
A drip irrigation system (I have some old hozelok kit that I can add to).
Miflora moisture sensors to prevent irrigation when the soil is wet.
One thing that I am stuck with, is that I would like to be able to switch between different water sources. I have a number of large water butts that I would like to use out of preference, only switching to tap water when they are empty. Sensing empty/full can be achieved with a simple water or moisture sensor. In terms of controlling inflow, I am guessing that it is not possible to reverse one of the Ezyvalve 4s to control 4 inputs to one output? Otherwise I would need a valve for each water source?
Thanks for sharing!
Is this last post complete, or is a modification of another post?
I tried to find another post from you in this thread, but I haven’t found.
This is exactly what I have done, see here - My Garden Irrigation. I even got mine from that exact supplier and I found them very helpful.
As for using an Ezyvalve box in reverse, I can’t see why you couldn’t do that, unless of course the internals won’t like the water flowing through it in reverse???
Looks great! As per the other thread, using a 4Ch pro means I will only need a single 24v AC transformer as the relays are isolated from the mains side.
I think reversing depends on the valve type. The rainbird ones that I have seen would definitely not work in reverse - see https://www.youtube.com/watch?v=5rokXHhxRSw
Would be good if anyone has any experience?
It is a complete setup for times, as mentioned in my intro. My original post is from July 2017. Over here I describe the timers first Garden Irrigation
For clarity I use irrigation boards based on the Wemos D1 mini, as per my post from Jul’17 Garden Irrigation . Messaging with the board is via MQTT. But that is immaterial to the timer setup, as you simply call switch.turn_on and switch.turn_off on the entity_id of your device. So, the timer is universally applicable.
If you see my initial post I was using a lot of input_number sliders for hour and minute settings. The input_datetime component makes this heck easier. Hope it helps.
Ok, thanks, this is for one sprinkler, then I have to duplicate it since I have four sprinkler, right?
I will try to use it and move the automation/script in NodeRed.
I hope to have some spare time to do it…
Thanks!
Yep. That’s why I mention generalising some scripts and passing variables to them in future versions.
So I recently bought my first house, and of course slowly making it a smart home. Anyway the house was built in 2003, and came with a Hunter Pro-C sprinkler system, and after talking to the orginal owner it was only used for one year then they never used it again that was 7/8 years ago - mainly because of the water rates in my town… (I’m single and live by myself, take showers do landry/dishes and my bill is around $60 USD a month.)
Anyway i after looking at this thread, i got the idea to modify the existing system so that it can work with Home Assistant. Anyone have any suggestions on how I might do this?
thanks.
hi
can you share /config/configuration.yaml ?
I have error when check config
    Invalid config for [automation]: required key not provided @ data['action']. Got None
required key not provided @ data['trigger']. Got None. (See ?, line ?). Please check the docs at https://home-assistant.io/components/automation/Hey Mate, do you use this with lovelace? and do you somehow call the entire retic.yaml file or do you split it out into different yaml files (ie. switch, automation etc.)
Still a bit of a newb at this
Cheers,
Cam
I do use Lovelace. The retic.yaml is a package, saved under config/packages which gets called in the config.yaml as packages: or something similar. I’m away at the moment so can’t post the code but will update with a new reply in a few days for you. The retic.yaml has all components within it, such as sensor: switch: automation: etc. Look up packages in the HA docs, they are definitely the best way to keep all of your code nicely organised
Ahhh, I see yeah that makes more sense, I am still getting weird errors though:
in “/config/packages/reticulation.yaml”, line 14, column 1 expected <block end>, but found ‘<block mapping start>’
might wait until you get back
Cam