Gas meter from Xiaomi/Aqara door sensor (ZigBee)

Check my initial post and stop the meter in the constant impuls state and try to find the position of the sensor, your meter has the marking 1 imp / 10dm3, witch means the second red number is the one that is sending the impulse.

Thankyou. I’ve tried stopping it as close as possible before and after 0 as pictured.

I’ve also tried taping the sensor in various locations and just running the gas to find anything. So far no pulses detected except with me manually using a magnet to ensure it works in the location network-wise.

Am I incorrect to assume the wheel at the bottom is what I’m meant to be detecting? Or is there actually a signal that gets transmitted only at the right time?

Edit I’m not opposed to drilling through the bottom of that’s going to work. i.e if the plastic is too thick?

As in the first post, the last number must be between 9 and 0, not exactly at 9 or 0.
The meter has an magnet so no fancy anything, if it has the impulse check meter instructions for the position of the original sensor. The magnet is closest to the original area when last digit is 9-0, that is the best time to detect his magnetic field.
Someone on the forum reported that his meter had a faulty magnet and the gas company replaced the meter with the same model and it worked after.

The manual for the meter says the pulse system is a cyble target. this is the rotating dial below the numbers. it rotates at the same rate at the last red wheel.

image
These Cyble sensors are purchasable but very expensive.

So this isnt using the meter numbers (wheels) at all. If there is a magnet on the second red wheel I’d need to cover the numbers in order to get close to it.

Edit, just saw that the target is non-magnetic so no good looking underneath near that. it’s numbers or bust

From your information the meter has a different type of registering the pulse, not using a magnet. You can use a hall sensor and ESP board to figure out a way, but will not be easy as the Aquara sensor.

1 Like

Hi again, although I have a working Gas Meter sensor that is feeding my energy dashboard it’s not calculating the cost in the dashboard. I’m not sure whether it’s an issue with the dashboard, the sensor of the rate but I have the following in HA:
IN developers templats:

daily electricity fee:  {{states('sensor.octopus_energy_electricity_current_rate') | float(0)}}
current gas rate: {{states('sensor.octopus_energy_gas_current_rate') | float(0)}}

produces the following output:
image
and in a self built dashboard I see the following using the same current_rate sensor:
image

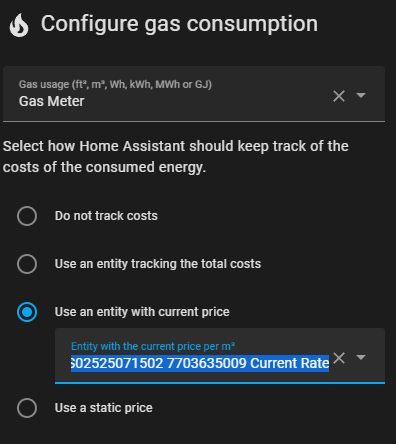
In the energy dashboard I have specified the Gas Meter sensor created as per previous posts and the same current_rate sensor for cost:
image
But I don’t get any calculated cost in the dashboard:

Any advice most welcome or should I take this to another post with regards the Energy Dashboard?

I think I’ve just seen the issue myself, the Gas current rate is in GBP/kWh and the cost field is expecting GBP/m³ so I’ll need to resolve that.

Since the helper text already says “current price per m³”, it’s possible it may just want GBP and it’ll apply the /m³ itself.
Oh, or £!

Thanks for your help. I decided to focus on the water meter instead and have it working immediately using the same method.

I’ll look into purchasing a cyble sensor to get the gas values

So the raw value from the sensor is just a number but it is in fact £/kWh so even if it did use it, which it isn’t, it would be wrong, so I’ll either have to re-calculate it or ignore it.

I had a simialr problem. I am billed for usage in megajoules. A google search revealed 1 m3 = 37 MJ so I just multiplied my charge by 37 to convert it, and changed the units to AUD/m3

Wish there was a way to link up an aqara sensor to a photoresistor to work on my electric meters like this :frowning:

Hi All
I love this project and i do have it working,
I am having issues with the measurement, I am showing ft3 instead of m3 (little 3’s) in the energy page. I have got m3 in my sensors.yaml exactly as the 1st post. (yes I do have a sensors.yaml that is correctly referenced in Configuration.yaml which is also used for my electricity)
Any ideas.

Many thanks

Based on this post and this video I did my Proof of Concept yesterday with a $5 Tuya Zigbee window sensor.

I had to dismount the plastics so that it can be put close enough, and it only works in a very specific diagonal position:
gas meter PoC

Problems (other than the whole thing looking like that!):

  1. When the 0 goes by, it closes/opens/closes/opens, i.e. the magnet is acting twice, duplicating the messages.
  2. Sometimes it sends a flood of messages instead of 4. Not sure why.
  3. These are causing a huge, unacceptable battery hit. But I see I’m not the only one, as many are plugging bigger batteries or even a battery pack.

I was expecting a higher consumption than usually, although not this much.

So, I’m waiting on a separate Reed switch to solder to the board and hoping that it improves.
I will also see if I need to replace the battery with two AA 1.5V to make 3V.

Other than that, it’s working great! Of course with an associated Automation (0.005 instead of 0.01 since it’s duplicated) Number Helper, Template Sensor, adding it to Energy Dashboard.

The alternative was buying the official sensor (a glorified Reed switch within a box designed to fit on my gas meter) to connect it to a Zigbee emitter anyway, but it’s 44€ vs 1€ so it’s a no from me (plus no fun!).

EDIT to add:
Learnt/remembered that a metal plate can block a magnetic field, so I used a small metal plate that I had around to block the lower part of the area, therefore blocking 2 of the 4 events. Now it only works on the top side (so one close, one open) as it should.

I also replaced the battery and it’s staying 100% for now (we’ll see how long). Still waiting on the Reed switch, plus considering connecting it to any Tradfri button/remote, maybe even a Styrbar remote which is not only the same price as the Shortcut button (10€), but uses 2 AAA batteries already, so less tinkering!
I opened them and tested them (based on some videos) and a Reed switch also works there…

2 Likes

Hi and thanks to @mpetcu for the thread. It is working well for me. I just have an issue when I should restard HA or in case of HA being off for a while… All the ticks send are “lost” is there a way to solve this issue… maybe using an esphome (esp32) instead of a door sensor? Has anyone found the solution to this issue ? thx.

That’s exactly what I’ve been thinking about :thinking:

Sadly haven’t been able to find anything about it online and I don’t think a simple photo-resistor in between would do anything on its own as it wouldn’t connect the circuit.

Probably a reason no one’s done it.

Hi, I see a lot of questions about connecting a photo resistor to the Aqara door sensor, is not that hard in theory, but I did not have any application for this so personally did not have the interest.
Here how I will do it:

  • get an 3,3 Arduino module like the one in the photo
  • connect the GND, VCC directly to an 3,6V lifeo4 battery same one that I have connected the Aqara sensor in the first post
  • remove the Reed sensor from the Aqara and connect the D0 from the photoresisor board.
  • the sensitivity of the on/off signal will be ajustabile from the photoresisor board.

If is close to an light source possibly can be adjusted to count signals with the same configuration in HA.
I do not know about the power consumption of the board so battery can be an issue.
Have fun testing this :slight_smile:
Capture-1

2 Likes

I’m struggling with this project.
I’m migrating from iobroker, where i had a similar automation running to track my gas usage. Now i’d like to have it in HA, too.

Is there a working solution for the current version of HA? There are plenty of ways in here, but nothing seems to be working. also, i’m very new to HA!

configuration.yaml:

### Gas meter template from counter
      gas_meter:
        friendly_name: Gas_Meter
        unique_id: gas_meter
        value_template: "{{ states ('counter.gas_counting') | float * 0.01}}"
        unit_of_measurement: "m³"
        icon_template: "mdi:fire"
        device_class: gas

customize.yaml:

sensor.gas_meter:
  #state_class: measurement
  state_class: total_increasing
  last_reset: '2021-08-20T06:43:36.740703+00:00'

automation

alias: Gas Counter
description: ""
trigger:
  - platform: state
    entity_id:
      - binary_sensor.sensor_gas
    from: "off"
    to: "on"
condition: []
action:
  - service: counter.increment
    data: {}
    target:
      entity_id: counter.gas_counting
mode: single

And you must add a helper as Counter

1 Like