Hanwha Q CELLS

First, big thank you to saintmatt81. His post and the link to his GitHub repository was a massive help and I would not have managed without it.

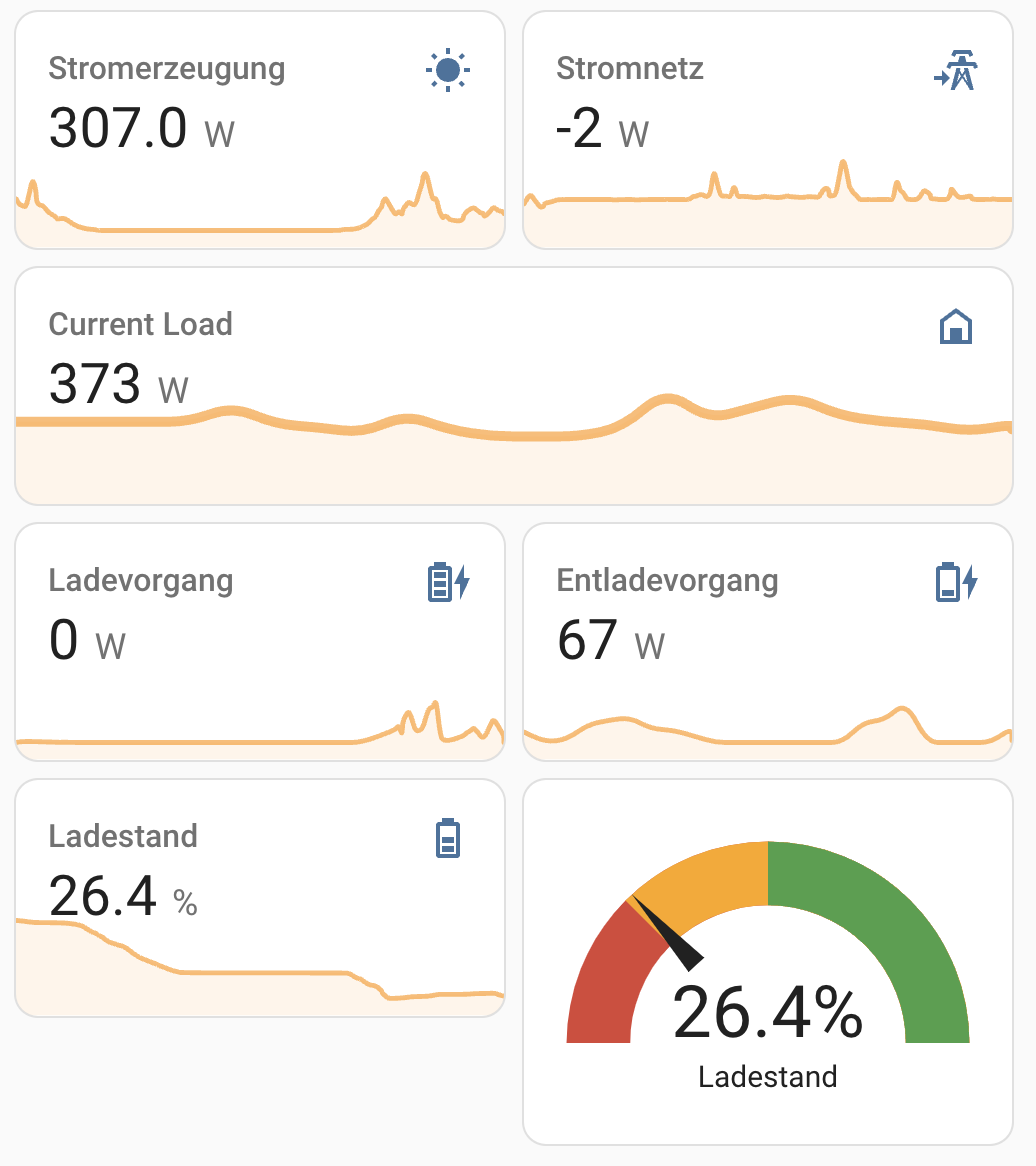
I finally managed to set up everything in Home Assistant :tada: I’m sure it is not the most beautiful or elegant solution - but it works for now. I’m grateful for any kind of feedback or improvements…

Here is what I did:

  1. To get the data with CURL I added in the configuration.yaml:
shell_command:
  run_curl: curl -X POST "https://<local_ip>:7000/login" -d "name=Login" -d 'pswd=<password>' -k -v -c /config/cookiejar.txt && curl -k -v -s -b /config/cookiejar.txt https://<local_ip>:7000/system/status/pcssystem -H "Accept:application/json" -o /config/qcells.json

This writes the data to a file called qcells.json in the /config/ folder.

  1. Also in the configuration.yaml I added an automation to trigger the CURL every second:
automation:
  - alias: 'Run curl every 1 seconds'
    trigger:
      platform: time_pattern
      seconds: '/1'  # This runs every 1 seconds
    action:
      service: shell_command.run_curl
  1. To make the file accessible for the file integration I also added this to the configuration.yaml:
homeassistant:
  allowlist_external_dirs:
    - /config
  1. I used the file integration to set up a bunch of sensors that read the json file:

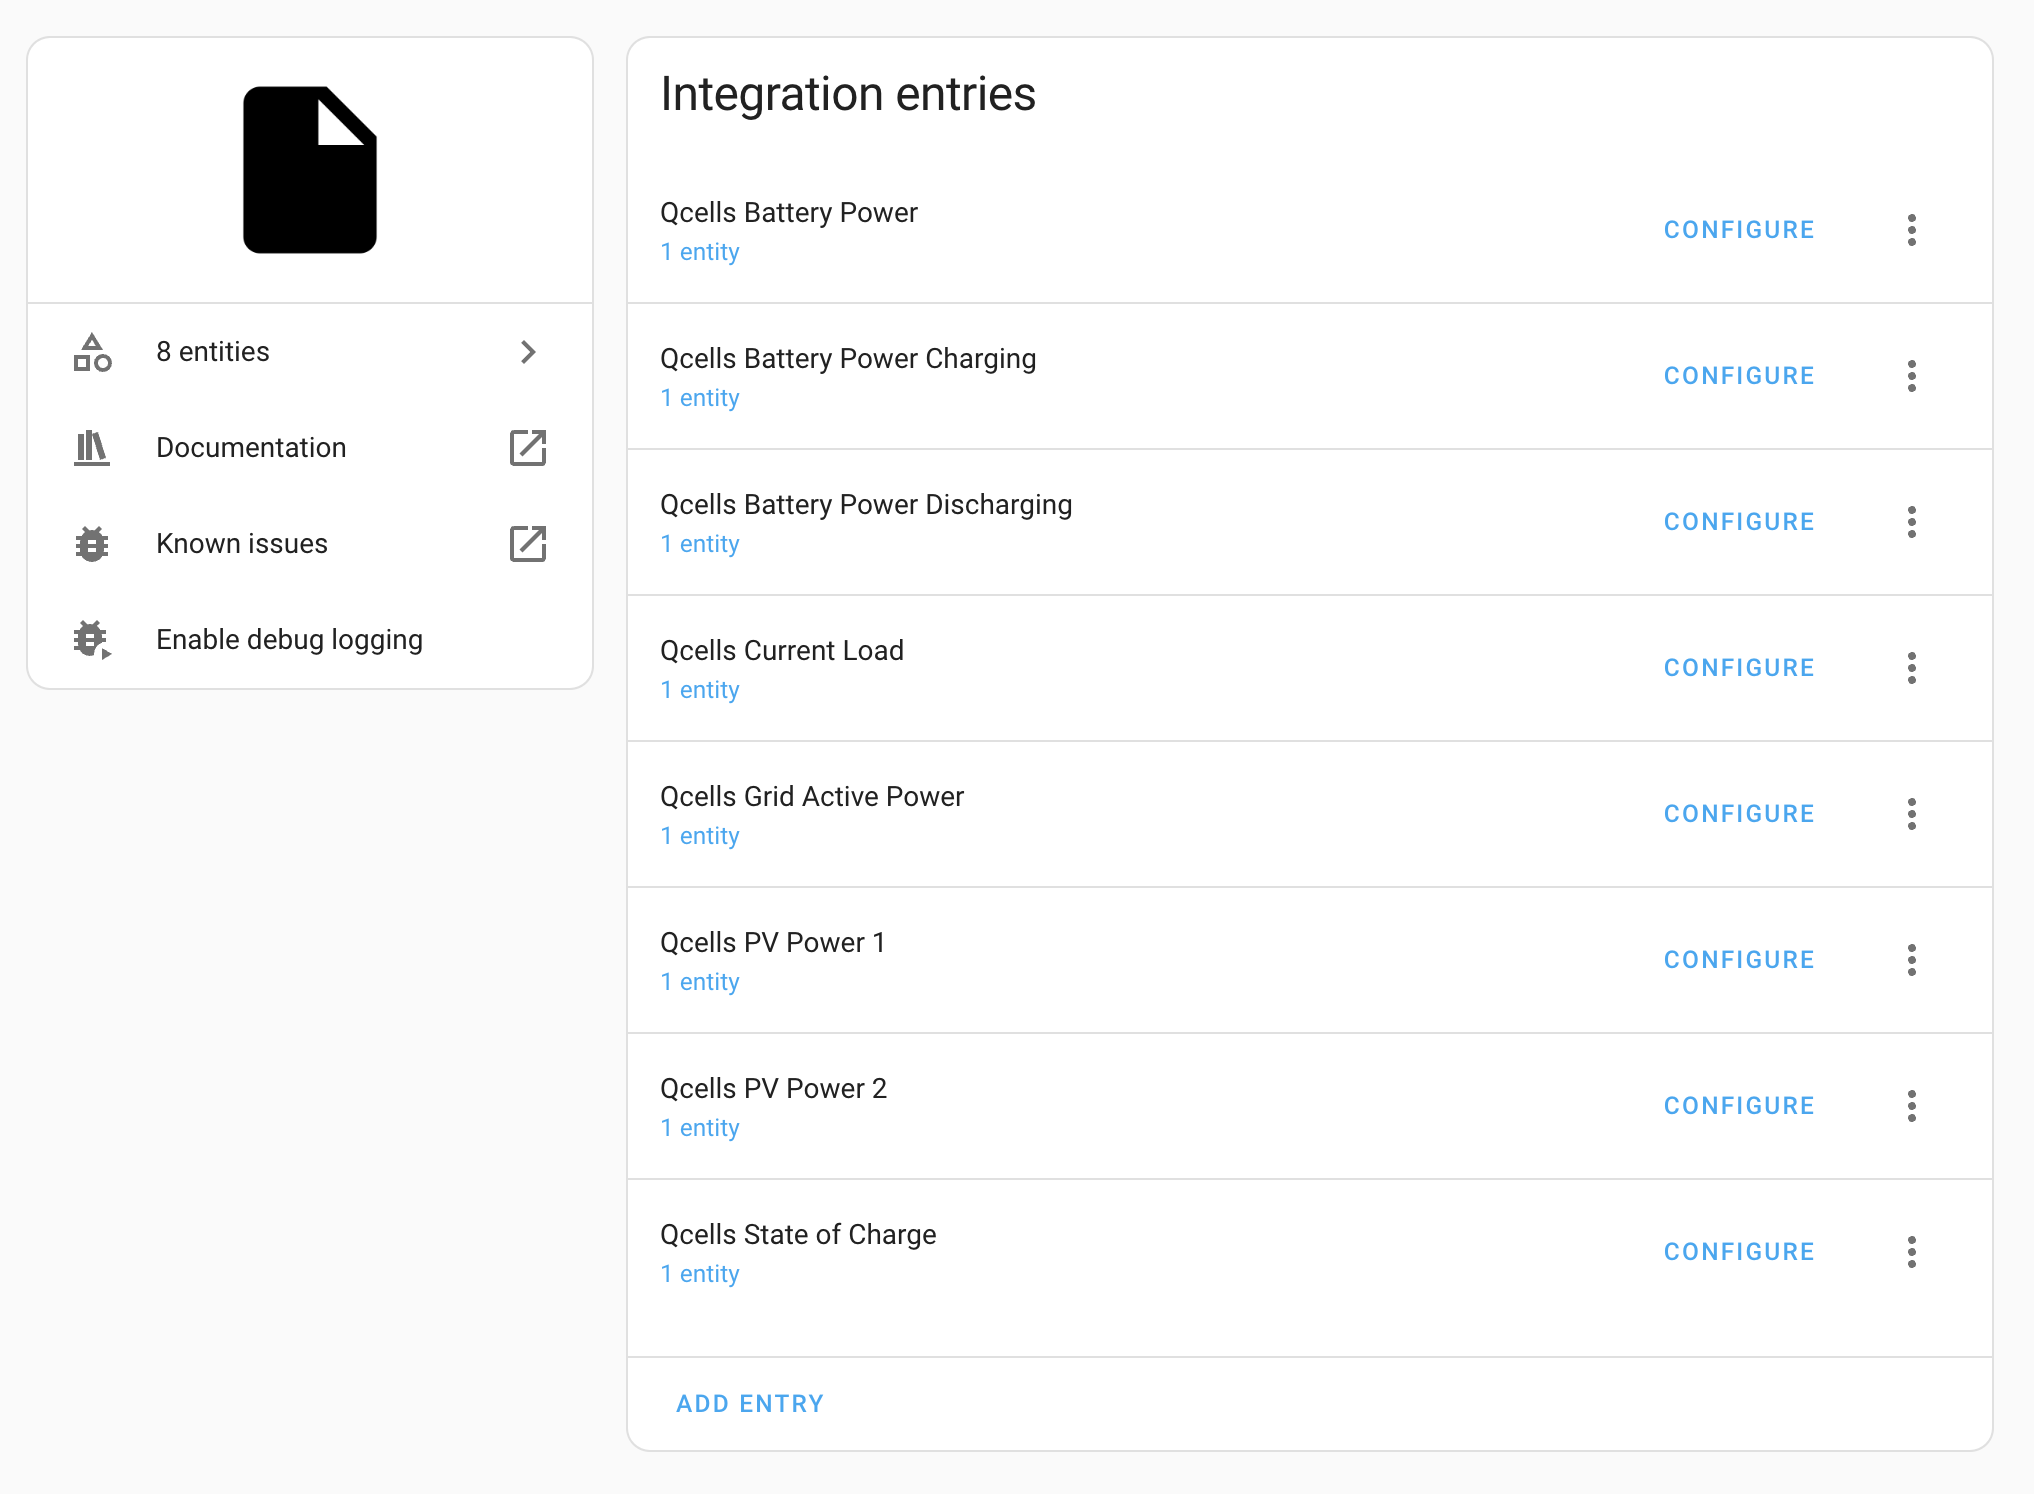
Here are the value templates I used:

  • Qcells Battery Power: {{ value_json.ess_all.inverter_info.bdc.power }}
  • Qcells Battery Power Charging: {{ [value_json.ess_all.inverter_info.bdc.power, 0] | min | abs }}
  • Qcells Battery Power Discharging: {{ [value_json.ess_all.inverter_info.bdc.power, 0] | max }}
  • Qcells Current Load: {{ value_json.ess_all.inverter_info.bdc.power + value_json.meter_info.grid_active_power + value_json.ess_all.pv_info.power.0 + value_json.ess_all.pv_info.power.1 }}
  • Qcells Grid Active Power {{ value_json.meter_info.grid_active_power }}
  • Qcells PV Power 1 {{ value_json.ess_all.pv_info.power.0 }}
  • Qcells PV Power 2 {{ value_json.ess_all.pv_info.power.1 }}
  • Qcells State of Charge {{ value_json.current_avg_soc }}

For all the sensors I turned off the ā€œpolling for changesā€ because it would update the sensor only every minute and I wanted a shorter interval (1 second). You can do that by clicking on the 3 dots next to the sensor name and then select ā€œsystem optionsā€.

  1. To have the sensors updated every second I added another automation to the configuration.yaml:
    trigger:
      platform: time_pattern
      seconds: '/1'
    action:
      - service: homeassistant.update_entity
        target:
          entity_id: sensor.qcells_grid_active_power
      - service: homeassistant.update_entity
        target:
          entity_id: sensor.qcells_pv_power_1
      - service: homeassistant.update_entity
        target:
          entity_id: sensor.qcells_pv_power_2
      - service: homeassistant.update_entity
        target:
          entity_id: sensor.qcells_state_of_charge
      - service: homeassistant.update_entity
        target:
          entity_id: sensor.qcells_battery_power
      - service: homeassistant.update_entity
        target:
          entity_id: sensor.qcells_battery_power_charging
      - service: homeassistant.update_entity
        target:
          entity_id: sensor.qcells_battery_power_discharging
      - service: homeassistant.update_entity
        target:
          entity_id: sensor.qcells_current_load
  1. I added the new sensors to the Energy Dashboard of Home Assistant:

  1. I build a (very first iteration) of a custom overview:

I hope this description will help a few more people to achieve the integration of Qcells in Home Assistant :crossed_fingers:

(Sorry for the three separate posts, but the forum did not let me post more than one picture in a post, because my account is too new

@feldhuegel

This is really great, Thank you so much.

Have you managed to send commands to the Inverter as well?

I have not tried to send commands to the inverter. At the moment I’m happy just with having the data in home assistant…

I would be too afraid to break things with sending commands :grimacing:

Out of interest: What would be your use case for sending commands?

Hi - a couple of cases really

  1. sometimes we get free electricity from the grid when there is a surplus, so I would like to start charging my battery during these periods.

  2. if my EV starts charging I want to stop discharging my batteries so I use the 7p electric rather than my free electric. (Will make sense with point 3)

  3. I get paid 15p for exporting my electric so every evening when the incoming tarrif becomes 7p I dump my batteries into the grid. HA can now work out at what point I need to stop discharging and start charging in order to be at 100% in the morning when the 7p ends.

I have all the triggers courtesy of an intergration with my energy provider - I just need to send the commands to the inverter. Someone else did it with some py scripts but it was too complicated for me to work out.

@feldhuegel This is fantastic, I’m so glad you’ve been able to use some of what I’ve done to get HA working.

Similar to @im.woodward, I’m really interested in seeing if it could be made to work with programming the inverter too, I have a similar use case where electricity is cheaper to import overnight and to automatically fill the batteries (or not) based on the weather forecast etc. I have that now, but only via my Python script, it’d be much better if it could be done within the HA environment and all the extra bells and whistles that brings.

@saintmatt81 - I think HA can run Py scripts, so if you write a script to change the inverter between the following Modes

Manual -5000
Manual +5000
Self Consumtion

Then you could trigger the script to run using automations and sensors?

Many thanks to everyone who has made progress on this - got the config that feldhuegel describes working for my system!

A few additional things that I needed to set up/change to get it working with the HA energy dashboard:

  • Changed the interval between calling the curl function to 10s from 1s - I think 1s is a bit unnecessary as it seems the values only update on the inverter every 10 - 15s
  • Added 2 new entries for grid power export and grid power import, following the same template pattern as the battery charging/discharging entries
  • Added integral helper sensors for each of the power entries - the HA energy dashboard requires energy (Watt hour or Wh) data not power (Watt or W) data. These are easy to set up using the add helper function in the devices and services settings menu
  • Added customisation for the integral helper sensors that calculate the energy, the energy dashboard doesn’t like taking in raw integral helper outputs, you have to persuade it that they are increasing energy sensors. Config in configuration.yaml looks like this:
  customize:
    sensor.qcells_battery_energy_charging:
      device_class: energy
      state_class: total_increasing
    sensor.qcells_battery_energy_discharging:
      device_class: energy
      state_class: total_increasing
    sensor.qcells_grid_energy_export:
      device_class: energy
      state_class: total_increasing
    sensor.qcells_grid_energy_import:
      device_class: energy
      state_class: total_increasing
    sensor.qcells_solar_energy:
      device_class: energy
      state_class: total_increasing 

Hi folks - I’m looking to take more control over my QCells system - wondering if you can answer some questions I have…

I’d be tempted to pick up the Home Assistant Green package. I can hook the Home Assistant up to my router as a wired device, but my Q.Home setup is on WiFi, not ethernet. Is this an issue? I’m assuming that as long as it’s on the network that’s fine?

I’m interested in having more dynamic control of the battery - is it possible for me to poll the battery percentage and adjust things accordingly? i.e. what I’d really like to do is say

if it's between 4-7pm and the battery is above 50% then set to manual mode: +[current PV generation+2000])

Or something to that effect… ultimately I want to discharge the battery to no lower than x% during peak times and find a way to stop battery charging during that time and export all generation to the grid.

Something that I imagine most people with the system would want to do but that there are no options for in q.ommand for some reason.

Hey everyone!

Thanks for all the information so far. As a result of the discussion here, I have started making a QCells integration that can be imported using HACS. I am very new to this - it’s my first attempt ever developing anything for home assistant.

It’s only been about two days since I started work on this so it’s still a big WIP but if anyone would like to use it or take a look then feel free to :slight_smile:
TEJ4321/qcells_ha: Q Cells Home Assistant Integration

I’ll probably work on this more through time but if anyone wants to help out or raise any issues to specifically address, I encourage it

Thanks - this is amazing :slightly_smiling_face:

Hopefully we can build enough knowledge to be able to send commands to the device next :slight_smile:

Hi, all. I know I’m late to the party here, but wondering if anyone has had any success integrating QCells with microinverters? I’ve tried to follow the above thread and the available HACS integration, but it appears to be for a system with a single inverter; however, I have 32 panels, each with a micro-inverter, all of which feed to what QCells calls the ā€œcombinerā€. I’ve identified the IP of the combiner on my network, but unable to log into it.

Appreciate any pointers and apologies in advance if this is a dumb question. Just getting into Home Assistant and coming up the learning curve.

Thanks!

Great piece of detective work. Well done, and many thanks for documenting what you have found.

I’m wondering if you had any need to add more than one instruction to the schedule for the inverter. My use case is:
00:00 Manual +(a number which varies from day to day) ; for 2 hours export
02:00 Manual -5000 (always) ;for 4 hour import as needed
06:00 Self-consumption ; an excess from PV will be exported

[ I get a good export rate for power and a very inexpensive buy rate from 2am-6am ]

So ideally, I would like to edit the first line and change the value as is needed. I’ve tried that using the structure and the example in your code. When I write my new instruction, it appears that the entire array is overwritten and two entries appear:
00:00 Manual (value I wrote)
02:00 Self-consumption (so it is assuming this second task, as I did not specify it.

So I wonder whether I should include an array of entries, (and if so is there something in the entry to tell the inverter which is task 1, task 2 etc., or does the start time fix that ?)

if you cannot help further with this, I’m sure I’ll figure it out, but I am grateful for what you have posted thus far.

Later on: Found the answer.

tou_action and tou_action_weekend are both arrays of variable length; should be 1 for each action.
The action values are 0=no op, 1=Self consumption, 2=manual, 3=Stop charging, 4=stop discharging. So for my use case, I will use {ā€œ2ā€,ā€œ2ā€,ā€œ1ā€} to have two manual sections and 1 self consumption section.

tou_time and tou_time_weekend are also arrays, for the start time of each of the actions. So in my case they will be {ā€œ0:00ā€,ā€œ02:00ā€,ā€œ06:00ā€}

tou_inverter_ref and tou_inverter_ref_weekend are the values for the actions. In the case of a manual action you need to specify a value (+ to discharge, - to charge from grid). you must pad this array with 0 for any action that does not call for a value. So in my case I might use {ā€œ5000ā€,ā€œ-5000ā€,ā€œ0ā€}

For my inverter, I also need to fill four additional properties.
advanced_tou_flag = ā€œ0ā€ I don’t know that this does
pv_connection_type = ā€œ2ā€ Again, don’t know what this does.
tou_info_end_data = ā€œ99990101ā€ This means indefinitely
tou_info_start_date=ā€œ20250818ā€ Today

That’s it and works like a dream. I check the battery level at 23:00 each night. Based on the battery level, I change the time for the discharging to start so that I can export as much as possible but keeping enough to run my house till the import starts.

Thanks for all the info on this page…

I’ve been scouring the forums, both here and Reddit, trying to get my QCells solar data into Home Assistant. Along the way, I stumbled into this…appears to be a QCells Developer Portal under development. As I’ve not seen anyone reference this anywhere else, I wanted to post it here in case folks might find it useful.

The manual, in particular, looks to have a lot of detail, but I just don’t know enough about the programming side to really know how to use it.

QCells Developer Portal

QCells Developer API Manual

Hi there, thanks for sharing your use case. Mine is a bit different, but still similar enough to be interested in how you solved creating the json and posting the json to the inverter within Home Assisstant. Could you share some details about your implementation?

Thanks :slight_smile:

Sure.

This is a bare bones python script to update an inverter. Lots of comments in there in case anyone with just a basic level can understand it.
Obviously the heavy lifting and detective work for this code was done by saintmatt88 above.

#!/usr/bin/python3
# imports
import requests,json,warnings 
from datetime import datetime


# The address 10.0.0.17 is just an example ip address for an inverter
# you need to find your own inverters address
baseURL  = 'https://10.0.0.17:7000'

# Functional URLs at the inverter
loginURL = baseURL + '/login'
postURL  = baseURL + '/install/device'

# Now create a session for the login attempt below
qcellsSession = requests.Session() 

# suppress warnings about invalid certificate for SSL connection to inverter
# Without this you will see warnings, but the script still works.
warnings.filterwarnings("ignore")

# attempt to login
try:
    # The name login is not a username, so don't change it.
    # The 'yourPassword' needs to match the password for your inverter.
    response = qcellsSession.post(loginURL, data={'name':'Login', 'pswd':'yourPassword'}, verify=False ) 
    response.raise_for_status()
    print('Login successful')
except requests.exceptions.RequestException as e:
    errors = True
    print("Unable to connect to the inverter")
    quit()


# Next set up the schedule as a json  structure.
#
# The actions are defined by qcell as  0=Do nothing,    1=self-consumption, 2=manual (need to specify the power)
#                                      3=stop charging  4=Stop discharging
# The names of the json elements are defined by qcell 
#
sched  = {
            # No need to change these (I don't know what they do
            "advanced_tou_flag": 0,
            "pv_connection_type": "2",
            # So in this example I have two manual actions followed by one self-consumption. You can add more
            "tou_action": [
                "2",
                "2",
                "1"
            ],
            # This is the same as above but for the weekend days
            "tou_action_weekend": [
                "2",
                "2",
                "1"
            ],
            # The schedule is active until this date, with 99990101 having a special meaning: permanently
            "tou_info_end_date": "99990101",
            # The schedul is active from this data.  The format is YYYYMMDD (no dash - or slash /) 
            "tou_info_start_date": datetime.now().strftime('%Y%m%d'),
            # The power associated with each action.  Only manual actions need this, but you must specify for 
            # all actions (so non-manual actions need a zero here).  So in this example, the first
            # value is the power I want to discharge per hour in the first manual action
            # The second value is the power I want to import for the second manual action and the 0 is for self-consumption
            # These are just strings, so you could use a variable here (converted to a string)
            # Notice that its a negative for charging, positive for discharging.
            "tou_inverter_ref": [
                "1500",
                "-5000",
                "0"
            ],
            "tou_inverter_ref_weekend": [
                "2000",
                "-5000",
                "0"
            ],
            # Next is the schedule.  Just the start time for each action.
            # So this example is manual dischaging of 2000W/hour from midnight to 2am
            # Followed by manual charging of 5000W/hour from 2am to 6am.
            # Followed by Self consumption at 6am until midnight.
            "tou_time": [
                "00:00",
                "02:00",
                "06:00"
            ],
            "tou_time_weekend": [
                "00:00",
                "02:00",
                "06:00"
            ]
            }
# So now the json is set up we just need to send it to the inverter.
responseDevice = qcellsSession.post(postURL, json=sched, verify=False)
responseDeviceJson = responseDevice.json()
# The response from the inverter is display. YOU may want to test this for success.
if responseDeviceJson["error_code"]==0:
  print("Update succeeded")

# When finished, close the session.
qcellsSession.close()


Posted the code…