Home Assistant on Zipatile?

I’d be very interested to see any documentation on how this can be achieved. Would you be able to share any notes on how you integrated Zipatiles with Home Assistant?

Hello, i have also an zipatile one on the wall that is doing nothing , can you help us to setup like you use it ? thanks

I found out that you can add an mqtt broker on the zipatile .
Internal MQTT client configuration GUI can be found here:
Zipato Launcher → Zipato Settings → Internal → MQTT Settings
i added the mqtt broker and is connected
but how can i see this now in ha ? ,
added the mqtt integration but do not see anything of the zipatile in it.
i hope someone can lead me in the good direction :slight_smile:

I don’t think the MQTT functionality on the ZipaTile (at least 1st gen) actually works. I have tried different configurations based on the document published by Zipato, but nothing is ever posted to the broker.

In my case, I ended using Node-Red. I created endpoints for each sensor I wanted to monitor, and then created rules on each Zipatile to pass the sensor values to that endpoint. It’s not elegant, but it works well and gives my old Zipatiles some purpose :wink:

indeed , the zipatile does not post anything to th broker.
And no answer from zipato … removed and added tablet , problem solved :slight_smile:

1 Like

I am going to try to explain how to have the information of what happens in Zipatile in Homeassistant, as far as I know, this is only used for the internal sensors of the Zipatile. I’m not an expert, maybe you already know many things that I explain and surely there are many ways to do it in a different and better way, but this is how it works for me:

  1. First you need to have an MQTT broker that “reads” the messages from the Zipatile.
    I use the Broker MQTT addon and the MQTT integration, configured in Home Assistant.

  2. Create a user in Homeassistant to connect to the MQTT Broker.
    Give a name, username and password (which we will use later).

  3. In Zipatile:

a) Open Zipato application and press menu (three lines, top left)

b) Click on “options”

c) Click on “internal”

d) The internal application will open, now click on the menu (three buttons, top right)

e) Select the option “MQTT Settings”

f) Fill in the data to communicate with the MQTT Broker:

username: login of the user created in homeassistant
password: password of the user created in homeassistant
client ID: whatever you want, in my case, I put Zipatile
topic: topic under which the zipatile messages will be published in MQTT
host: IP and port of the MQTT broker

… finally, press “CONNECT”


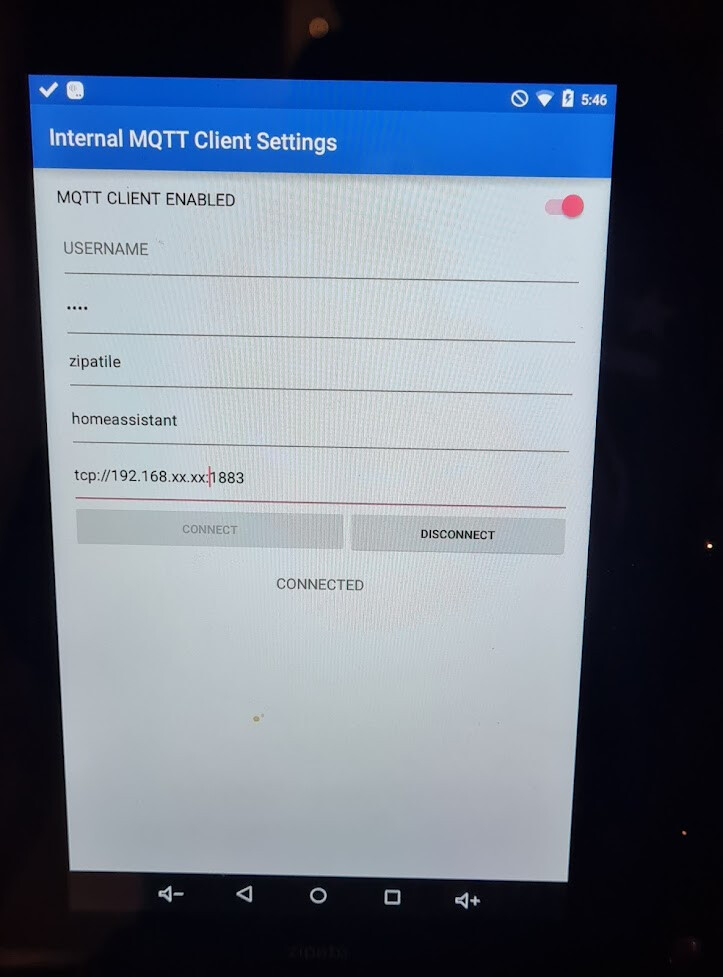
** If so far everything has gone ok, on the Zipatile screen we will see “CONNECTED”.
.
4. Now, we can verify that Home Assistant “reads” the messages from the Zipatile, for this:

a) Go to Configuration/Integrations/MQTT and press “CONFIGURE”

b) In the “Listen a Topic” section, where it says “Topic to subscribe to”, in my case I indicate “homeassistant/zipato/zipatile/#”, and I see the messages of my Zipatile, if you are not sure about your topic, You can always just type “#” and you will see all the messages that arrive at the MQTT Broker:

  1. View these Zipatile sensors on Homeassistant. I use YAML, for this:

a) Use the addon File editor or Visual Studio Code (I prefer the latter)-

b) Under the “sensor” platform, create the sensors that you are interested in seeing, I put the ones that I use, but this is totally customizable:

sensor:
- platform: mqtt
  unique_id: zipatile_conexion
  name: Zipatile Conexión
  state_topic: "zigbee2mqtt/bridge/state"

- platform: mqtt
  unique_id: zipatile_temperatura
  state_topic: "homeassistant/zipato/zipatile/idyourzipatile/temperature/events"
  name: Temperatura Salón Zipatile
  unit_of_measurement: "°C"
  value_template: "{{value_json['value']}}"

- platform: mqtt
  unique_id: zipatile_pir
  state_topic: "homeassistant/zipato/zipatile/idyourzipatile/motion/events"
  name: Presencia Salón Zipatile
  value_template: "{{value_json['value']}}"
  
- platform: mqtt
  unique_id: zipatile_humedad
  state_topic: "homeassistant/zipato/zipatile/idyourzipatile/humidity/events"
  name: Humedad Salón Zipatile
  unit_of_measurement: "%"
  value_template: "{{value_json['value']}}"

- platform: mqtt
  unique_id: zipatile_luminosidad
  state_topic: "homeassistant/zipato/zipatile/idyourzipatile/light/events"
  name: Luminosidad Salón Zipatile
  unit_of_measurement: "lux"
  value_template: "{{value_json['value']}}"

- platform: mqtt
  unique_id: zipatile_sonido
  state_topic: "homeassistant/zipato/zipatile/idyourzipatile/noise/events"
  name: Sonido Salón Zipatile
  value_template: "{{value_json['value']}}" 

- platform: mqtt
  unique_id: zipatile_rele2
  state_topic: "homeassistant/zipato/zipatile/idyourzipatile/relay2/events"
  name: Zipatile Rele 2
  value_template: "{{value_json['value']}}"

- platform: mqtt
  unique_id: zipatile_rele1
  state_topic: "homeassistant/zipato/zipatile/idyourzipatile/relay1/events"
  name: Zipatile Relé 1
  value_template: "{{value_json['value']}}"

- platform: mqtt
  unique_id: zipatile_power
  state_topic: "homeassistant/zipato/zipatile/idyourzipatile/mains_power/events"
  name: Zipatile Corriente
  value_template: "{{value_json['value']}}"

- platform: mqtt
  unique_id: zipatile_siren
  state_topic: "homeassistant/zipato/zipatile/idyourzipatile/siren/events"
  name: Sirena Salón Zipatile
  value_template: "{{value_json['value']}}"

- platform: mqtt
  unique_id: zipatile_tactil
  state_topic: "homeassistant/zipato/zipatile/idyourzipatile/touch_events/events"
  name: Pantalla Táctil Salón Zipatile
  value_template: "{{value_json['value']}}"
  1. Restart Homeassistant and enjoy the new possibilities of seeing this information and using it in automations, Node-red or whatever comes to mind!

Hopefully it will serve as many people as it has served me. Enjoy it and Happy New Year!

3 Likes

My Zipatile is also of the 1st gen, but I no longer use the Zipato platform, in my case it was very unstable and it had failed me a lot, now I use Homeassistant, and I take advantage of the Zipatile sensors.

To give more use to my Zipatile, I tried to install the Home Assistant application but (in my case) it was incompatible because google services are missing.

So I spent a few months using home assistant in my zipatile from the internet browser that is installed in the Zipatile. This was a good solution and I set up a couple of good Lovelace. But I have finally found a more attractive and faster solution that works better for me. It is the Homehabit app

1 Like

Thanks very much for these instructions! I will give it another try and see if have better luck this time.

I also had a lot of success using HomeHabit (I shared my project here) Too bad we are limited to the free version as the premium paid version requires google Play store, which cannot be installed on the Zipatiles.

1 Like

I’m sorry it took so long to respond, I hope it helps you. I am delighted to be able to help someone in this community who helps me so much.

I’m also looking for a way out of the free version, but at the moment I can’t find the solution either.

Yesterday I shared how to create Zipatile MQTT sensors in Homeassistant.

Now I share how to create and control a Zipatile MQTT switch in Homeassistant:

# Example configuration.yaml entry
switch:
- platform: mqtt
  unique_id: zipatile_relay1
  name: "Relé 1 Zipatile"
  state_topic: "homeassistant/zipato/zipatile/idyourzipatile/relay1/events"
  value_template: "{{value_json['value']}}"
  command_topic: "homeassistant/zipato/zipatile/idyourzipatile/relay1/commands"
  payload_on: '{"command": "SET_STATE","value": "ON"}'
  payload_off: '{"command": "SET_STATE","value": "OFF"}'
  state_on: 'ON'
  state_off: 'OFF'
  optimistic: false
  qos: 0
  retain: true

And another exemple of integration the motion sensor of our Zipatile in Homeassistant like a binary sensor:

# Example configuration.yaml entry
binary_sensor:
- platform: mqtt
  unique_id: zipatile_motion
  name: Presencia Salón Zipatile
  device_class: motion
  state_topic: "homeassistant/zipato/zipatile/idyourzipatile/motion/events"
  value_template: "{{value_json['value']}}"
  payload_on: 'MOTION'
  payload_off: 'NO MOTION'
  optimistic: false
  qos: 0
  retain: true

Maybe you can convince @igorz (the developer) of HomeHabit to implement off-PlayStore licensing :slight_smile: It would be great to have more than 3 dashboard pages, and I would certainly be willing to pay for that license, as so far HomeHabit has been super stable on the Zipatiles.

I would also be willing to pay very gladly :star_struck:

Thanks for your work for the community. I was also able to integrate Zipatile2 sensors into HA by this way and I’m keen on to go further and mqtt publish to Zipatile (RGB, Siren) but it does not work for me. Someone know the way how to do it?

horvathgergo

2 d

Thanks for your work for the community. I was also able to integrate Zipatile2 sensors into HA by this way and I’m keen on to go further and mqtt publish to Zipatile (RGB, Siren) but it does not work for me. Someone know the way how to do it?
Hi! I’m glad it was helpful.

I also want to have control of Zipatile’s siren in Home-assistant. I would like to have an input-select to choose the sound and a switch to turn it on/off. But so far my progress is this:

# Example configuration.yaml entry
- platform: mqtt
  unique_id: zipatile_siren_select
  name: "Sonido Sirena Zipatile"
  state_topic: "homeassistant/zipato/zipatile/idyourzipatile/siren/events"
  value_template: "{{value_json['value']}}"
  command_topic: "homeassistant/zipato/zipatile/idyourzipatile/siren/commands"
  options:
    - '{"command":"SET_STATE","value":"STOP_SOUND"}'
    - '{"command":"SET_STATE","value":"EMERGENCY"}'
    - '{"command":"SET_STATE","value":"FIRE_ALERT"}'
    - '{"command":"SET_STATE","value":"AMBULANCE"}'
    - '{"command":"SET_STATE","value":"POLICE_CAR"}'
    - '{"command":"SET_STATE","value":"DOOR_CHIME"}'
    - '{"command":"SET_STATE","value":"BEEP"}'
#  optimistic: false
#  qos: 0
#  retain: true

This creates an input-select, which when chosen, activates the sound in the Zipatile, it works very well and fast, but isn’t very pretty, hehe.

I hope someone else can think of how to improve it…

1 Like

If anyone is of any help, Zipato posted a pdf with most of the options and examples of handling and watching the Zipatile from an MQTT server.

Are you sure it’s working? With your code example I got a configuration error message: “Invalid config for [input_select]: expected dictionary for dictionary value @ data[‘input_select’]”

Ups sorry! Is a select. I forgot that I work with packages and I have the platform line in another file. The first line was missing with a select. It would look like this:

# Example configuration.yaml entry
select:
- platform: mqtt
  unique_id: zipatile_siren_select
  name: "Sonido Sirena Zipatile"
  state_topic: "homeassistant/zipato/zipatile/idyourzipatile/siren/events"
  value_template: "{{value_json['value']}}"
  command_topic: "homeassistant/zipato/zipatile/idyourzipatile/siren/commands"
  options:
    - '{"command":"SET_STATE","value":"STOP_SOUND"}'
    - '{"command":"SET_STATE","value":"EMERGENCY"}'
    - '{"command":"SET_STATE","value":"FIRE_ALERT"}'
    - '{"command":"SET_STATE","value":"AMBULANCE"}'
    - '{"command":"SET_STATE","value":"POLICE_CAR"}'
    - '{"command":"SET_STATE","value":"DOOR_CHIME"}'
    - '{"command":"SET_STATE","value":"BEEP"}'
#  optimistic: false
#  qos: 0
#  retain: true

This is how it works for me, try it and tell me if you need help :wink:

Thanks for the clarification! The config is ok now. It creates a select entity for me, but unfortunately I don’t hear any sound from the Zipatile when I choose and option on the lovelace UI.

image

I listened the siren mqtt topic and found that the siren events in my Zipatile2 are marked as numbers (like BEEP is equal to “6” in my case), so I gave it a go. Unfortunately nothing happened

Listening to siren events (when I manually push the BEEP siren button on internal app):

1 Like