You can’t tie like that. You would use the input_boolean as a condition in the other automations so the motions sensor still triggers but then the condition looks at the input_boolean and if true it runs the actions (or vice versa).
Another option is of course to also disable the motion sensor entity but typically that’s not what is wanted.
If you disable the motion sensor, you disable it for everything else as well - for example, mine turn the lights on and off, but they’re also part of the security system.
Use trigger_id ie Motion for motion detected & Manual On for swithced on etc.
Then use an input_binary helper to indicate lighting mode. Then use it as a condition to inhibit/allow the motion action.
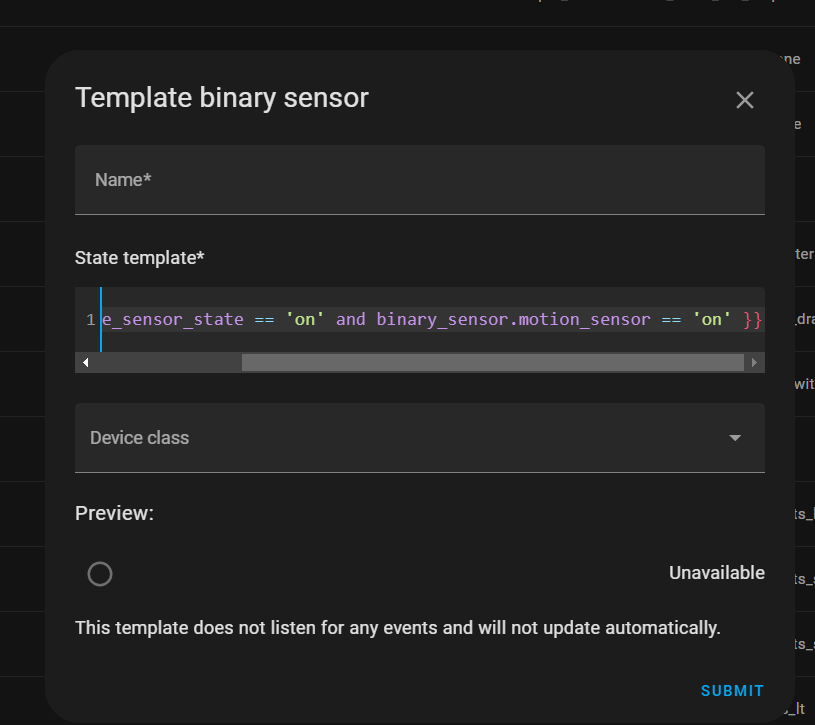
personally, i wouldn’t take the approach of doing a check in each automation. for good programming hygiene, i think it’s best to centralize logic. don’t duplicate when possible. so i’d create a helper template sensor with this:
{{ input_boolean.use_sensor_state == 'on' and binary_sensor.motion_sensor == 'on' }}
Thanks very much for helping with this everyone! I will be looking through these in the next few hours after I am finished with some work related stuff. Looks like there are a lot of ways to do this.
I basically went with scan NFC tag to change the state of the input_boolean variable. Then any automations I run will either check against it as a condition, or will turn this input_boolean state on or off depending on what I need. Have tested it and it does work. Many thanks!
FWIW: Every answer here was the solution. Thank you all.
you’ll appreciate centrailizing the logic if at some point in the future, you decide to change the logic of it… then you can go to one place to make the change.
Im doing it now while I still dont have too much going on. When using this, do I need to change the code snippet from 'binary_sensor.motion_sensor` to what I use? If so, then it seems I would need a lot of these lol. I guess I am unsure of how to use it against any motion sensor. Before you answer, let me test for a few. I cant imagine this being too difficult. I just need to logically think it through
when you said “it”, you mean the input_boolean? for all of the solutions, you have to have your automation turn the input_boolean on/off. i think we all presumed you had done that?
in this case, when you say “it” what do you mean?
wrt {{ input_boolean.use_sensor_state == ‘on’ and binary_sensor.motion_sensor == ‘on’ }}
the boolean template sensor lets you specify an expression. and the sensor will be the value of that expression.
so this template sensor’s boolean value will be the evaluation of: {{ input_boolean.use_sensor_state == ‘on’ and binary_sensor.motion_sensor == ‘on’ }}
if you think about it… you want this sensor to be “true” if the helper boolean is “on” and if the binary_sensor (real sensor) is also on. right? ie, if either is “off” then it should be “off”
therefore the expression i wrote is exactly “if input_boolean is on and binary sensor is also on”
no worries… i think what you’ll generally find here is that if you’re willing to learn, folks here are willing to explain.
Yeah, I have several tags already created and they behave as expected. however I am not able to find the template entity.
I think I will just go with the easier route of per room or per automation overrides with input_boolean. Ive already asked too many questions. I just need to go read up on templates and how to use them instead of asking silly questions. Thank you for the head start though!
So I take a slightly different approach with my motion overrides. My beef was that I would “turn off” a motion sensor using an input_boolean, and then I would forget to turn it back on. I even created a nightly “reset” automation that reset all my motion overrides because of my memory. lol
The solution I have now is a bit better, imho (even though it goes against “proper” HA usage). What I did is setup timers for 20-30 minutes in the areas that I want to override. I have an automation that triggers off various conditions (button press, voice command, etc) that turns off the lighting/motion automation and starts the timer. Then, if a button press or voice command happens again, it cancels the timer and turns the lighting/motion automation back on. If the timer finishes, it also re-enables the lighting/motion automation and sets the lights back to their normal lighting mode.
If you’re interested, I can share my automation/scripts with you.
Im interested. Anything I can use to make my life easier - and by easier, meaning getting my wife to stop complaining about something not working lololol