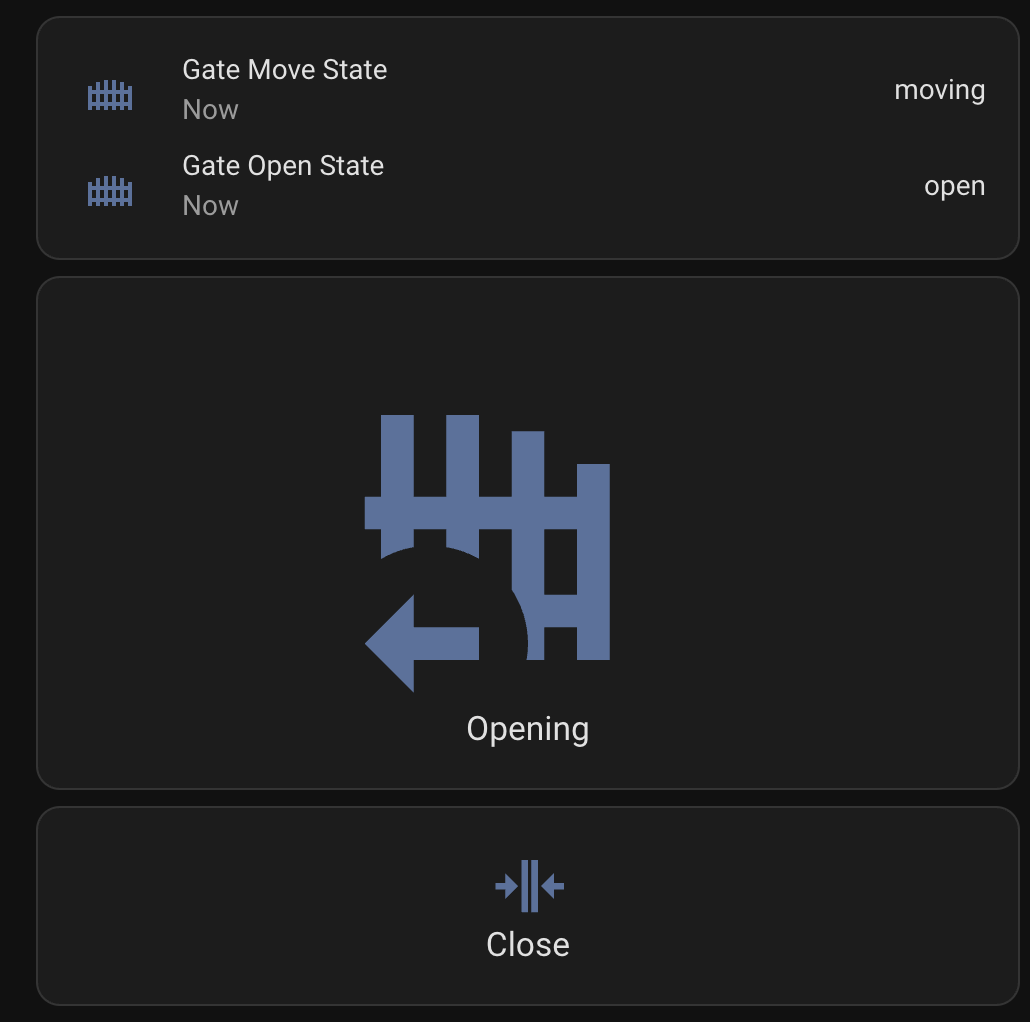
Hey, I wanted to share rupertas solution upgrade. The difference is that I’m able to distinguish between all states of the gate.
Make sure both Shelly channels are set as:
- Relay
- Settings → Button Type → Detached Switch
- Timer → Turn off after 0.5
- Power on default: Off
Wiring is the same on my Deimos Ultra BT A600:
Shelly->BFT
- VCC- > 51 (24V+)
- N → 50 (24V-)
- IN_1 → 20 (AUX0=6)
- IN_2- > 26 (AUX3=1)
- N/GND_1 → 60 (COM)
- N/GND_2 → 60 (COM)
- OUT1 → IC1 (IC1=0)
- OUT2 → IC2 (IC2=3)
BFT->BFT
- 51->27 (Power supply for 27th port)
The main difference is how I utilize AUX inputs:
The 20:AUX0=6
Aux logic= 6 - FLASHING LIGHT output.
Contact stays closed while leaves are operating
This one tells us if the gate is moving or stationary.
The 26: AUX3=1
Aux logic= 1 - SCA GATE OPEN LIGHT output.
Contact stays closed during opening and with the leaf open, intermittent during closing, and open with the leaf closed.
With these, we can get all the possible states, and the hardest part is that
intermittent during closing
In other words, it’s “blinking” or changing states every second or so.
Here’s the template I created to calculate all possible states:
- trigger:
    - platform: homeassistant
      event: start
      id: "init"

    - platform: state
      entity_id: binary_sensor.gate_channel_2_input
      to: "off"
      for:
        seconds: 4 # make this slightly longer than the lamp blink time
      id: "closed"
    - platform: state
      entity_id: binary_sensor.gate_channel_2_input
      to: "on"
      for:
        seconds: 4 # make this slightly longer than the lamp blink time
      id: "open"
    - platform: state
      entity_id: binary_sensor.gate_channel_2_input
      to: # a null 'to' only triggers on all state changes, not attribute changes
      id: "closing"

  sensor:
    - name: "Gate Open State"
      icon: mdi:gate
      state: >
        {% if trigger.id == 'init' %}
          {% if is_state('binary_sensor.gate_channel_1_input', 'on')  %}
            moving
          {% elif is_state('binary_sensor.gate_channel_1_input', 'off') and is_state('binary_sensor.gate_channel_2_input', 'off') %}
            closed
          {% else %}
            open
          {% endif %}
        {% elif trigger.id == 'closed' %}
          closed
        {% elif trigger.id == 'open' %}
          open
        {% elif trigger.id == 'closing' %}
          closing
        {% else %}
          unknown
        {% endif %}

- trigger:
    - platform: homeassistant
      event: start
      id: "init"

    - platform: state
      entity_id: binary_sensor.gate_channel_1_input
      to: "on"
      for:
        seconds: 4.5
      id: "moving"
    - platform: state
      entity_id: binary_sensor.gate_channel_1_input
      to: "off"
      for:
        seconds: 4.5
      id: "stationary"

  sensor:
    - name: "Gate Move State"
      icon: mdi:gate
      state: >
        {% if trigger.id == 'init' %}
          {% if is_state('binary_sensor.gate_channel_1_input', 'on')  %}
            moving
          {% else%}
            stationary
          {% endif %}
        {% elif trigger.id == 'moving' %}
          moving
        {% elif trigger.id == 'stationary' %}
          stationary
        {% else %}
          unknown
        {% endif %}

- sensor:
    - name: "Gate Status"
      icon: "mdi:gate"
      state: >
        {% if states('sensor.gate_open_state') == 'closed' %}
          Closed
        {% elif states('sensor.gate_move_state') == 'moving' and states('sensor.gate_open_state') == 'open' %}
          Opening
        {% elif states('sensor.gate_move_state') == 'stationary' and states('sensor.gate_open_state') == 'open' %}
          Open
        {% elif states('sensor.gate_move_state') == 'stationary' and states('sensor.gate_open_state') == 'closing' %}
          Open
        {% elif states('sensor.gate_move_state') == 'moving' and states('sensor.gate_open_state') == 'closing' %}
          Closing
        {% else %}
          Unknown
        {% endif %}
Then, using this, I created entity cards.
One for seeing both states:
type: entities
entities:
  - entity: sensor.gate_move_state
    name: "Gate Move State"
    secondary_info: last-updated
  - entity: sensor.gate_open_state
    name: Gate Open State
    secondary_info: last-updated
The other interface uses buttons with icons reflecting the gate state (Closed, Opening, Open, or Closing). The input command logic is a bit different here:
- IC1 = 0 serves as a toggle—Open, Close, or Stop—depending on the current state. Most of the time, I just want to open the gate, but occasionally, I use it to stop it mid-motion.
- IC2 = 3 is a dedicated Close command. I use this when I want to make sure the gate is closed, regardless of whether it’s currently open, opening, or even already closed—I just hit it to force it shut.
Here are the buttons:
type: vertical-stack
cards:
  - type: custom:button-card
    tap_action:
      action: toggle
    entity: switch.gate_channel_1
    show_state: false
    show_name: true
    show_icon: true
    icon: |
      [[[
        if (states['sensor.gate_status'].state === 'Closed') {
          return 'mdi:gate';
        } else if (states['sensor.gate_status'].state === 'Opening') {
          return 'mdi:gate-arrow-left';
        } else if (states['sensor.gate_status'].state === 'Open') {
          return 'mdi:gate-open';
        } else if (states['sensor.gate_status'].state === 'Closing') {
          return 'mdi:gate-arrow-right';
        }
        // Default fallback icon if none of the above conditions match
        return 'mdi:help-circle';
      ]]]
    name: |
      [[[
        return states['sensor.gate_status'].state;
      ]]]
  - type: custom:button-card
    entity: switch.gate_channel_2
    show_name: true
    show_icon: true
    tap_action:
      action: toggle
    icon: mdi:arrow-collapse-horizontal
    name: Close
    styles:
      card:
        - height: 100px
        - opacity: |
            [[[
              if (['closing', 'closed'].includes(states['sensor.gate_open_state'].state)) {
                return '0.5';  // Semi-transparent to indicate disabled
              }
              return '1';  // Fully opaque when enabled
            ]]]
      lock:
        - pointer-events: none
    state:
      - value: "on"
        styles:
          card:
            - pointer-events: |
                [[[
                  if (['closing', 'closed'].includes(states['sensor.gate_open_state'].state)) {
                    return 'none';  // Disable button interaction
                  }
                  return 'auto';  // Enable button interaction
                ]]]
The final result looks like this: