IKEA Vindriktning Air Quality Sensor

I just want to say be very careful with soldering (or maybe I’m just very bad at it).
In my case the + pad on the board came loose and when I tried to fix it somehow it came loose all the way to the edge of the board.

Any tips for what the best way is to solder this, let me know :).
Like do you put tin first on the pad and then solder the wire to the pad?

Guess I’ll have to buy a new one :frowning:

1 Like

I was thinking about stripping the original pcb and drive the sensor + status leds directly with the wemos.
This way the status leds could be used for other thing (messages, alarm etc etc).
Maybe add some pressure/temp and CO2 sensors.
Give it a try before trashing it!

1 Like

I believe here is the answer why the PCB has those connectors at the end:

https://about.ikea.com/en/newsroom/2021/07/30/starkvind-air-purifier-launch

I cannot see any information what solution it will have Wifi or Zigbee, but I am pretty sure someone will find some time to tinker with it once it is released. (My guess would be Wifi and using the already implemented CoAP from the Tradfri bridge.)

@Habbie, @Hypfer

1 Like

Just built one of these, pretty easy and fun! Thanks for showing us how to mod one, I think it’s a great ESPHome starter project.

I was just wondering about the PM1006 sensor. I thought a PM2.5 sensor means that it’s detecting only particles smaller than 2.5. But the sensor datasheet seems to indicate it detects between 0.3 and 10 micrometer? Doesn’t that make it a PM10 sensor? Or don’t I understand the PM definitions correctly?

@rindlerblabla I think this might also be why you see differing values between your other PM2.5 sensors and the IKEA one. If it’s actually a PM10 sensor, wouldn’t it catch much more particles than a true PM2.5 and thus return a much higher value?

But my other sensors also output PM10, and the IKEA vindriktning sensor is about as much higher than those values as well. Right now it says 9ug/m3. Sps30 indoor, which is placed just next to the IKEA sensor is 1.43ug/m3, the outdoor sensor says 2.38ug/m3.

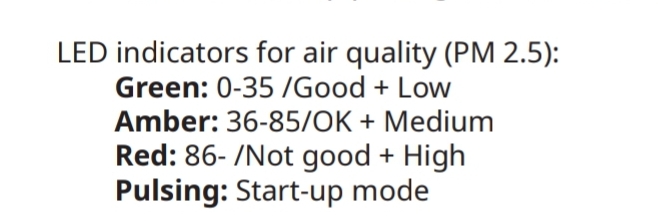
I will filter the values and create a text sensor instead, with the values according to the manual - low, medium, high. The number values are too unspecific to use.

Screenshot_20210808-091134_Drive

3 Likes

Just seen this project and great mod. well done OP

Question . Can we use tasmota on the wemos and is the ikea sensor compatible ?

If you build the component for Tasmota, then of course. The Wemos just does UART RX and decodes the values what was received. But this ia not implemented out of the box for Tasmota, only for ESP Home currently.

If you do add that code to the Tasmota project, please report back here and I will add it to the OP as well.

I’m keeping the numbers - be they what they may - but added color ranges to my graph so it’ll show up orange/red when PM becomes medium/high according to their stats.

So far so good, all green :slight_smile:

1 Like

I did something similar with Apex charts, my pms7003, and my Xiaomi Air Purifier.

And actually I used the sensor and my air purifier together in a Generic Thermostat - unit is wrong but functions fine.

Mobile screen shot so doesn’t look as nice.

Take a guess when I’m cooking:)

I use the Australian quality thresholds.

2 Likes

Hey guys, just an idea.

It would be very cheap and easy to add a TM1637 number display to this. Cheap as.

Hardest bit would be cutting a hole for it I guess?

2 Likes

Hello all, I’ve tried to use the @sermayoral fork to use the @Habbie code from esphome… All is installed, but no data is returned! I checked the connections and all seems ok, I also desoldered and soldered again, and nothing! This is my code:

esphome:
  name: livingroom-particulate-matter
  platform: ESP8266
  board: nodemcuv2

# Enable logging
logger:

# Enable Home Assistant API
api:

ota:

wifi:
  ssid: !secret wifi_ssid
  password: !secret wifi_password
  fast_connect: true
  domain: .myhome
  use_address: 192.168.7.251
  
  ap:
    ssid: "livingroom_particulate_matter"
    password: !secret wifi_ap_password

captive_portal:


web_server:
  port: 80

# MQTT
mqtt:
  broker: !secret mqtt_broker
  discovery: false
  topic_prefix: "esphome/livingroom_particulate_matter"
  
  
# Example configuration entry
uart:
  rx_pin: D2
  baud_rate: 9600

sensor:
  - platform: pm1006
    pm_2_5:
      name: "Livingroom Particulate Matter 2.5µm Concentration"
      
external_components:
  - source: github://sermayoral/esphome@pm1006
    components: [ pm1006 ]

Any help would be welcome

Are you using mqtt and api at the same time? Is that possible?

I tried to disable the mqtt and same result tried with nodemcu and a d1 mini, same, this are the logs:

[10:36:16][C][uart_esp8266:075]: UART Bus:
[10:36:16][C][uart_esp8266:080]:   RX Pin: GPIO4
[10:36:16][C][uart_esp8266:081]:   RX Buffer Size: 256
[10:36:16][C][uart_esp8266:083]:   Baud Rate: 9600 baud
[10:36:16][C][uart_esp8266:084]:   Data Bits: 8
[10:36:16][C][uart_esp8266:085]:   Parity: NONE
[10:36:16][C][uart_esp8266:086]:   Stop bits: 1
[10:36:16][C][uart_esp8266:090]:   Using software serial
[10:36:16][C][logger:189]: Logger:
[10:36:16][C][logger:190]:   Level: DEBUG
[10:36:16][C][logger:191]:   Log Baud Rate: 115200
[10:36:16][C][logger:192]:   Hardware UART: UART0
[10:36:16][C][pm1006:016]: PM1006:
[10:36:16][C][pm1006:017]:   PM2.5 'Livingroom Particulate Matter 2.5µm Concentration'
[10:36:16][C][pm1006:017]:     State Class: 'measurement'
[10:36:16][C][pm1006:017]:     Unit of Measurement: 'µg/m³'
[10:36:16][C][pm1006:017]:     Accuracy Decimals: 0
[10:36:16][C][pm1006:017]:     Icon: 'mdi:chemical-weapon'
[10:36:16][C][captive_portal:148]: Captive Portal:
[10:36:16][C][web_server:142]: Web Server:
[10:36:16][C][web_server:143]:   Address: 192.168.7.227:80
[10:36:16][C][ota:029]: Over-The-Air Updates:
[10:36:16][C][ota:030]:   Address: 192.168.7.227:8266
[10:36:16][C][api:095]: API Server:
[10:36:16][C][api:096]:   Address: 192.168.7.227:6053
[10:36:16][D][debug:023]: ESPHome version 1.20.4
[10:36:16][D][debug:025]: Free Heap Size: 31576 bytes
[10:36:16][D][debug:053]: Flash Chip: Size=4096kB Speed=40MHz Mode=DOUT
[10:36:16][D][debug:190]: Chip ID: 0x007F9507
[10:36:16][D][debug:191]: SDK Version: 2.2.2-dev(38a443e)
[10:36:16][D][debug:192]: Core Version: 2_7_4
[10:36:16][D][debug:193]: Boot Version=6 Mode=1
[10:36:16][D][debug:194]: CPU Frequency: 80
[10:36:16][D][debug:195]: Flash Chip ID=0x001640EF
[10:36:16][D][debug:196]: Reset Reason: External System
[10:36:16][D][debug:197]: Reset Info: External System

The log stops there and nothing happens

it’s like he’s not even using the p1006 component!

@Soloam, can you share your wiring? I have a feeling that you might have wired the PM1006 sensor to a different GPIO and that’s why you are not having any data.

Otherwise, the front LED lights up on the device? And does the fan spin up as well?

@GSzabados

  • Fan spinning
  • Led on the device lighting green
  • ESP boots

I tried to remove the pins and solder directly to the esp, to discard bad connections, and same!

I tried to install the beta, to rule out external component problem, and the result was the same!

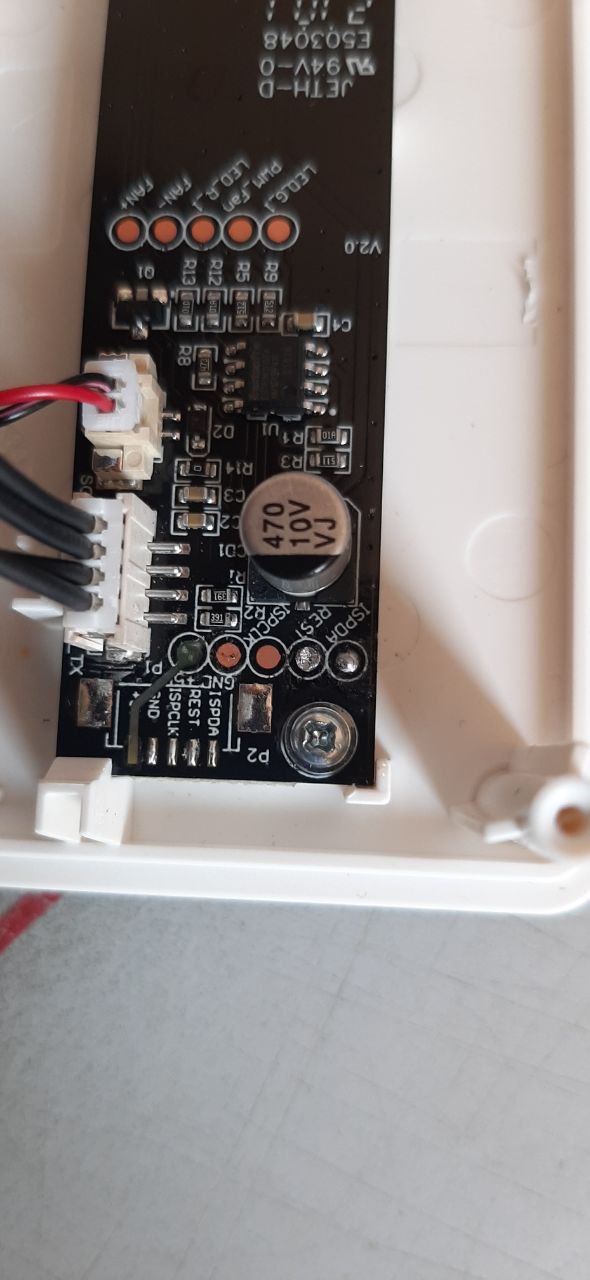
Do you have a multimeter? Can you check that do you have any continuity between REST and the pad next to it ISPD? And between REST and any other pads? Do this without powering the device or anything.

Use the diode test function for this.

If you don’t have any continuity then power on the device and try to measure DC Volt between Ground and REST, or connect a logic analyser, but that is something what not everyone keeps in their drawer.

So make sure that you haven’t shorted the REST with any other pad, and you have signal output on REST.

Check that your cable is good as well and it is not broken inside.

These are some basic troubleshooting steps what I would do to verify what is going on with the electronics.