For those who want to upgrade from Debian 11 (bullseye) to Debian 12 (bookworm) without starting from scratch, here comes how it can be done (successfully tested on RPI4 and amd64).
![]() This upgrade guide works also on the amd64-architecture. It is not exclusive to the RPI.
This upgrade guide works also on the amd64-architecture. It is not exclusive to the RPI.
![]() This upgrade guide is exclusively for upgrading Debian 11 (bullseye) to Debian 12 (bookworm).
This upgrade guide is exclusively for upgrading Debian 11 (bullseye) to Debian 12 (bookworm).
If you have a Debian derivative such as Raspberry Pi OS or Ubuntu installed the upgrade will fail and you will get an “Unsupported” and “Unhealthy” system. DO NOT post in this thread about your OS not being supported, you must run Debian, not a derivative.
![]() “A Debian derivative is a distribution that is based on the work done in Debian but has its own identity, goals and audience and is created by an entity that is independent from Debian. Derivatives modify Debian to achieve the goals they set for themselves.” (Source: Debian -- Debian derivatives).
“A Debian derivative is a distribution that is based on the work done in Debian but has its own identity, goals and audience and is created by an entity that is independent from Debian. Derivatives modify Debian to achieve the goals they set for themselves.” (Source: Debian -- Debian derivatives).
 Before proceeding, please read the following information
Make sure you have a recent full backup of your Home Assistant ready just in case something goes wrong. Since this guide is about upgrading the operating system itself it is wise to keep a copy of that backup not only on the HA device you are going to upgrade. I am not responsible for any data loss which might occur. Please do some research if you have any concerns about upgrading the OS before following this guide!
This upgrade guide is considered advanced and should only be used if one is an expert in managing a Linux operating system, Docker and networking!
![]() Do yourself (and the supporting community here) a favor and refrain from executing the following commands as the system’s root user. Doing so can lead to all kinds of hard to find errors and the upgrade will eventually fail.
Do yourself (and the supporting community here) a favor and refrain from executing the following commands as the system’s root user. Doing so can lead to all kinds of hard to find errors and the upgrade will eventually fail.
Run the commands to upgrade your system as the unprivileged user you created when initially building your system. Prepend sudo to all of the selected commands instead as shown within this upgrade guide to get temporary root-access when needed only.
Make sure all packages on your Debian 11 OS have the latest versions installed.
Execute from the CLI:
sudo apt update && apt upgrade -y && apt autoremove -y
![]() In case the kernel has been upgraded with the above command or you see the recommendation to reboot the host you should reboot the system before continuing with this guide.
In case the kernel has been upgraded with the above command or you see the recommendation to reboot the host you should reboot the system before continuing with this guide.
Also make sure you have the latest HA-Version, Supervisor-Version and OS Agent installed.
At the time of this writing/latest edit this is:
- HA-Version: core-2025.2.5
- Supervisor-Version: supervisor-2025.03.3
- Agent-Version: 1.7.2
Now do from the console as an unprivileged user (not root) :
sudo sed -i 's/bullseye/bookworm/' /etc/apt/sources.list
sudo sed -i 's/bullseye/bookworm/' /etc/apt/sources.list.d/*.list
sudo sed -i 's|bookworm/updates|bookworm-security|' /etc/apt/sources.list
Continue with the OS upgrade:
sudo apt update
Only if you see the following error message after “sudo apt update”:
The value 'bullseye' is invalid for APT::Default-Release as such a release is not available in the sources
Run:
sudo sed -i 's/bullseye/bookworm/' /etc/apt/apt.conf
and again:
sudo apt update
Now upgrade your existing packages without adding any new packages to the upgrade process:
sudo apt upgrade --without-new-pkgs -y
![]() The above command will take some time. Be patient.
The above command will take some time. Be patient.
![]() If asked whether the installer should automatically restart certain services during the upgrade choose “yes”.
If asked whether the installer should automatically restart certain services during the upgrade choose “yes”.
Now do the final upgrade to Debian 12 (bookworm) by executing the following command:
sudo apt full-upgrade -y
![]() The above command will take even longer and sometimes feels like the process has stalled, especially when it has reached:
The above command will take even longer and sometimes feels like the process has stalled, especially when it has reached:
Checking for services that may need to be restarted...
Checking init scripts...
Just be patient and don’t interrupt the upgrade process but let it work in the background. As mentioned above this will take quite a while.
When the process has finally finished it is time to reboot your RPI:
sudo reboot
or (depending on the system architecture):
sudo systemctl reboot
After the system has rebooted go back to the CLI and check the version number of the OS by executing the lsb_release and cat commands:
sudo lsb_release -a
sudo cat /etc/debian_version
It should show:
No LSB modules are available.
Distributor ID: Debian
Description:    Debian GNU/Linux 12 (bookworm)
Release:        12
Codename:       bookworm
and
12.10
With the Debian 12 upgrade finally complete, remove any unwanted packages that might have carried over from the previous OS installation. Run:
sudo apt --purge autoremove -y
Make sure all installed packages are up-to-date:
sudo apt list --upgradable
If there are upgradable packages available execute:
sudo apt update && apt upgrade -y && apt autoremove -y
to upgrade those packages.
![]() If asked about whether to keep locally modified configuration files always choose:
If asked about whether to keep locally modified configuration files always choose:
"Keep the local version currently installed"
Most probably also the kernel got upgraded. Thus you have to reboot the system:
sudo systemctl reboot
After the system is up and running again execute:
sudo apt-get install udisks2 wget
Check whether systemd-journal-remote is installed:
sudo dpkg -s systemd-journal-remote
The output should contain:
Version: 252.36-1~deb12u1
Depends: libc6 (>= 2.34), libcurl4 (>= 7.16.2), libmicrohttpd12 (>= 0.9.50), libsystemd-shared (= 252.36-1~deb12u1), systemd
If systemd-journal-remote is not installed run:
sudo apt install systemd-journal-remote -y
In case the version on your RPI shows < Version: 252.17-1 run:
sudo apt-get install --reinstall systemd-journal-remote
![]() About
About systemd-resolved which is needed by HA Supervised:
The new systemd-resolved package will not be installed automatically on upgrades. You need to install the new package manually!
Note that until systemd-resolved has been (re-)installed, DNS resolution might no longer work since the service will not be present on the system.
Installing this package will automatically give systemd-resolved control over /etc/resolv.conf. If you don’t want this, follow this post to regain control over /etc/resolv.conf after you have completed the following steps:
Check whether systemd-resolved is correctly installed:
dpkg -s systemd-resolved
The output should contain:
Version: 252.36-1~deb12u1
Replaces: resolvconf, systemd (<< 251.3-2~)
Provides: resolvconf
In case systemd-resolved is not installed run:
sudo apt-get install systemd-resolved
![]() If the system complains about certain unfulfilled dependencies while installing
If the system complains about certain unfulfilled dependencies while installing systemd-resolved just hit “y”
It is time now to restart the host system once again:
sudo systemctl reboot
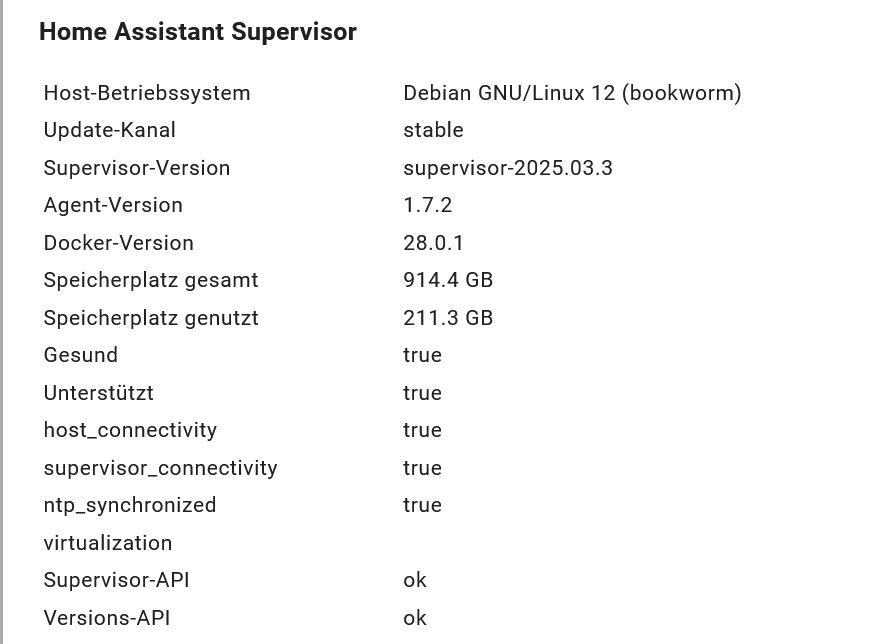
All done. Your HA Supervised should now run on Debian 12 (bookworm) and shows similar to:
![]() In case you are still seeing the status “Unsupported” and/or “Unhealthy” at this point, re-run the “supervised-installer”:
In case you are still seeing the status “Unsupported” and/or “Unhealthy” at this point, re-run the “supervised-installer”:
cd /usr/local/src
sudo rm -f homeassistant-supervised.deb
sudo wget https://github.com/home-assistant/supervised-installer/releases/latest/download/homeassistant-supervised.deb
sudo dpkg -i homeassistant-supervised.deb
![]() You may be prompted to choose a machine type during the installation process. If so, choose
You may be prompted to choose a machine type during the installation process. If so, choose raspberrypi4-64 if you do the upgrade on a RPI4 64bit.
Now reboot the host once again.
![]() If you are you are presented with the following message after the host reboot:
If you are you are presented with the following message after the host reboot:
Unsupported system - CGroup version
Execute the following command through CLI:
sudo sed -i.bak 's/$/ systemd.unified_cgroup_hierarchy=0/' /boot/firmware/cmdline.txt
and reboot.
The above command will also take care of writing a backup of the original file (/boot/firmware/cmdline.txt.bak) just in case something goes wrong.
Addendum (12 Oct. 2024):
Since some users have run into DNS issues (i.e. “lookup ghcr.io: no such host”) here come the steps on how to resolve those issues:
Find your active interface using the CLI:
sudo nmcli con show --active
The output shows something similar to:
NAME             UUID                                  TYPE      DEVICE
Supervisor eno1  e874k675-44d4-31a4-8cf8-3b8cc5f3b7cb  ethernet  eno1
lo               1e5bf4e3-e5c6-40d4-a193-0ffaa1l4fd2b  loopback  lo
where
e874k675-44d4-31a4-8cf8-3b8cc5f3b7cb
is the active interface of my RPI4 used by Supervisor.
Now run the following command but use the UUID of your active interface:
sudo nmcli con mod "e874k675-44d4-31a4-8cf8-3b8cc5f3b7cb" ipv4.dns "8.8.8.8, 8.8.4.4"
With the above command you configure the RPI to resolve TLD’s using Google’s DNS servers (8.8.8.8 and 8.8.4.4). Of course you can change this to whatever valid DNS-servers of your choice.
Restart the NetworkManager service:
sudo systemctl restart NetworkManager
OR (if the above does not lead to working DNS services):
Open/edit file /etc/gai.conf
Find line:
#precedence ::ffff:0:0/96 100
and uncomment it:
precedence ::ffff:0:0/96 100
to prioritise IPv4 over IPv6.
Save /etc/gai.conf and reboot the host:
sudo systemctl reboot
(Upgrade guide last updated/revised: 22 March 2025)