Integration Solar inverter huawei 2000L

I will try to do a template with this attribute:

I’ve seen today the wlcrs integration in HACS. What is better to use?
Should I change to this integration?
And how do you do this card whith all this icons and lines? could you share?
Thanks Rafal

It was already posted in this topic, but It had been 1,5 year ago so I post it again.

elements:
  - entity: sensor.power_meter_active_power
    style:
      left: 27%
      top: 7%
    type: state-label
  - entity: sensor.active_grid_a_power
    style:
      left: 52%
      top: 16%
    type: state-label
  - entity: sensor.active_grid_b_power
    style:
      left: 52%
      top: 19%
    type: state-label
  - entity: sensor.active_grid_c_power
    style:
      left: 52%
      top: 22%
    type: state-label
  - entity: sensor.m_grid_a_voltage
    style:
      left: 38%
      top: 16%
    type: state-label
  - entity: sensor.m_grid_b_voltage
    style:
      left: 38%
      top: 19%
    type: state-label
  - entity: sensor.m_grid_c_voltage
    style:
      left: 38%
      top: 22%
    type: state-label
  - entity: sensor.m_grid_exporterd_energy
    style:
      left: 68%
      top: 7%
    suffix: ' >>> '
    type: state-label
  - entity: sensor.m_grid_accumulated_energy
    prefix: ' <<< '
    style:
      left: 68%
      top: 13%
    type: state-label
  - entity: sensor.energy_used
    style:
      left: 68%
      top: 31%
    suffix: ' >>> '
    type: state-label
  - entity: sensor.daily_yield
    prefix: 'Dzisiaj '
    style:
      left: 40%
      top: 37%
    type: state-label
  - entity: sensor.total_yield
    prefix: 'Total '
    style:
      left: 68%
      top: 37%
    type: state-label
  - entity: sensor.sun2000_8ktl_m0
    style:
      left: 20%
      top: 37%
    type: state-label
  - entity: sensor.phase_a_current
    style:
      left: 40%
      top: 46%
    type: state-label
  - entity: sensor.phase_a_voltage
    style:
      left: 26%
      top: 46%
    type: state-label
  - entity: sensor.phase_b_current
    style:
      left: 40%
      top: 49%
    type: state-label
  - entity: sensor.phase_b_voltage
    style:
      left: 26%
      top: 49%
    type: state-label
  - entity: sensor.phase_c_current
    style:
      left: 40%
      top: 52%
    type: state-label
  - entity: sensor.phase_c_voltage
    style:
      left: 26%
      top: 52%
    type: state-label
  - entity: sensor.device_status
    style:
      left: 60%
      top: 62%
    type: state-label
  - entity: sensor.pv_input_power
    style:
      left: 20%
      top: 62%
    type: state-label
  - entity: sensor.pv_01_voltage
    style:
      left: 40%
      top: 70%
    type: state-label
  - entity: sensor.pv_01_current
    style:
      left: 60%
      top: 70%
    type: state-label
  - entity: sensor.pv_02_voltage
    style:
      left: 40%
      top: 88%
    type: state-label
  - entity: sensor.pv_02_current
    style:
      left: 60%
      top: 88%
    type: state-label
image: /local/sun2000e.png
title: Sun2000-8KTL-M0
type: picture-elements


it is only this card:

I think wlcrs is better.

1 Like

Sorted now. I moved away from the router approach.
I had a raspberry pi running Octopi near a network switch so I changed it to connect to lan via ethernet and inverter network on it’s wifi. Then setup the NAT on it which is working fine. Well it did once I remembered to enable nat in the kernel config.
So working fine with raspberry pi doing NAT to inverter ssid and latest firmware on the inverter.

Hello all, how do you upgrade the dongle? I always have an error :frowning:

I used the “sun2000” app on Android from Huawei market place

I think I used this guide:

In the above guide is also an email address to Huawei support where you can request firmware if you don’t have it, it only took a couple of hours before they sent it to me.

Yes of course, sorry for the delay with my answer.
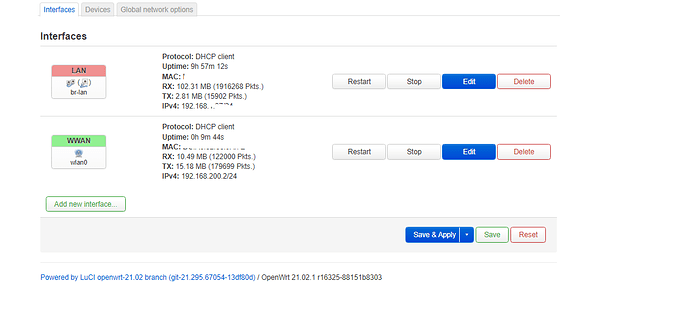
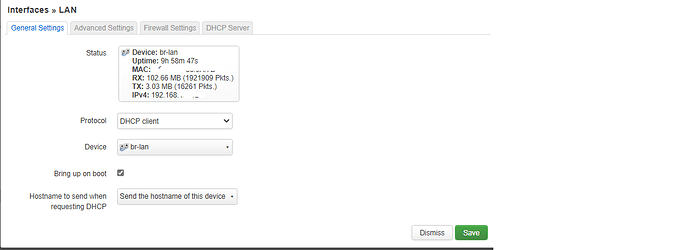
Configuration of openwrt to act as bridge connecting to the inverter AP:
1 - Connect to the inverter as client. Here the configuration wireless connections, you must access with “Mode Client” to the inverter AP network:


2- Config the Bridge device, WLAN and Ethernet and interfaces as follow:

Bridge ports: eth0 (your ethernet interface)

The interfaces:


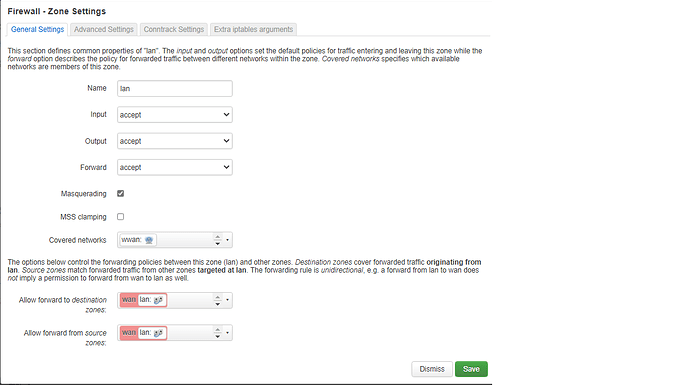
3- Firewall configuration and the most important “Port Forwarding”:


Here I show two rules, with the modbus port 502 for the case old inverter firmware and other rule with the new modbus port 6607, depend on which version you have.


Example how to config the Forward Port rule:


To connect the HA integration to the SUN2000L inverter to set as “host” the LAN IP of the openwrt router and the correct port depend on the version of the inverter firmware ( port 502 or 6607)

That’s all…

7 Likes

Thought I check back and post progress.

I have set up a dashboard with metrics I find interesting to track on a daily basis.

I have also set up 6 automations that controls the battery usage based on forecast and electric prices.

I am using TOU and have set a schedule that allows charge during the night and discharge during the entire day (excess PV output gos to the battery). I will check back with the results of this behaviour.
I have struggled to be able to make it 100% dynamic based on the automations…

  • UPDATE - It seems to work fine, as long as you are fine with limiting yourself to charge-from-grid only at nighttime and hence not discharge the battery at night

I have two questions:

  • What Operating mode are you using on the Luna in order to fully automate the discharge/charge based on energy prices?
  • Has anyone set up a card like https://github.com/reptilex/tesla-style-solar-power-card that shows the current energy flows similar to what is shown in the fusionSolar App? I would particularly be interested in a blueprint of Template sensors that can support the different entities in the card, such as generation_to_grid_entity.
8 Likes

That’s a very nice looking dashboard! Congrats!

As to your first question: it’s very dependent on the country/location where you live which Operating mode makes most sense. Many of us are still experimenting with what mode makes most (economical) sense

@wlcrs I’m having some issues with the latest beta release (1.0.0a3).

2022-03-02 10:05:22 INFO (MainThread) [pymodbus.client.asynchronous.async_io] Connected to 192.168.8.1:502.
2022-03-02 10:05:23 INFO (MainThread) [custom_components.huawei_solar.config_flow] Successfully connected to inverter SUN2000-6KTL-M0 with SN HV1970006XXX
2022-03-02 10:05:23 INFO (MainThread) [pymodbus.client.asynchronous.async_io] Protocol lost connection.
2022-03-02 10:05:23 INFO (MainThread) [pymodbus.client.asynchronous.async_io] Protocol made connection.
2022-03-02 10:05:23 INFO (MainThread) [pymodbus.client.asynchronous.async_io] Connected to 192.168.8.1:502.
2022-03-02 10:05:25 WARNING (MainThread) [homeassistant.config_entries] Config entry 'SUN2000-6KTL-M0' for huawei_solar integration not ready yet: Could not update HV1970006XXX v
alues: Got error while reading from register 37760 with length 28: Exception Response(131, 3, IllegalAddress); Retrying in background
2022-03-02 10:05:25 INFO (MainThread) [pymodbus.client.asynchronous.async_io] Protocol lost connection.

It looks like it tries to read the register for the battery soc, but I don’t have a battery.

I’ve created a GitHub issue as well.

Thanks,
eicosan

I live in sweden and I am paying the hourly rate that is VERY volatile.

I have found out the following:

  • Set the TOU to charge 00:00-23:59

In HASS create an automation that based on electric price sets

  • the working mode to TOU
  • Allow grid charge swith to true
  • Grid charge power to an appropriate value

And then create another HASS automation that based on electric price sets

  • The working mode to MaximiseSelfConsumption
  • The Allow discharge power to an appropriate value

This allows for full control and full automation.

4 Likes

Has anyone a good example of a template sensor that calculates the Daily Solar Yield?

I think I also need some instructions on how to use the sensor (I am completely new to HASS).

  • What to put in which .yaml? (To create the sensor)
  • How to reference it from an entity card?

I have tried adding some sensors to configuration,yaml (and the config is valid) but I cannot find the sensor in a lovelace entity card e.g.

wlcrs integration has an sensor for daily solar yield out of the box.
It can be used in the energy panel straight away.

1 Like

Not if you have a battery. But there are posts above which suggest how the yield can be calculated in this case.

1 Like

I am confused right now if I can use integration from WLCRS to connect with my inverter.

I’ve connected to SUN2000 AP and change Modbus settings

Here is my devices firmware:
Inverter: V100R001C00SPC140
Dongle: V100R001C00SPC124

I try to ping dongle which is in my network and its possible also a port 502.
When I put this IP into config I have “Connection Error”

I am using only HA Core because of using Docker version of HA.

I think you must be connected directly to invertor via wifi:

you must ping in 192.168.200.1

Quick update on the calculation of the daily PV yield based on the numbers which can be retrieved from the integration/Modbus TCP:

I have been in contact with Huawei support on how to calculate the PV yield to match the numbers in Fusionsolar. They have confirmed that the formula

PV yield = daily yield from inverter + battery day charge – battery day discharge

is correct to calculate the PV yield as a raw figure. However, the calculation of the PV yield in Fusionsolar is slightly different, because they also include the energy consumed by the inverter. So the Fusionsolar formula is:

PV yield = daily yield from inverter + battery day charge – battery day discharge – energy absorbed by inverter

Based on this I tried to reverse engineer the Fusionsolar numbers and found the following: The closest I get to the Fusionsolar numbers is by using the formula and when the PV is producing energy (and only then!) subtracting approx. 0.11 kWh per hour for the energy consumption of the inverter. The energy consumption of the system when the PV is not producing, is already covered by the fact that the battery discharge number is typically higher than the increase of the daily yield from the inverter, resulting in a negative PV yield number. So those negative PV yield numbers are correct from a total energy produced/consumed point of view. Of course, if you don’t like to see the negative values then just set the result to 0 whenever the calculation leads to a negative number. This is also how it’s done in Fusionsolar.

If replicating the Fusionsolar numbers is not that important, then just use the first formula to get the raw numbers and then the inverter consumption (during the times when the PV is producing energy) will be included in your total energy consumption.

4 Likes

Is there a way to shutdown the inverter and its battery when the benefice to keep it “ON” is lower than to switch it OFF?

E.g. :

  1. Battery empty at the end of the day will increase you net consumption until next day (8PM to 8AM = 12 * 0.066kWh = 0.792kWh (often during winter days - 4 month a year ±96kWh )
    0.66W is the power I can still see when all my house installation is switched off at the main breaker.
    (Knowing that the battery cannot over discharge, what cannot happen in one night)

  2. Battery charge is lower than Minimum Charge (E.g SOC 15%) + Solar installation self consumption (0.792kWh)

My installation has been placed a couple of months ago, the inverter has been replaced for commercial reasons. I have the feeling that when the first was installed, I had self consumption very limited (Total house consumption less than 10W) Would it be due to the use of another Firmware (updated to be able to use the Home Assistant ), due to a setting, or was it just a fake memory.?

Wow.
But, even after that, I couldn´t finish the config. I think I mislead something… and I broke openwrt.
when do you save and update the configuration?.
How do you connect the openwrt with the raspberry pi?

Thanks

There is no such setting available. Not for the battery, not for the inverter. :frowning:

They have a bit more going on than that. Their figure is correct even if the battery is partially charged from grid with cheap energy, the formula would add that energy to pv yield.
I’ve tried using the FusinSolar kiosk with another integration but it only seems to update the kiosk page every 30 minutes and it’s figures are somehow slightly different to the main FusionSolar page too!