It took me a while to figure everything out too, I just started using home assistant 1 month ago. The Tuya payload is definitely the more confusing part, and I cannot find much documentation about it. I’m glad it helped!

All working  perfect guide mate, now my next task is the Kogan pet feeder lol


(This is my first original contribution post, please be nice)
Context:
I accidentally uploaded tasmota-minimal and bricked my kettle so I poked around trying to figure out how to flash via serial. I figured it out. BUT, I would honestly recommend other methods before this, including: 1. Flash OTA using Tuya Convert; 2. Use Google Assistant relay to mimic “hey google, turn on the kettle”; 3. Flashing via serial (detailed below). This only gives enough detail for someone familiar with serial flashing already.
Inside the kettle & accessing the flashing points on the ESP8266
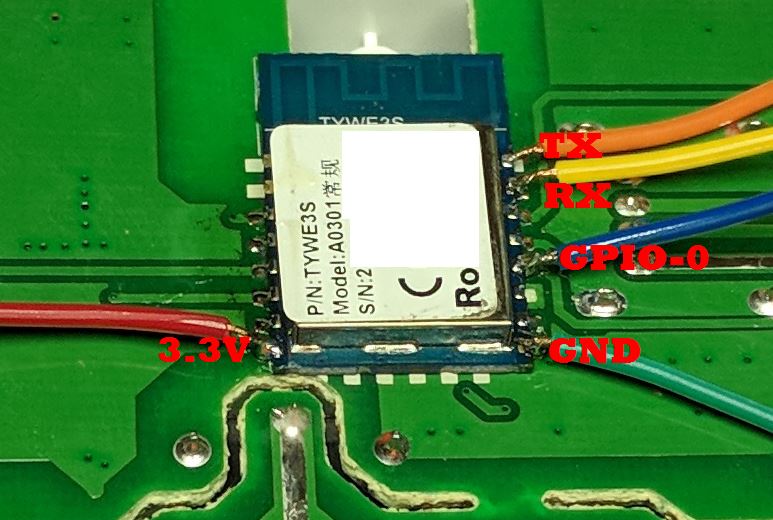
It was actually really easy to get into the kettle and see all the electronics including the ESP8266 chip running the smarts of the device. While I have flashed heaps of sonoff devices and d1 minis over serial I was completely lost. There’s no obvious markings for VCC, GND, RX and TX so I thought I’d point out to other novices (like me) how to do it.
The chip appears to be an ESP8266. The model is TYWE3S. If you get stuck on the steps below, check these two articles that helped me: about the TYWE3S (here) and the section on this page title Flashing - Preparation (here).
Steps:
- Extract the computer board (unscrew base, remove handle cover, remove the computer board from the handle).
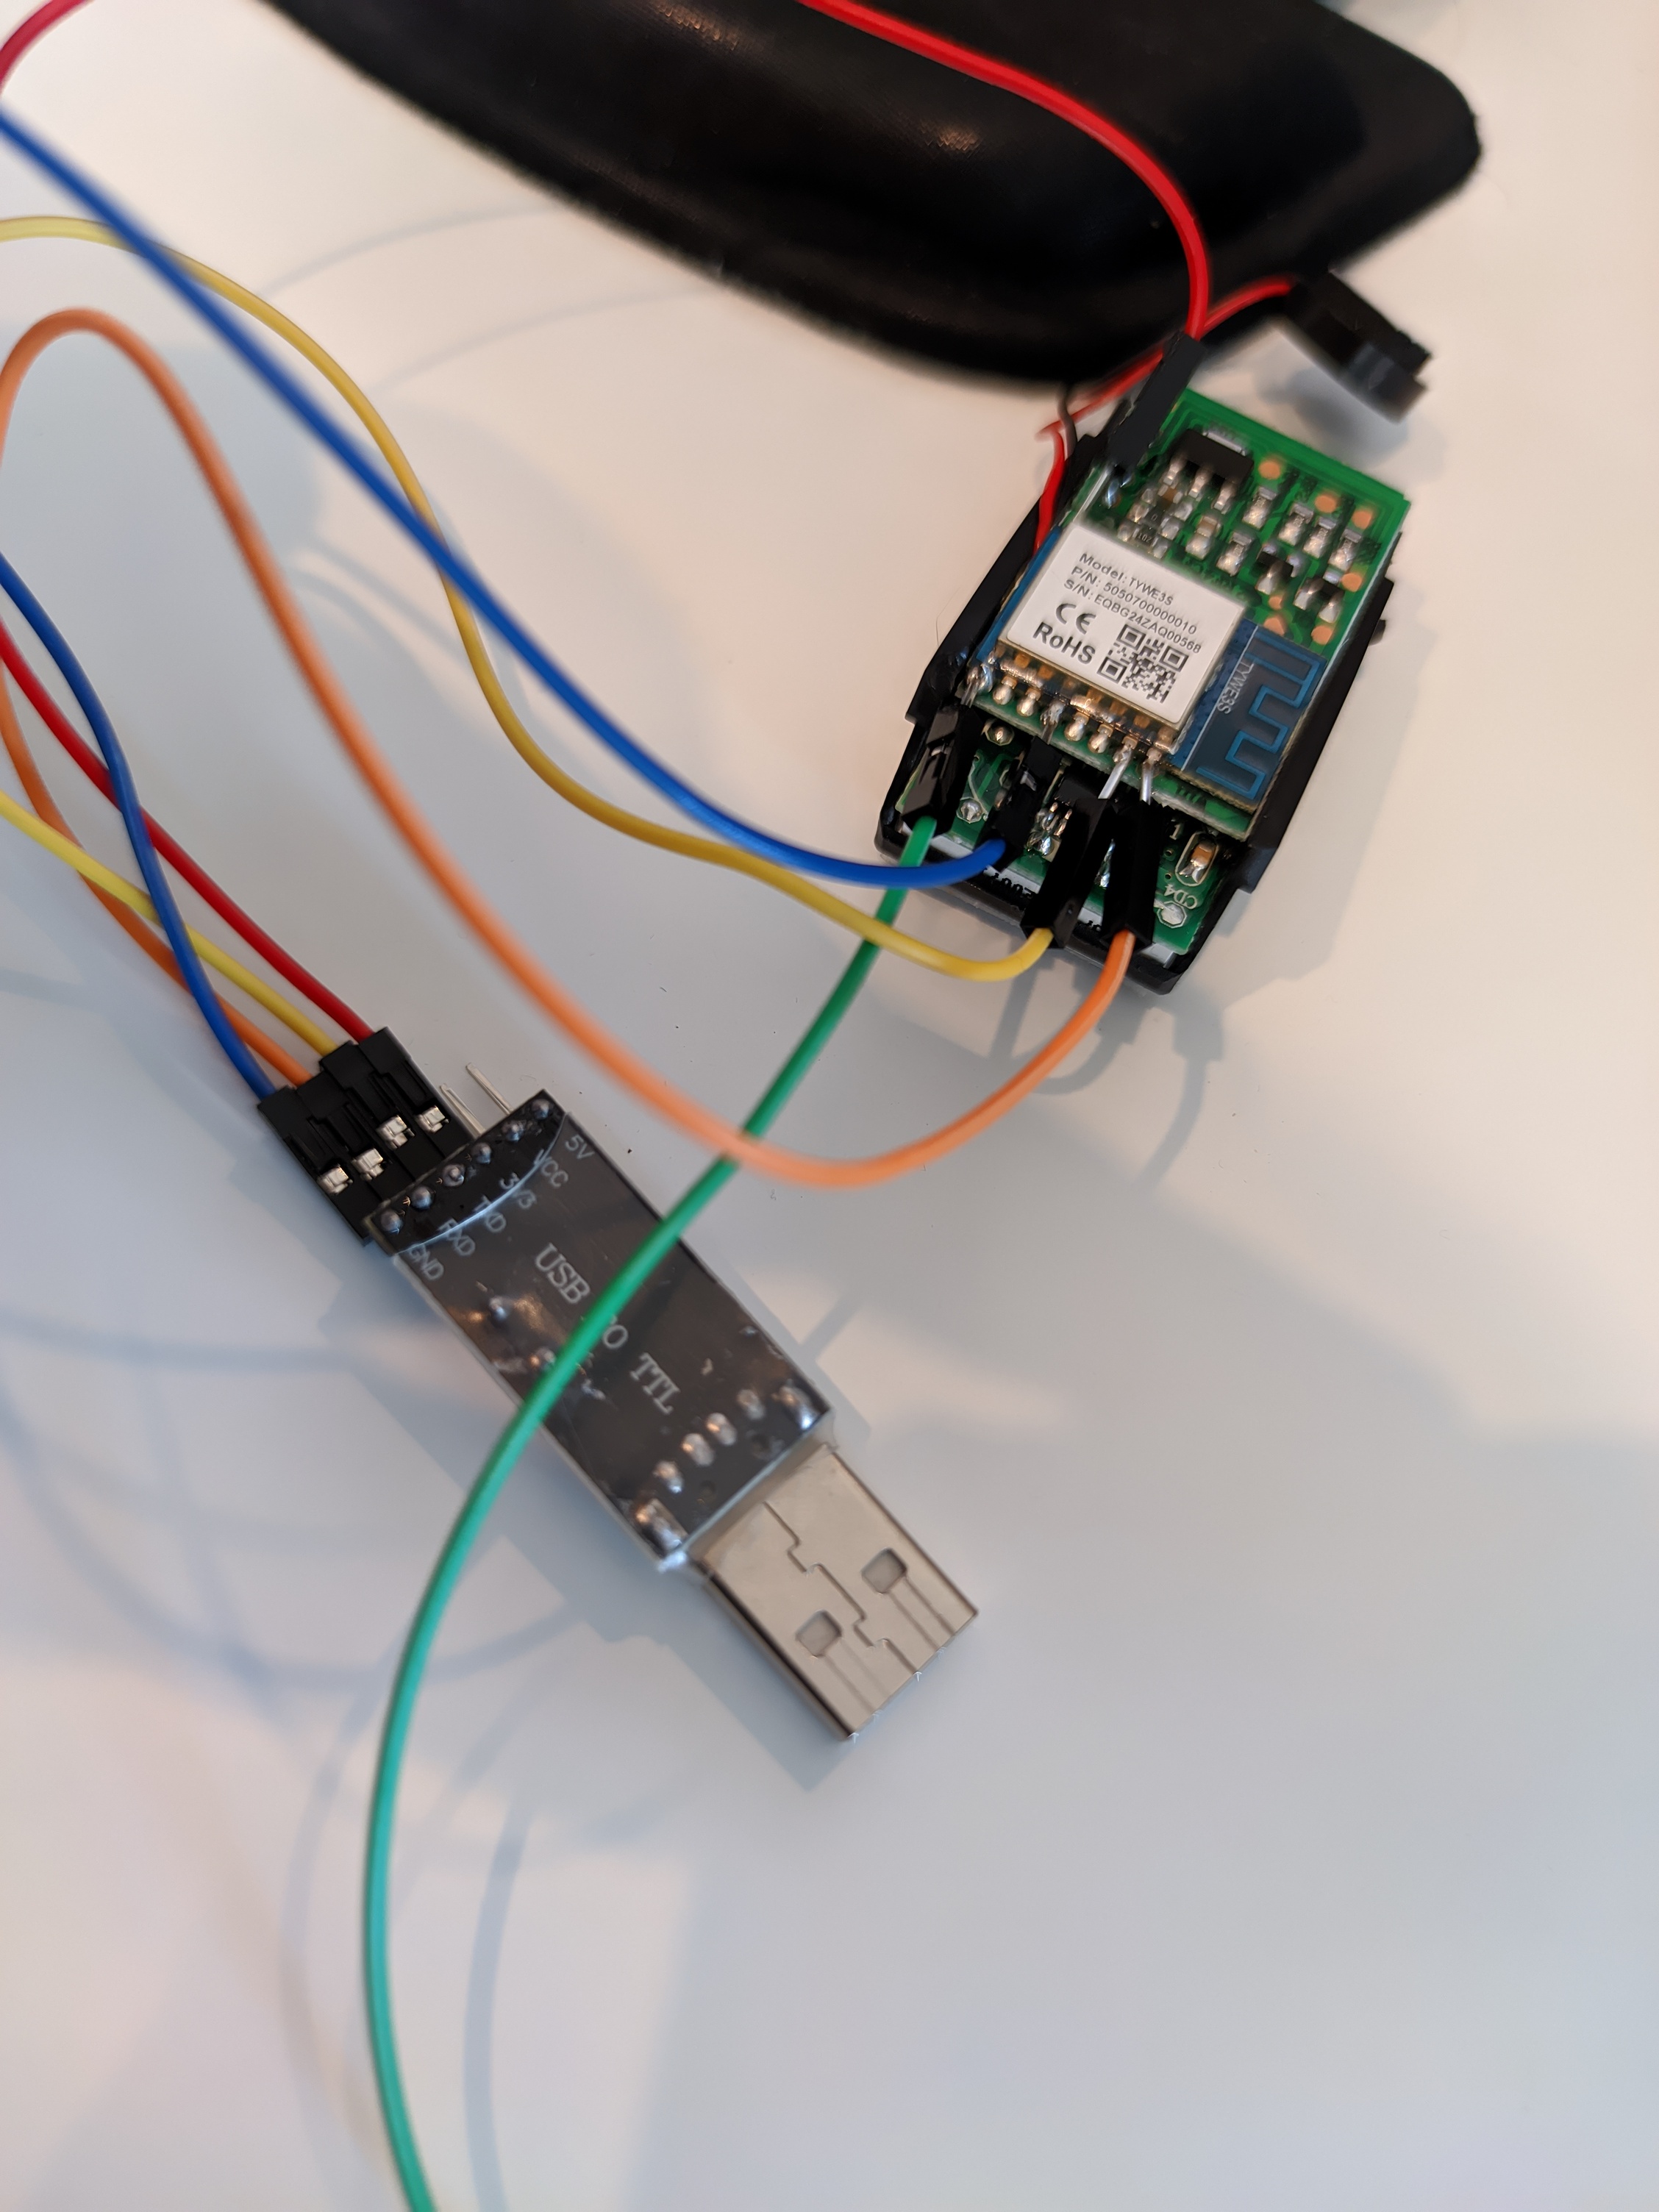
- Get ready to flash, part 1: attach cables from your serial adaptor to the ESP8266 board, like this.
- Get ready to flash, part 2: (as per Flashing - Preparation subheading) You need to GPIO-0 to the GND to enable flashing mode - i soldered a wire between.
- (also as per link in #3) Disable the MCU during flashing.
(Warning: I have little expertise and fumbled my way through this. I think I was probably a few mins away from overheating the whole thing - there is probably a better way but I had no guides to follow and nothing to lose.)The article gives 3 options to disable the MCU sending data on TX and RX.I went with option 3. The way I did this was probably pretty dodgy, and definitely smelt a bit like burning, but I got away with it: link the GND of the ESP chip with either VDD on the underside. I knew this worked when the lights of the display did not light up.EDIT: the best way would be to de-solder the four pins holding the two boards together. - Unlink GPIO-0 and GND from ESP chip) and power back up so that it is no longer in flashing mode. As per any other flashing process, it should produce its own Wifi network, join, configure as per many other guides, and then set up kettle as per the original post.
Good luck to anyone else doing this!
EDIT: 21/03/2021 made changes to Step 4
3 Likes
Thanks for the update and taking the time to right this

1 Like
You’re all awesome! Thanks so much for all the help with this.
One quick question: I’ve got mine flashed and got the tempers ture and other sensors working. But when I put the kettle on to boil manually - i.e. At the kettle rather than via MQTT or HASS - the power status is not reflecting back in my sensors? So it still shows as off, even though it isn’t.
Any ideas on that one?
yeap That right
if you turn on the jug manually it does NOT SEND a MQTT message back
its something to do with the TuyaReceived can’t break that down
Thanks @myle - I thought I was doing something wrong.
Is there a TuyaReceived message that we just can’t decode? Or does one just not get sent when the manual start is done?
Hi! This is my first post on the Community forum. I’ve learned a lot over the last year or so as I’ve been getting into HA properly. Also, the Kogan Kettle was my first device that was flashable with Tasmota, which was quite an interesting experience. I got it a few months ago, and had it working in HA fairly swiftly, not least thanks to posts in this thread. However, I’ve also also worked out a few other things separately, which I wanted to share.
In the Tasmota settings for the kettle, I’ve got setOption19 turned on, of course, for easy Home Assistant discovery. I’ve also got setOption 66 enabled, which means that the full TuyaReceived stack is published to MQTT. I think that then solves the problem that @myle and @thecrane seem to be having with the state of the kettle not getting reported back to Home Assistant when you change settings on the device itself.
Temperature sensor
I don’t know if it’s because of setOption 66, but I noticed that in my MQTT, I in fact have an ordinary decimal report of the live temperature, in TuyaReceived.DpType2Id5. No conversion from base-16 required! Therefore, I have the following in my configuration.yaml for the kettle temperature sensor:
  - platform: mqtt
    name: "Kettle temperature"
    state_topic: "tele/kettle/RESULT"
    unique_id: "kettle_temperature"
    value_template: >
      {% if 0 <= value_json.TuyaReceived.DpType2Id5 <= 100 %}
         {{ value_json.TuyaReceived.DpType2Id5 }}
      {% else %}
        {{ states('sensor.kettle_temperature') }}
      {% endif %}
    unit_of_measurement: '°'
The if…else helps to deal with the occasional wild reading returned in that JSON element. I have the unit_of_measurement as just ‘º’ rather than ‘ºC’ because my main installation’s unit system is imperial, but I don’t want this particular temperature reading to be converted to Fahrenheit.
Mode: keep-warm and boil
As suggested in this thread, I’ve set up an input_select to use to control the kettle. I was using the automation proposed by @myle and then refined by rabbit-aaron, but in the last few days I’ve moved it over to Node-Red (where I have a lot of automations, although I do not claim to be an expert!). In so doing, I’ve added in some more functionality:
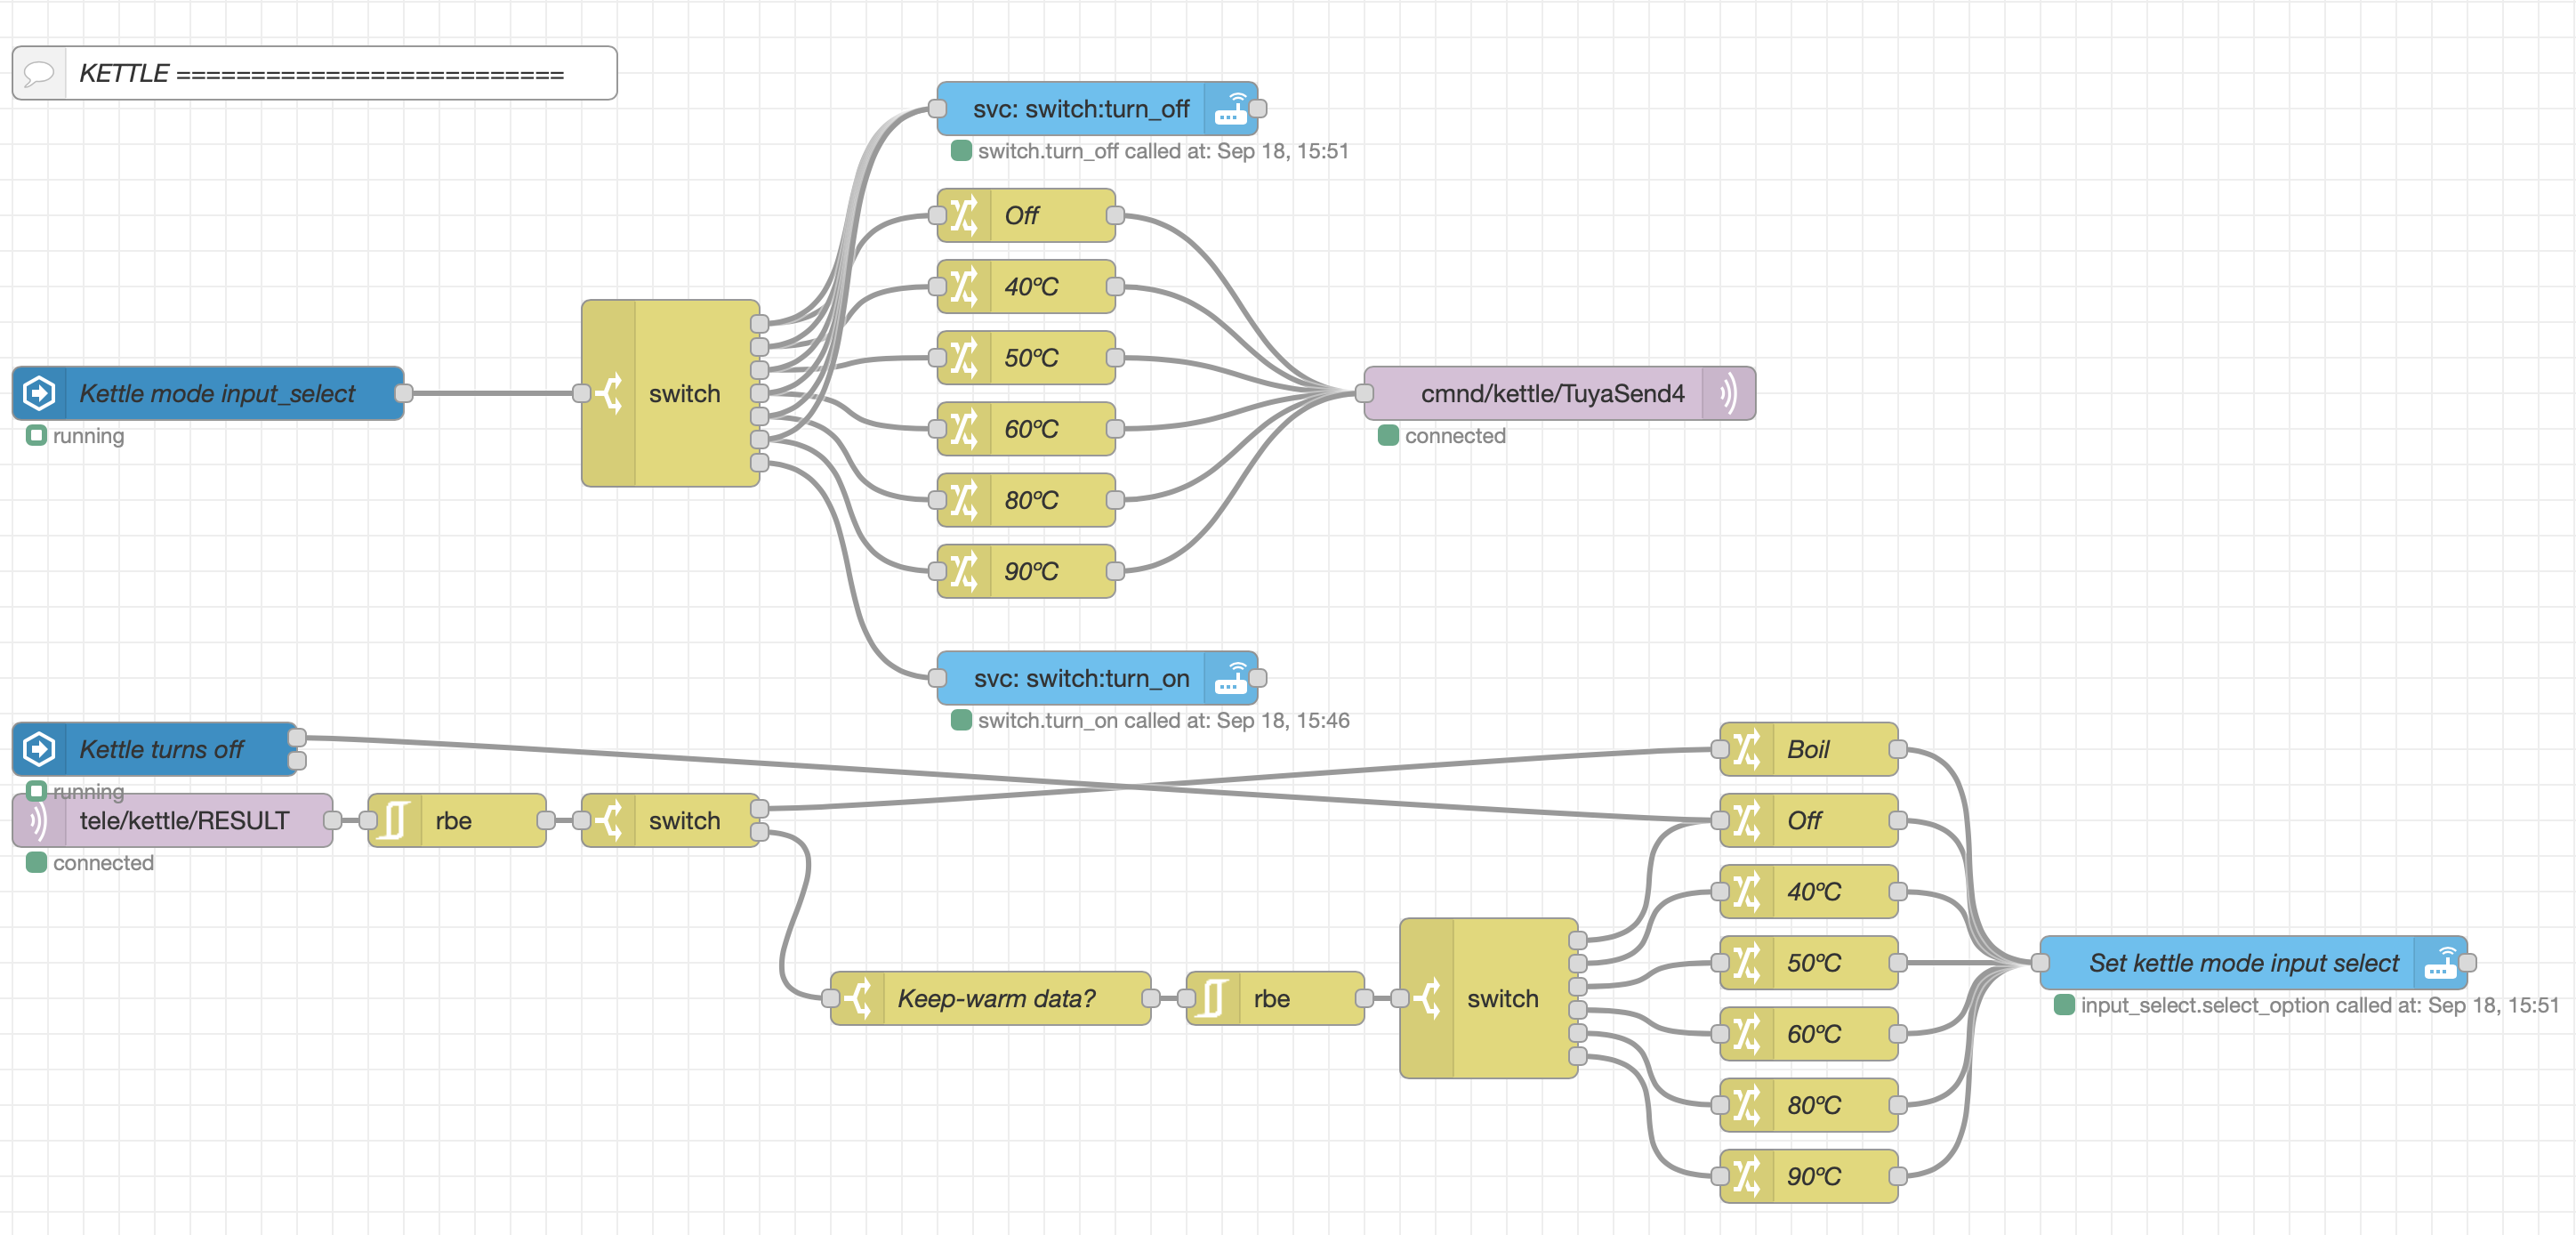
You can find the code for this flow on Pastebin.
Basically, what it does is to watch for changes to the input_select (which has the options of Off, 40ºC, 50ºC, 60ºC, 80ºC, 90ºC, and Boil), and then to send the relevant command to the kettle either by MQTT, or turning on the kettle switch in Home Assistant. Meanwhile, the bottom message flow watches for changes coming in on MQTT, and updates the input_select accordingly: changing the mode on the kettle itself is updated instantaneously in the UI.
I was aiming to slightly change the usage model for the kettle, so that the ‘keep-warm’ temperature is really now just a temperature target for the kettle: things are set so that if you set a keep-warm temperature, the kettle itself is turned off. This makes more sense with the way we use the kettle, with the different temperatures for different types of tea.
4 Likes
(Sorry, being a new user, I am limited in how many links and images I can post at once. Forgive me…)
Lovelace
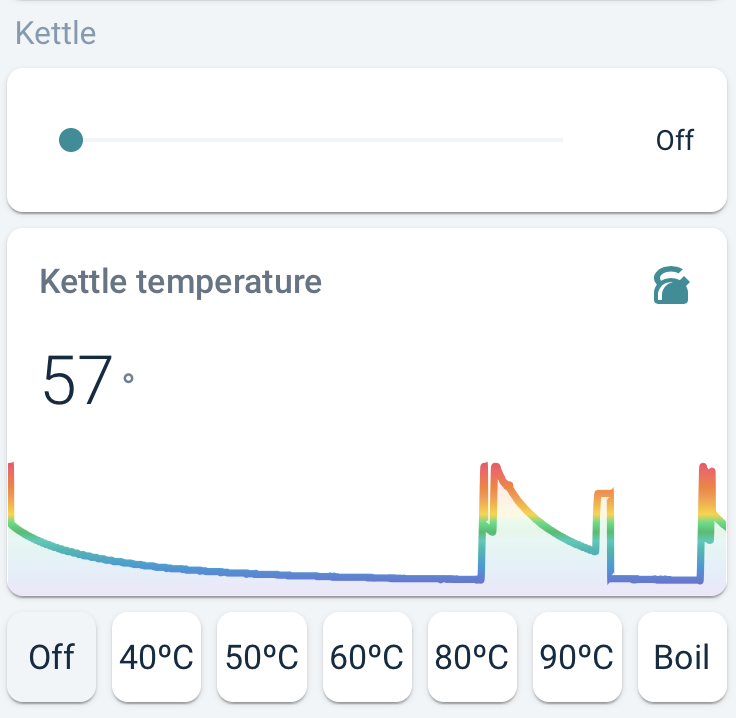
I’m experimenting with a couple of different ways to control the kettle’s input_select in the UI. Thomas Loven’s slider-entity-row provides a slider element: that’s pretty cool, and easy to use:
type: entities
entities:
  - entity: input_select.kettle_mode
    type: 'custom:slider-entity-row'
    full_row: true
I’ve also realized that using RomRider’s Button Card, I can achieve the radio button array that I’ve been seeking for a few purposes for a while now. There are more lines of code there than I might like, because basically you have to set tapping the button to call the input_select.select_option service, while you style the button according to what the input_select’s current option is. And you then repeat this for each of the seven buttons… Here are the first two: the rest are just the same, mutatis mutandis:
type: horizontal-stack
cards:
  - type: 'custom:button-card'
    entity: input_select.kettle_mode
    show_icon: false
    show_state: false
    show_label: false
    aspect_ratio: 1/1
    name: 'Off'
    show_name: true
    tap_action:
      action: call-service
      service: input_select.select_option
      service_data:
        entity_id: input_select.kettle_mode
        option: 'Off'
    state:
      - operator: template
        value: |
          [[[ return states['input_select.kettle_mode'].state === 'Off' ]]]
        styles:
          card:
            - background-color: var(--secondary-background-color)
  - type: 'custom:button-card'
    entity: input_select.kettle_mode
    show_icon: false
    aspect_ratio: 1/1
    name: 40ºC
    show_name: true
    show_state: false
    tap_action:
      action: call-service
      service: input_select.select_option
      service_data:
        entity_id: input_select.kettle_mode
        option: 40ºC
    state:
      - operator: template
        value: |
          [[[ return states['input_select.kettle_mode'].state === '40ºC' ]]]
        styles:
          card:
            - background-color: var(--secondary-background-color)
And of course kalkih’s near-ubiquitous mini-graph-card makes for a pretty representation of the kettle’s temperature over time!
I hope that all this helps someone out there! The best thing? Asking Siri to turn the kettle on via CarPlay while driving home!
6 Likes
Thanks for the detailed post!
It really helped me flash my kettle.
I did not find the RST to ground the MCU so I unsoldered the MCU board from the ESP8266 board.
Also, the base of my kettle did not come off easily, even after I removed the three screws underneath. I found that I did not need to remove that anyway.
Hope this helps someone!
Does anyone know how to open it?
I’ve removed the 3 screws at the base but then nothing seems to budge…
Tom states: 1. Extract the computer board (unscrew base, remove handle cover, remove the computer board from the handle). Which implies needing to remove the base?
while @alistercole says " I found that I did not need to remove that anyway."
so im confused!
Do i need to remove the base?
How is the easiest way to get the handle off?
Thanks!
Guy,
You don’t need to remove the screws on the base of the unit.
Rather you need to carefully pry open the cover on the handle. Start at the bottom. There is a plastic clip that should open with a little pressure from a flat screwdriver or the like.
Cheers
1 Like
Just bought a Kogan kettle for $30, but found that Tuya-Convert is not working on my particular model. I’m confident it’s because of the updated firmware being shipped with the unit.
Instead of busting the thing open and soldering/flashing, I settled with pairing it to the TuyaSmart app, and then using the LocalTuya integration from HACS. This gives me a switch, as well as a temperature sensor (DPS 1 and 5 respectively).

So far, haven’t found a way to reflect the kettle’s state in HA from manually turning it on, but I don’t think that’s entirely useful right now, anyway.
Hope this helps anyone who’s recently purchased the kettle. If you’ve got any questions on how to get the localkey etc, let me know.
2 Likes
Hey that’s a cool idea, probably going to be enough for some peoples requirements of just turning it on locally. 
Yep!
Also can build your own keep warm/temperature limiting function, since the temperature is exposed and is pretty much update in real-time.
Thanks tbut,
This is my first attempt of low level electrical tinkering. I’ve soldered all the connections per Step #2, but I’m confused at the following steps.
Do I need to connect GPIO-O to the USB-Serial GND and the ESP GND to the ESP VDD?
Is there a specific sequence I need to perform these connections, i.e. connect GPIO-0 to serial GND, then disconnect after boot (to prepare for flash)?
Following step 5, will the device be able to power up and produce an SSID without reconnecting it back to the kettle power source?
Which tools do you recommend to do the flash? I was looking at Tazmotizer.
Apologies for all the questions, total noob here. Here’s my setup so far.

Do I need to connect GPIO-O to the USB-Serial GND and the ESP GND to the ESP VDD?
GPIO 0 needs to be connected to GND (before VCC is connected) so ESP8266 goes into flash mode, and GPIO0 can be connected to GND during the entire flashing process. As for the other MCU, I’m not sure, @tbut7633 did say the other board was overheating and I don’t want to risk it. I desolder the 4 points between the two boards and separate the WiFi board (ESP8266) from the other MCU. This makes things simpler, you don’t need to worry about shutting it off.
Following step 5, will the device be able to power up and produce an SSID without reconnecting it back to the kettle power source?
After flashing, disconnect GPIO0 from GND, then disconnect and reconnect VCC. It should boot into your custom firmware (I use Tasmota) and you can configure it over wifi.
Which tools do you recommend to do the flash? I was looking at Tazmotizer.
I use esptool. Tazmotizer is a good choice too, it uses esptool under the hood.
2 Likes
Hey I have a similar setup now, sometimes updating the dropdown will send another dropdown update command for me. not sure if it will be a problem for u but it has created some trouble for my setup. to get around that, I check the user that triggers dropdown change, if it was created by the nodered user, I’ll just drop the payload.
I have noticed the double change also from time to time.
Bit off topic but its far more noticeable on my Tuya MCU Anko fan from Kmart as it beeps on every change.
I noticed If I change the settings on the device itself that when the UI list updates to reflect the state change that home assistant/node red then sends that out as a command due to the list updating.
There must be a way to check in node red the incoming status update and then block the outgoing list change but its a little over my head at this point in time.