Hallo, ik heb informatie nodig over de commando’s om de warmtepomp van HA te beheren. De instelling van de verwarmings-/koeltemperatuur, de overgang van warm naar koud. Ik heb waveshare geïnstalleerd voor Modbus-communicatie. Ik wil graag de warmtepomp bedienen vanuit de home assistant. Hoe kan ik doen? heb je zoiets gedaan?
Hi, do you know if the Therma V can be reached via Modbus WiFi?
Thanks
Hello, I was able to read the heat pump registers via modbus, even if in my opinion they are not correct. Other values can be read from the machine display. Also in the HA logs it gives me these errors: Received 0 bytes, unpack error unpack required a buffer of 2 bytes
and: Pymodbus: PdC: Modbus Error: [Input/Output Modbus Error: [Invalid Message] No response received, expected at least 8 bytes (0 received).
How can I fix?
Hi all
Big thank for all the previous posts! Helped me a lot!!
Here is how I got it all to work
(sharing this because i find that good post contains more then one way to solve it, for all those after us)
I first ordered a Waveshare RS485 TO POE ETH (B) from a german website https://eckstein-shop.de/
Then installed this in the chassis where the PCB and connections reside
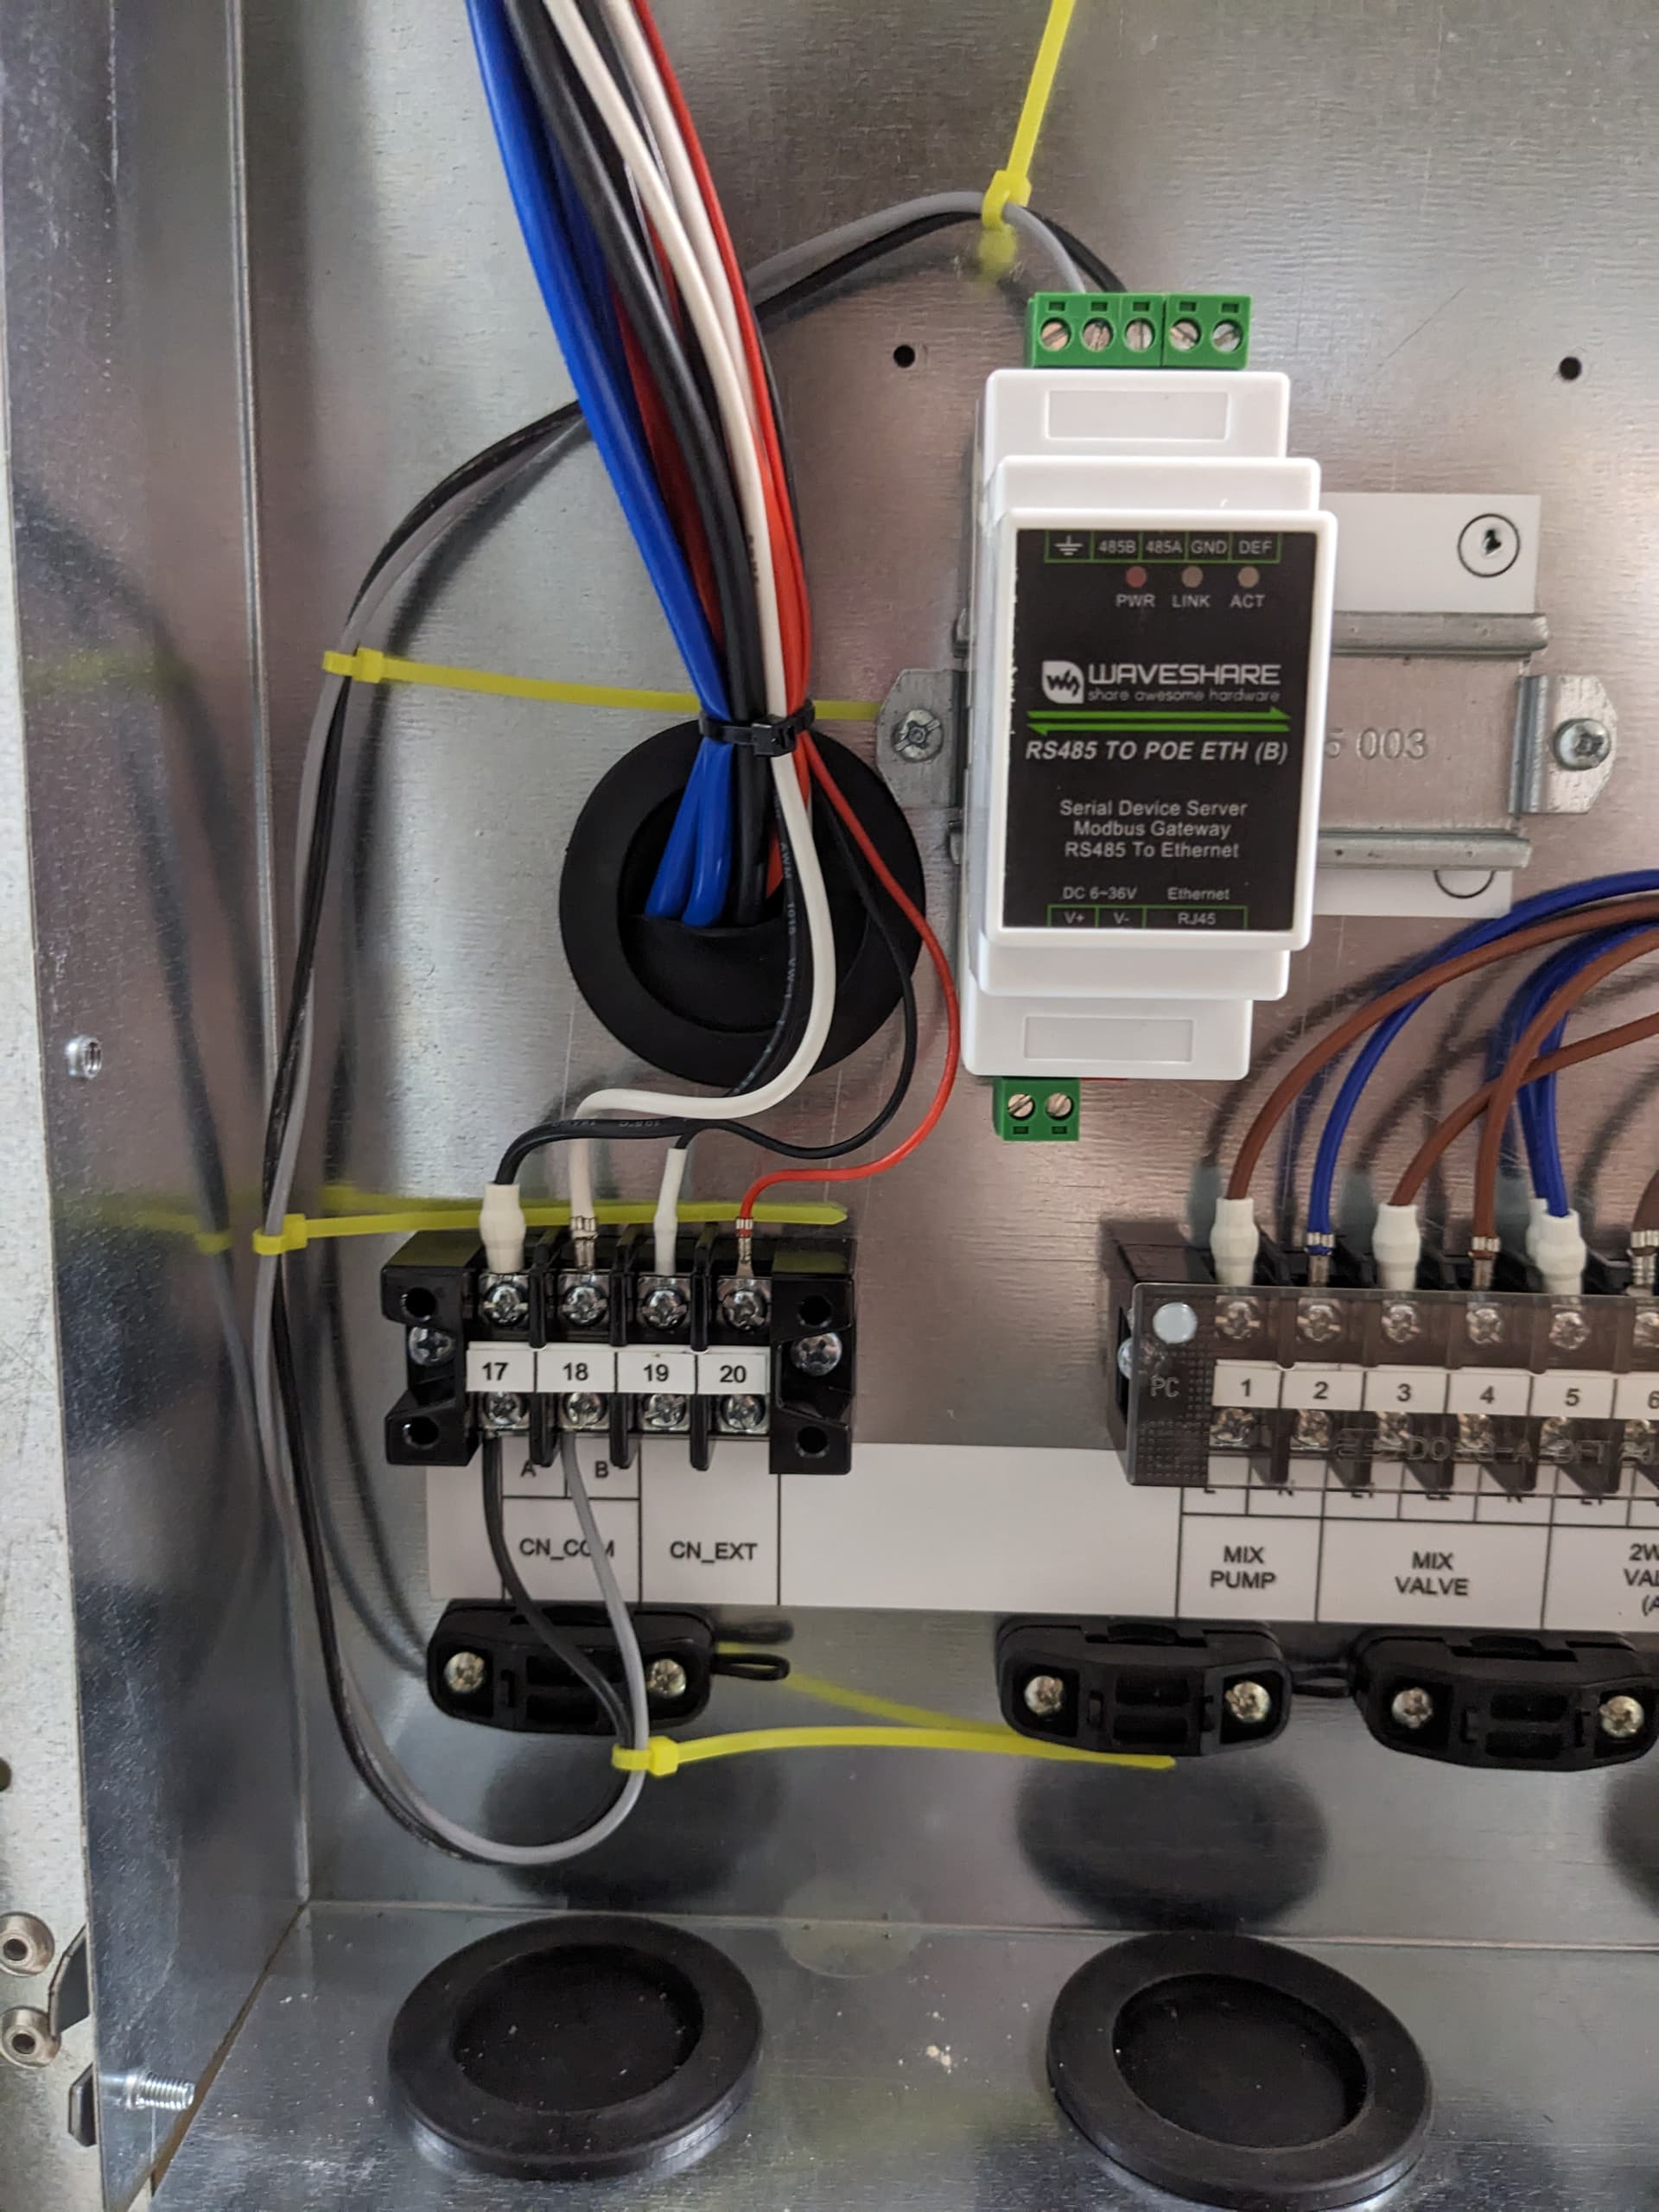
As you can see, A-A, B-B between the module and CN_COM.
The ethernet cable is missing is this picture. The nice thing about this model is that it supports POE and has “Power isolation, signal isolation protection”.
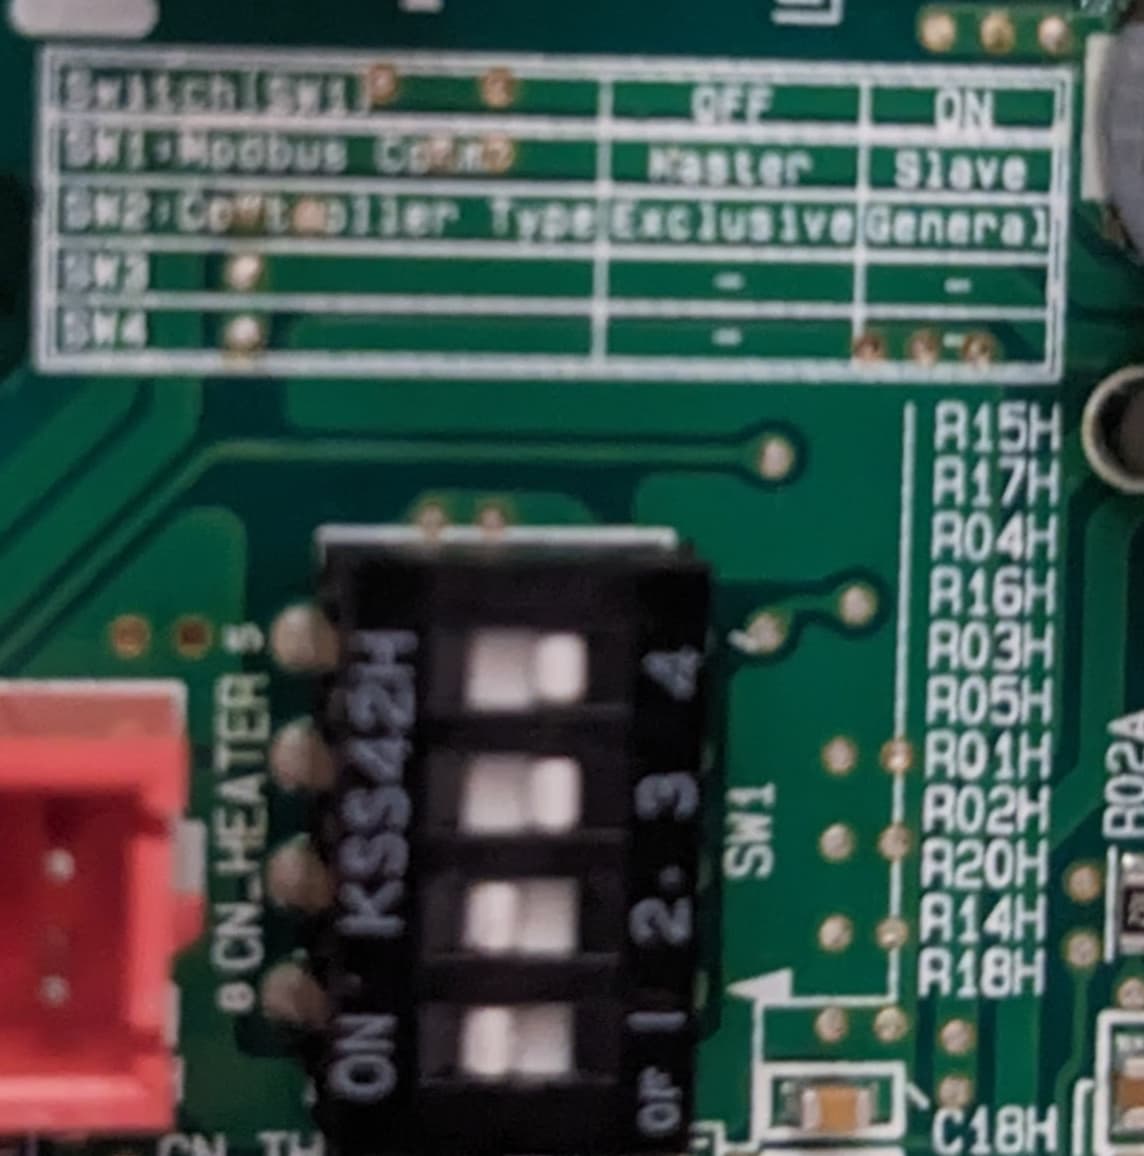
Then set the dip switched correct. You can clearly see on the silkscreen that this is what you need.
(in my manual sw2 was indicated to be “reserved”, yeah, thx manual)
I also set the modbus address to 01
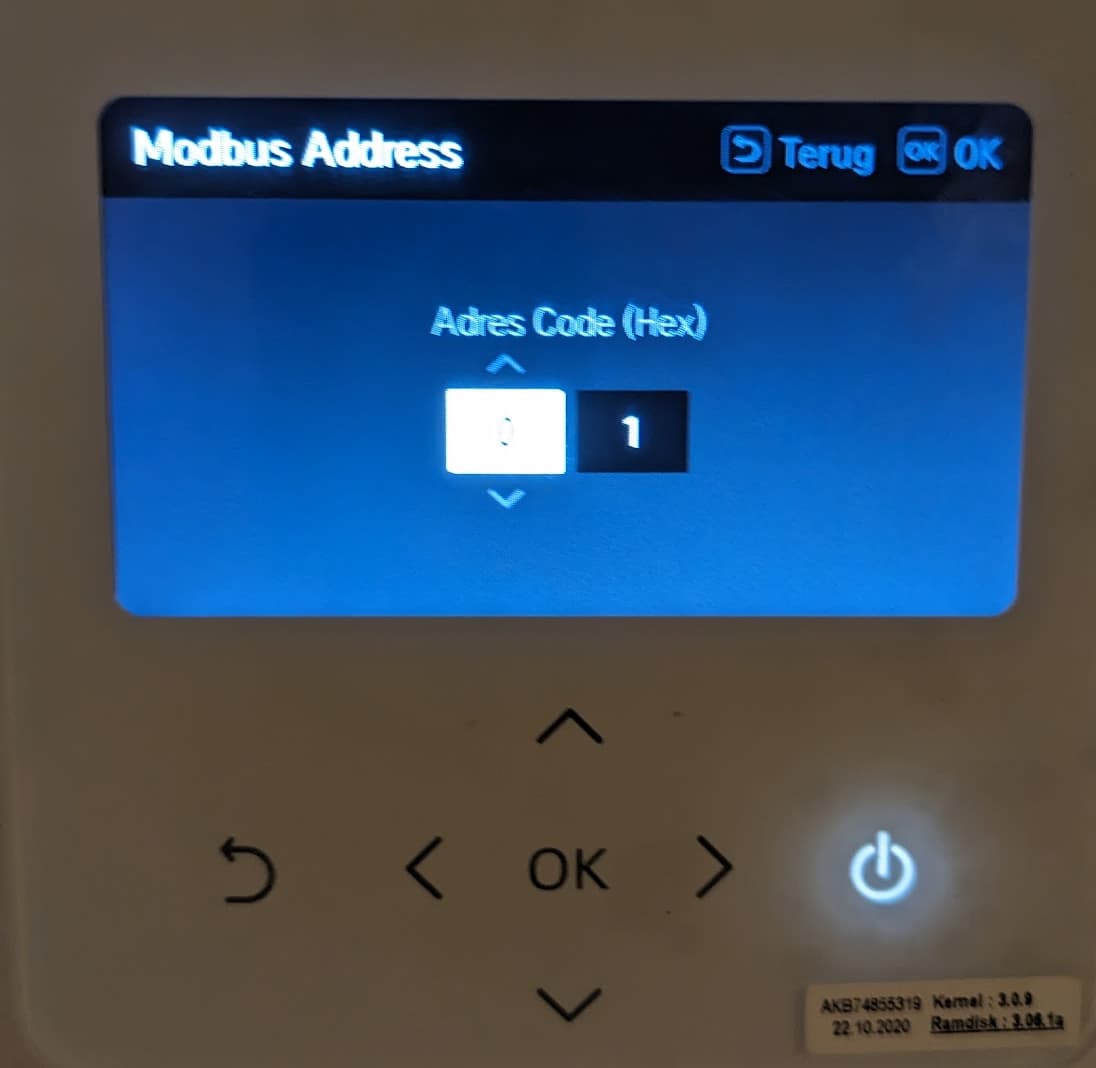
I guess it doesn’t have to be 01, but your config should match up.
I then used nmap to find the static IP already set to the device from the factory.
It’s in the 192.168.1.0/24 range, so be carefull if this is the same as your home network. My device had ip 192.168.1.201. If surfed to the website (http) to set an IP that I wanted it to have.
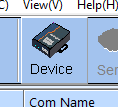
Then I switched over to using my windows machine to use the provided (on site) software.
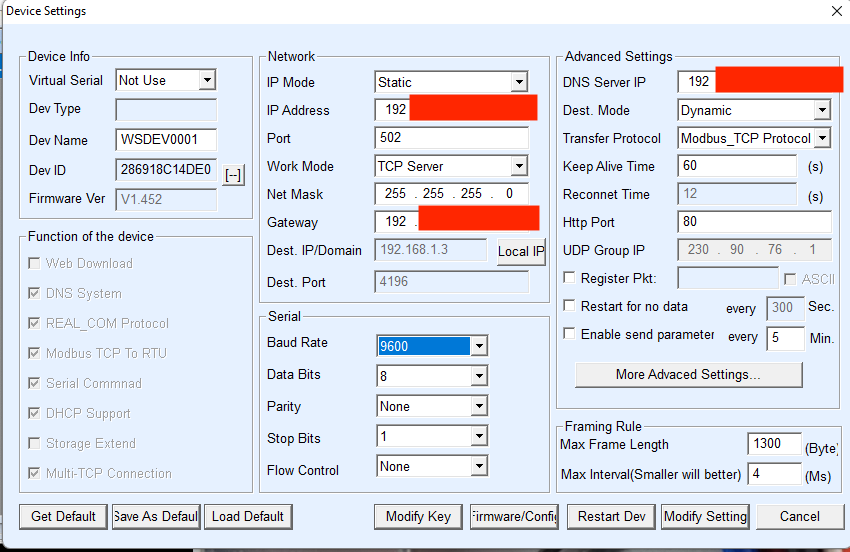
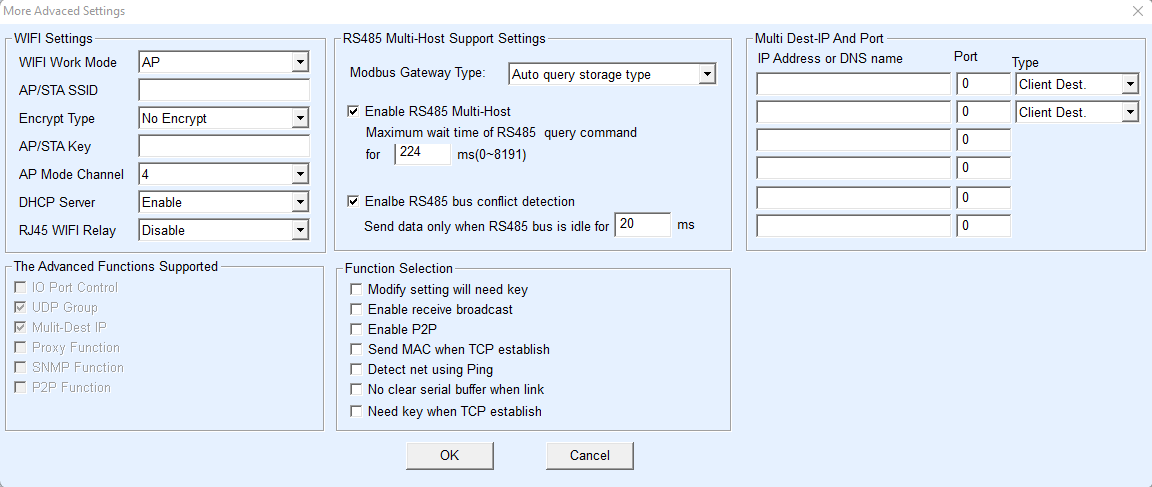
Here are my settings:
![]()
select device

En then my not yet fully done but working configuration (again thx to before me)
modbus:
  - name: "LG Therma V"
    delay: 1
    close_comm_on_error: false
    timeout: 14
    retry_on_empty: true
    retries: 10
    message_wait_milliseconds: 200
    host: <IP OF THE MODBUS - TCP SERVER>
    port: 502
    type: tcp
    binary_sensors:
      - name: "LG Therma V Compressor"
        address: 3
        slave: 1
        scan_interval: 10
        device_class: running
        input_type: discrete_input
      - name: "LG Therma V Defrost"
        address: 4
        slave: 1
        scan_interval: 10
        device_class: running
        input_type: discrete_input
    sensors:
      - name: "LG Therma V Inlet"
        scan_interval: 10
        address: 2
        slave: 1
        input_type: input
        scale: 0.1
        device_class: temperature
        unit_of_measurement: "°C"
        precision: 0
      - name: "LG Therma V Outlet"
        scan_interval: 10
        address: 3
        slave: 1
        input_type: input
        scale: 0.1
        device_class: temperature
        unit_of_measurement: "°C"
        precision: 0

      - name: "LG Therma V Flow Rate"
        scan_interval: 10
        address: 8
        slave: 1
        input_type: input
        scale: 0.1
        unit_of_measurement: "l/min"
        precision: 0.1
        zero_suppress: 5

      - name: "LG Therma V Flow Outside Temperature"
        scan_interval: 10
        address: 12
        slave: 1
        input_type: input
        scale: 0.1
        device_class: temperature
        unit_of_measurement: "°C"
        precision: 0

    switches:
      - name: "LG Therma V Verwarming"
        slave: 1
        address: 0
        write_type: coil
        command_on: 1
        command_off: 0
        verify:
          input_type: coil
          address: 0
          state_on: 1
          state_off: 0

      - name: "LG Therma V Warm water"
        slave: 1
        address: 1
        write_type: coil
        command_on: 1
        command_off: 0
        verify:
          input_type: coil
          address: 1
          state_on: 1
          state_off: 0

      - name: "LG Therma V Silent Modus"
        slave: 1
        address: 2
        write_type: coil
        command_on: 1
        command_off: 0
        verify:
          input_type: coil
          address: 2
          state_on: 1
          state_off: 0

    climates:
      - name: "LG Therma V Verwarming"
        address: 7
        slave: 1
        input_type: input
        count: 1
        max_temp: 25
        min_temp: 16
        offset: 0
        precision: 0
        scale: 0.1
        target_temp_register: 2
        temp_step: 1
        temperature_unit: C
        hvac_mode_register:
          address: 0
          values:
            state_cool: 0
            state_heat: 4
            state_auto: 3

      - name: "LG Therma V Warm Water"
        unique_id: lg_therma_v_warm_water
        slave: 1 # Modbus address
        address: 5 # DHW tank water temp.
        input_type: input # Input Register
        count: 1
        max_temp: 55 # Max temperature (can be higher or lower based on serive settings)
        min_temp: 40
        target_temp_register: 8 # DHW Target temp.
        temp_step: 1
        temperature_unit: C
        offset: 0
        precision: 0
        scale: 0.1 # 0.1°C x 10
I’ve also added some climate-template “magic” to get the off state working within the climate entities.
!!! custom component !!!
see https://github.com/jcwillox/hass-template-climate
climate:
  - platform: climate_template
    name: Warm Water
    unique_id: lg_therma_v_combined
    modes:
      - "off"
      - "heat"
    min_temp: 40
    max_temp: 55
    current_temperature_template: "{{ state_attr('climate.lg_therma_v_warm_water', 'current_temperature') }}"
    target_temperature_template: "{{ state_attr('climate.lg_therma_v_warm_water', 'temperature') }}"
    hvac_mode_template: "{{ 'heat' if is_state('switch.lg_therma_v_warm_water', 'on') else 'off' }}"
    set_temperature:
      - service: climate.set_temperature
        data:
          entity_id: climate.lg_therma_v_warm_water
          temperature: "{{ temperature }}"
    set_hvac_mode:
      - choose:
          - conditions:
              - "{{ hvac_mode == 'heat' }}"
            sequence:
              - service: switch.turn_on
                target:
                  entity_id: switch.lg_therma_v_warm_water
          - conditions:
              - "{{ hvac_mode == 'off' }}"
            sequence:
              - service: switch.turn_off
                target:
                  entity_id: switch.lg_therma_v_warm_water

  - platform: climate_template
    name: Vloerverwarming
    unique_id: lg_therma_v_verwarming_combined
    modes:
      - "off"
      - "heat"
      - "cool"
      - "auto"
    min_temp: 16
    max_temp: 30
    current_temperature_template: "{{ state_attr('climate.lg_therma_v_verwarming', 'current_temperature') }}"
    target_temperature_template: "{{ state_attr('climate.lg_therma_v_verwarming', 'temperature') }}"
    hvac_mode_template: "{{ states('climate.lg_therma_v_verwarming') if is_state('switch.lg_therma_v_verwarming', 'on') else 'off' }}"
    set_temperature:
      - service: climate.set_temperature
        data:
          entity_id: climate.lg_therma_v_verwarming
          temperature: "{{ temperature }}"
    set_hvac_mode:
      - choose:
          - conditions:
              - "{{ hvac_mode == 'off' }}"
            sequence:
              - service: switch.turn_off
                target:
                  entity_id: switch.lg_therma_v_verwarming
          - conditions:
              - "{{ hvac_mode in ['auto', 'heat', 'cool'] }}"
            sequence:
              - service: switch.turn_on
                target:
                  entity_id: switch.lg_therma_v_verwarming
              - service: climate.set_hvac_mode
                data:
                  entity_id: climate.lg_therma_v_verwarming
                  hvac_mode: "{{ hvac_mode }}"
1 Like
hello, I followed your choices and installed the components as described, also using your code. HA gives me this error log how can I fix it?
Logger: homeassistant.components.modbus.base_platform
Source: components/modbus/base_platform.py:217
Integration: Modbus (documentation, issues)
First occurred: 25 agosto 2023 alle ore 09:52:43 (588140 occurrences)
Last logged: 10:12:15
Received 0 bytes, unpack error unpack requires a buffer of 2 bytes
Does the U34 monoblock have integrated sensor for measuring and reporting inlet and outlet water temp?
How can I then measure COP if I know consumption but do not know water flow?
Sorry I didnt check here long time.
If still you can not do connection I can help you. What is your problem now ? did you set sw settings like I wrote and also modbus address must be 2.
    sensors:

      - name: hp_inlet_temp
        scale: 0.1
        precision: 1
        scan_interval: 30
        address: 2 # reg 3
        slave: !secret lg_heatpump_modbus_slave
        unit_of_measurement: °C
        device_class: temperature
        input_type: input

      - name: "hp_outlet_temp"
        scale: 0.1
        precision: 1
        scan_interval: 30
        address: 3 # reg 4
        slave: !secret lg_heatpump_modbus_slave
        unit_of_measurement: °C
        device_class: temperature
        input_type: input
In the end i used an device from waveshare ( |Module Name:|RS232/485 TO ETH|
| — | — |
|Firmware Revision:|V1.0.2|) beawere to order the MODBUS variant ( 49,95) = , (MODBUS support!) works like a charme orderd @ sossolutions in Holland,
Please, could someone give me a hint? I already tried different advices from this thread
-
switched SW1/1 (Modbus - as slave)
-
switched SW2/1 (Role when central controller is equipped - slave)
-
left SW1/2 as is (Common 3rd party, not siemens)
-
wired A to A, B to B to an RS485 to USB, some kind of FTDXX inside, it connected as COM4
-
turned on HP
-
configured modbus ‘address code hex’ to 0x02 (on internal display unit)
Then I tried various Modbus windows utils (ModbusPoll, QModMaster), but was not able to read coils or registers
- successfully connected to RS485 dongle via COM
- RX flashed
- some flickering on a scope
- TX never flashed
- read timeout.
Label on HP says: ‘3rd party controller A,B 5V DC’
However RS485 is not 5V DC, in my case cca. -0.8 to 2.6V on receiver side, which si OK according to RS485 spec, but far from ‘5V DC’
May this be an issue?
Many thanks
HN091MR NK5, firmware v. 3.0.6.4
Edit:
Today I tried different RS485 module, connected to ESP32. This one produces stronger signal (-4 to +5V), but HP still doesn’t give a f@k.
1 Like
In my case problem was siemens protocol. It must be Siemens protocol. Can you try ?
Hi all,
I’ve been trying to connect to the LG V therma heatpump as well, with no succes till now…
Setup
I have the HN091MR NK5 with a split unit outside
Firmware version 3.066
I’m using settings as PeterNibbik suggested
With the similar Waveshare unit
Below overview of print in Heat pump, waveshare terminals connected to 21/22. Dip switches in middle of board
What I’ve tried
-Many restarts
-Switch A and B connections
-Different options for SW1 (1 on/ 2 off, 1 on/ 2 on)
-Different options for SW2 (1 on/2 off, 1 off, 2 on, both off)
-The above in different combinations
Different Modbus adress on HP unit (1, 2)
According to manual actually I only think dat SW1 (1 or 2) has an effect on modbus communication
(LG HN091MR.NK5 Product Support: Manuals, Warranty & More | LG UK ← installation manual page 123)
Also tried switches in external unit, allthough I guess I have a different version of the HP for which thiss is not necessary? Nevertheless, all to no avail…
** What I get**

When connecting, only first 2 lights blink on waveshare unit (power and work), there’s a 0.45 V voltage over A and B connections. There seems to be no communication (or would there be communication without blinking lights?). No communication to Home Assistant, but already some error messages on modbus part. Didn’t sort that out yet as I didn’t expect any results on this part before I’d see something happening at the waveshare unit.
Is there anyone with experience with a similar setup?
Does anyone have suggestions to make it work?
What would your next step be to find out to solve this issue?
I’m thinking of trying a modbus over USB connector (haven’t bought yet) to make sure it is not the waveshare unit, any suggestions for this?
Spent quite some hours on this and I’m with my ‘hands in my hair’ now.
Hope anyone could help.
Best regards,
Eelke
(Could only place 1 picture in this message as I’m a new user, rest of pictures can be found through google drive pictures - Google Drive)
I can try help. Just Im not using Home Assistant. Im using USB RS485 Module and C#. It works fine for me. If this will help you please let me know
Thanks for your offer to help, for now I rather keep using HA for this. Got a few steps further today ![]()
Update:
OK, had to learn a bit more about MODBUS communication…
Wasn’t at the site with the heatpump, but could try it out at home with an irradiance meter (Hukseflux SR05).
I’ve used GitHub - ClassicDIY/ModbusTool: A modbus master and slave test tool with import and export functionality, supports TCP, UDP and RTU. to have a clearer idea on how the communication with modbus devices takes place and I could test if communication over ethernet worked properly.
Then learned about different register types and took the datasheet of the Irradiance meter.
Now I’m able to read different data types (Unsigned 16 bit, Signed 32 bit) from different register adresses with Home Assistant.
Update 23:11
Tested with actual heatpump these days. Works like a charm!
Thanks everyone for placing your experiences in this forum!
Hi,
so what did you have to change in the end to make it work?
You say it now works fine but before it didn’t, what was the trick?
Ha, well the key was, I just tried to make it work by copy pasting what I found here but not having a clue what I did.
I had some error messages in HA, but didn’t bother first. I expected some feedback on the modbus controller (flashing lights) after proper connection before moving on to doing something about the errors in HA.
By starting with the basics (reading about modbus) and trying out writing/ reading registers directly (with the modbustool) I understood that there is no modbus-communication unless I specifically ask for it. (on hindsight a no-brainer, but that’s generally the thing with hindsight…).
The trick was to first make sure that HA communication with the waveshare device worked well by only reading out one Modbus register and in case of errors, specifically see what went wrong, or just uncheck the part that gave the error
For example the part below, after input i got an error on count, don’t need it now, don’t bother to fix. But at least it doesn’t influence the rest of the communication.
    climates:
      - name: "LG Therma V Verwarming"
        address: 7
        slave: 1
        input_type: input
        #count: 1
        max_temp: 60
        min_temp: 16
From there building up the code for each sensor I wanted to read out/ write to.
In my case it is just a proof of concept now. So I know I can read and write to this device.
Full code below:
logger:
  default: warning
  logs:
    homeassistant.components.modbus: debug
    pymodbus: debug

modbus:
  - name: "WS485toETH"
    delay: 1
    timeout: 14
    retries: 10
    message_wait_milliseconds: 200
    host: XXXXXXXXX
    port: 502
    type: tcp
    sensors:
      - name: "LG Therma V Inlet"
        scan_interval: 10
        address: 2
        slave: 1
        input_type: input
        scale: 0.1
        device_class: temperature
        unit_of_measurement: "°C"
        precision: 0
      - name: "LG Therma V Outlet"
        scan_interval: 10
        address: 3
        slave: 1
        input_type: input
        scale: 0.1
        device_class: temperature
        unit_of_measurement: "°C"
        precision: 0
      - name: "LG Therma V Flow Rate"
        scan_interval: 10
        address: 8
        slave: 1
        input_type: input
        scale: 0.1
        unit_of_measurement: "l/min"
        precision: 0.1
        zero_suppress: 5
      - name: "LG Therma V Flow Outside Temperature"
        scan_interval: 10
        address: 12
        slave: 1
        input_type: input
        scale: 0.1
        device_class: temperature
        unit_of_measurement: "°C"
        precision: 0


    switches:
      - name: "LG Therma V Silent Modus"
        slave: 1
        address: 2
        write_type: coil
        command_on: 1
        command_off: 0
        verify:
          input_type: discrete_input
          address: 7
          state_on: 1
          state_off: 0
      - name: "LG Therma V Verwarming"
        slave: 1
        address: 0
        write_type: coil
        command_on: 1
        command_off: 0
        verify:
          input_type: coil
          address: 0
          state_on: 1
          state_off: 0

      - name: "LG Therma V Desinfection"
        slave: 1
        address: 3
        write_type: coil
        command_on: 1
        command_off: 0
        verify:
          input_type: discrete_input
          address: 6
          state_on: 1
          state_off: 0

      - name: "LG Therma V Warm water"
        slave: 1
        address: 1
        write_type: coil
        command_on: 1
        command_off: 0
        verify:
          input_type: coil
          address: 1
          state_on: 1
          state_off: 0
    climates:
      - name: "LG Therma V Verwarming"
        address: 7
        slave: 1
        input_type: input
        #count: 1
        max_temp: 60
        min_temp: 16
        offset: 0
        precision: 0
        scale: 0.1
        target_temp_register: 2
        temp_step: 1
        temperature_unit: C
        hvac_mode_register:
          address: 0
          values:
            state_cool: 0
            state_heat: 4
            state_auto: 3
As you can see above, copy pasting makes degree Celcius sign look weird. These things sometimes give issues. I don’t care to see the exact sign, so would just replace with C only.
Interesting. I struggled a lot with the CH03 error, I am following up another thread on a dutch forum to see if there is a solution.
But at the same time I have returned the Waveshare RS485-to-Wifi module as it was really embarassing in terms of documentation and settings.
I think you have the ETH version, I cannot run a cable so I have to go wireless, but this module has the worst UI I have ever seen and I didn’t manage to undertand how to start the basic communication.
But more than the module what stopped me is the CH03 error, and I read that it’s quite tricky to find a solution as it may be due to HA or to the module.
For now I have this project on pause
Yes, I have the ETH version
If you run a windows computer on your network, you could try this tool: GitHub - ClassicDIY/ModbusTool: A modbus master and slave test tool with import and export functionality, supports TCP, UDP and RTU.
to at least see if you could communicate over modbus through your device.
I also saw the CH03 error at the start, later not anymore. Don’t know what solved it (or if it is really solved, am not @ location so cannot see screen) But now you mention it, if I have time I could probably read it out from the device.
BTW, I also wasn’t able to edit settings in waveshare device through that nmap tool, had to use webadress.
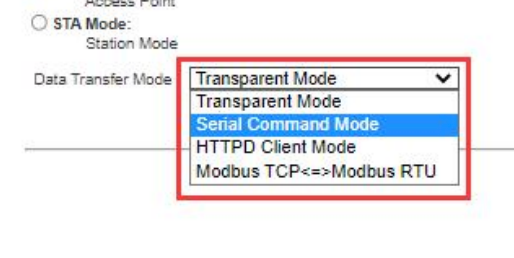
Does the ETH version have 4 modes of operating?
If yes what are you using?
People reporting the CH03 error seem to report that when HA goes down or is shut down they get the error, others report that polling too often the heatpump cause the remote controller to lose connectivity to the main unit.