NUT / APC XS-1000 failed - Data stale

So my config was identical to yours and was crashing every two hours. The only difference was that I had set the ‘productid’ option to 0501 and you have ‘vendorid’ set to 0764 instead. Both are correct from reading the NUT compatibility pages. I switched out my ‘productid’ for the ‘vendorid’ option instead and the NUT add-on has now been up for about 3 hours without problems.

It may yet be too early to say for sure so I’ll see how it is in the morning. I have no idea why that would have a detrimental effect on the add-on. It’s two different ways of specifying the same UPS and both are equally valid under NUT. I’ve got my fingers crossed though.

Out of curiosity, are any of you running NUT inside a VM or in a Docker container?

I am running it on a Supervised install, so yes in a docker container under Debian 10.

Did the fix hold for you? Neither are deprecated and both are documented. The only difference is what part of the USB connection that the data is compared to? I have always used vendorid on my ups units for years.

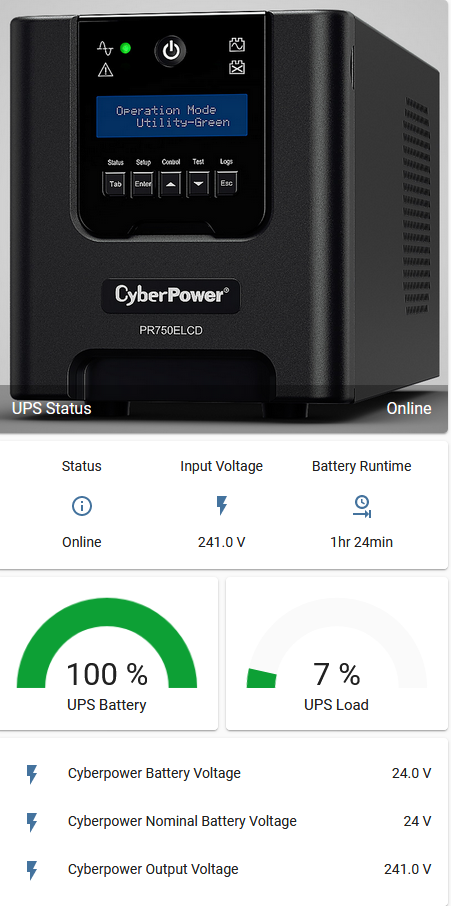
Thanks so much for posting this. I had real trouble trying to integrate my CyberPower PR750ELCD, just trying to get it to connect, and then it would disconnect after 20 minutes. At first I thought it was the USB port going to sleep, but even after disabling that in Windows, (and failing to find a similar setting in the VM), it still dropped out. I also needed to pass the USB port to the virtual machine.

Another thing that stumped me, that seems totally obvious afterwards, was that Home Assistant has its own built in NUT server. I’m so used to just going to the integration page, it didn’t occur to me to go to the Supervisor Add-on store, and look there. I had been struggling with command lines in Windows, which are really badly documented. For anyone else wanting to go this route:

libgcc_s_dw2-1.dll
ssleay32.dll
libeay32.dll

needed to be in both sbin, and bin folders, and from memory some of them weren’t included in the package.

Please improve Windows port documentation/packaging · Issue #262 · networkupstools/nut · GitHub helped but unlike any other program I’ve ever used in a Windows DOS/command prompt, you had to have two separate windows, and keep them open: one to run upsdrvctl start, and another to run upsd.exe

It also required making its own .inf using libusb-win32 files.

All in all a bit of a nightmare compared to how easily the Home Assistant add-on was, except for the pollinterval = 15 thing which needed to be under config.

I haven’t needed to bother with the vendor ID, but it is listed as 0764
Bus 002 Device 006: ID 0764:0601 Cyber Power System, Inc. PR1500LCDRT2U UPS
which is the wrong UPS, but still seems to work. Here is my config in case it helps anyone else:

users:
  - username: remote
    password: xxxxxxxxxxxxx
    instcmds:
      - all
    actions: []
devices:
  - name: cyberpower
    driver: usbhid-ups
    port: auto
    config:
      - pollinterval = 15
mode: netserver
shutdown_host: false
list_usb_devices: true
upsd_maxage: 25
upsmon_deadtime: 25

Glad it is working for you. Never thought to mention the fact that there was an integration and addon. Have never tried nut with windows, always remoted them on a pi and direct connection to HA server on a pi or now a Lenovo I3.

Yeah, it’s so obvious when you know, but until you do… Hopefully someone will be able to benefit from my idiocy :slight_smile:

And while I’m here, here is my Lovelace card cobbled together from various sources that may help too:

cards:
  - type: picture-entity
    entity: sensor.ups_status
    image: https://i.imgur.com/V4wbzvE.png
  - entities:
      - entity: sensor.cyberpower_status
        name: Status
      - entity: sensor.cyberpower_input_voltage
        name: Input Voltage
      - entity: sensor.cyber_ups_uptime
        name: Battery Runtime
    theme: default
    type: glance
    state_color: true
  - cards:
      - entity: sensor.cyberpower_battery_charge
        max: 100
        min: 0
        name: UPS Battery
        severity:
          green: 0
          red: -80
          yellow: -30
        theme: default
        type: gauge
      - entity: sensor.cyberpower_load
        max: 100
        min: 0
        name: UPS Load
        severity:
          green: 0
          red: 90
          yellow: 70
        theme: default
        type: gauge
    type: horizontal-stack
  - type: entities
    entities:
      - entity: sensor.cyberpower_battery_voltage
      - entity: sensor.cyberpower_nominal_battery_voltage
      - entity: sensor.cyberpower_output_voltage
type: vertical-stack

and to get the time remaining in something more useful than thousands of seconds then put this in a file called: ups.yaml ( name isn’t important) under:
\your home Assistant IP address\config\packages

You may need to create it.

sensor:
  - platform: template
    sensors:
      cyber_ups_uptime:
        value_template: >
          {%- set time = states('sensor.cyberpower_battery_runtime') | int %}
          {%- set minutes = ((time % 3600) // 60) %}
          {%- set minutes = '{}min'.format(minutes) if minutes > 0 else '' %}
          {%- set hours = ((time % 86400) // 3600) %}
          {%- set hours = '{}hr '.format(hours) if hours > 0 else '' %}
          {%- set days = (time // 86400) %}
          {%- set days = '{}d '.format(days) if days > 0 else '' %}
          {{ 'Less than 1 min' if time < 60 else days + hours + minutes }}

You’ll have to change your Entity names to match your own, but if you’ve come this far it should be a breeze! You’ll need to restart Home Assistant for the packages template code to be loaded.

Edit:

homeassistant:

  packages: !include_dir_named packages  

needs to be in your configuration.yaml

This is how I represent each of my ups units. It is fairly compact and contains the important stuff. I leave my runtime in seconds, but may try the conversion above to see how I like it for the actual uptime of the units.

Unfortunately not. After days of trying different things I ended up giving up entirely and moved my Nut server to Unraid instead with Home Assistant running as a client. It’s been rock solid ever since and I haven’t even needed to set the pollinterval or any of the other options either.

That looks nice and streamlined. Here’s mine:

I leave my runtime in seconds, but may try the conversion above to see how I like it for the actual uptime of the units.

I I think it looks more practical for hours/minutes to be displayed, but it did cause me some grief with a node red automation, that I had set to go off after 10 minutes, i.e <10, but as 1(hour) is less than 10, it was firing when it shouldn’t. So I went back to monitoring by seconds, <600, instead.

A little update. So the fix I mentioned above actually didn’t end up being stable. The host OS, which is MacOS in one of my instances, ends up not “playing nice” and eventually takes over the lock on the USB port, rendering NUT incapable of communicating with the UPS. This is especially the case during a reboot. I can trick it into having the hypervisor grabbing the lock, if I boot the Mac without the USB being plugged in, and only plugging it back in after the VM starts, but that’s hardly a solution. I might come back to this later, but I’m picking my battles, and since I’m not having this issue in Linux, for the time being, I’m just using a spare RPi to to run NUT.

Thanks Quadhammer your config solved my problem. But I found an error in your config.

The first “upsmon_deadtime: 25” under the device is not valid and was generating warning.
The line should only be under “upsd_maxage: 25”

Also, I removed the quotes for shutdown_host: false to be consistent.

users:
  - username: xxxxxxx
    password: xxxxxxx
    instcmds:
      - all
    actions: []
devices:
  - name: Network-UPS
    driver: usbhid-ups
    port: auto
    config:
      - pollinterval = 15
mode: netserver
shutdown_host: false
list_usb_devices: true
upsd_maxage: 25
upsmon_deadtime: 25

No worries, and thanks, I edited my post above to fix the errors.