Right I got it working now after several days of wrestling through the topics.
Ipad model from 2012, IOS 9.3.6 highest possible at the moment.
I got homeAssistant OS, So that means, no direct docker commands possible, completely unclear where the Add ons are in the filesystem etc. the minimum what you need is ssh. I got a HomeAssistant Yellow, so dedicated RPI and HomeAssistant pre-installed as Homeassistant OS, which is basically a closed/ impossible system if you want to run docker commands.
My current configuration is :
Ipad 9.3.6 → RealVNC → connect to firefox that’s running internal in HA → firefox is connected with HA via homeassistant.local:8123. It sounds complicated, but it is rather fast and convenient.
I used the firefox add on : Home Assistant Add-On: Firefox
However this prebuild image does not have the ports mapped ! 5800:5800 and 5900:5900. I needed this mapping because I want to access the homeassistant firefox browser from my internal network.
Also I’d like to set the kiosk mode, dark mode and the right screen resolution (which is apparently 2048x1536 (QXGA) for my model Ipad).
Another problem I encountered is downloading a compatible version on the Ipad. I now have this working with VNC on port 5900 which is in my opinion much faster than using a firefox instance on the ipad and using port 5800.
So the mistake I made was (after having the app installed on another IOS device with the same user) trying to download the app on the 9.3.6 ipad directly from the store. This is not what you should do, go to purchases ‘aankopen’ and there you have all the apps installed on your more modern device. If you click the download in this overview, you get the offer to download an older compatible version ! this worked both for firefox and realvnc and probably for a whole bunch more apps.
So to get the right parameters changed in the existing image, I was ‘inspired’ by the ‘hello world’ application mentioned here : Tutorial: Making your first add-on | Home Assistant Developer Docs
You can try up to step 2, step 3 is not important to know for now.
If you succeeded, you can basically put a few files in a new addon directory ‘hello world’ via ssh and have this picked up by the addon store of homassistant OS. you can install it and run it. nice…
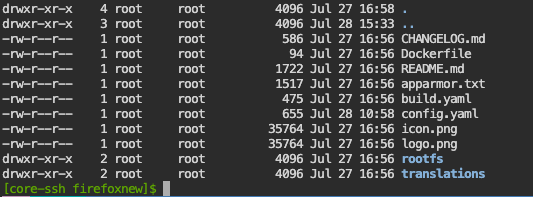
So equally I picked the firefox browser addon (after removing the default add on that I got via adding a repo the ‘normal’ way). And I made a folder called ‘/addons/firefoxnew’. after that I did a git clone of the repo (mentioned on top) to get the files fast and easy to this folder. After that I moved all the files in the ‘firefox’ dir to the firefoxnew directory and removed the other files . so it looks like this :

Now you have to change the config.yaml with the parameters, at least add
ports:
  5800/tcp: 5800
  5900/tcp: 5900
I also added in the environment section:
FF_KIOSK: "1"
DARK_MODE: "1"
DISPLAY_WIDTH: "1536"
DISPLAY_HIGHT: "2048"
Now that you are done, you can follow the same instructions as “hello world”. So update your add on store, ‘firefoxnew’ should be visible (oh yeah, the name in the config.yaml on top should be changed to “FireFoxnew” or something else that you like).
Now you can install this addon, that you tweeked. basically it seems that it copies it somewhere internal, so you could delete your addon folder later on, I kept it for later use.
I think this is it more or less. It is not a step by step guide, but more like an “I did it, I really did it”. And of course every question I’m happy to try and answer. It took me a lot of hours to figure it out, so possibly others can also benefit from it. cheers !


