In an open source world, either the main author or an adventurer with free time.
so what is the solutions that need to work?
I found that adding a simple sleep(0.05) was enough to give the system time to read the high and low values when using the callback.
If we added this to the call back function it should work.
We need to find out where this add_event_decect is located at.
GPIO.add_event_detect(pin, GPIO.BOTH, callback=state_change_hadler, bouncetime=300)
These look to be all the routines that use that event call back.
For me, I just needed it for the binary sensor.
Edit
homeassistant/components/binary_sensor/rpi_gpio.py
Add
Line 17: from time import sleep
Line 76: sleep(0.02)
That’s it ! a 20 ms delay and everything works reliable.
If somebody can show me where to submit this as an enhancement I’d appreciate that. I know people would enjoy the stability of this slight change.
So to clarify, line 76 would put that line in the constructor, but I assume you mean for it to go in the read_gpio method, correct? I could certainly help with submitting a pull request, but I’m doubtful that a delay is a good solution that will pass review, especially a hardcoded one. I could make it configurable, of course.
It’s worth a try.
where did you put the sleep command?
Followed suggestions from @Flyguy86 (thanks!) and things work great for me.
Using HA 0.79.3 on a PI Zero W.
configuration.yaml
binary_sensor:
- platform: rpi_gpio
ports:
21: Button
pull_mode: DOWN
switch:
- platform: rpi_gpio
ports:
26: Led - platform: rpi_gpio
ports:
20: Relay
invert_logic: true
automation.yaml
- alias: ‘Push Button’
trigger:- platform: state
entity_id: binary_sensor.Button
to: ‘on’
action: - service: homeassistant.toggle
entity_id: switch.Led - service: homeassistant.toggle
entity_id: switch.Relay
- platform: state
Nothing fancy: Pi, a breadboard and 3.3v + GPIO pins. One button push turns on both the Led and Relay, one more push and it turns them off.
1 Like
Still having the issue of binary_sensor raspberry pi GPIO only recognizing first state switch to on and not returning to off. (home assistant 0.89.1)
I used a workaround using a sensor reading the state from commandline:
sensor:
  - platform: command_line
    name: SensorNameGPIO24
    command: "cat /sys/class/gpio/gpio24/value"
    value_template: '{{ value }}'
    scan_interval: 1
    command_timeout: 1
since it took me quite a while to figure that out, I thought that might help others.
and I also configure the GPIO as input using home assistant
binary_sensor:
  - platform: rpi_gpio
    ports:
      24: InputGPIO24
    pull_mode: DOWN
all displayed config is done in configuration.yaml
3 Likes
So this solved lack of stability by gpio of the pi?
My understanding is that this solution will be limited by the scan interval, and would only work if you can guarantee that an input will last longer than a second, anything that could be shorter could miss being scanned.
So while it might be a good workaround for something like a door sensor (unlikely to be open for less than a second) I’m not sure it’s a great solution for something like a doorbell which may be pushed for only half that time.
One second is a CPU intensive scan interval already. Imagine having 24 inputs to scan with this. Not really an ideal solution.
SOLVED. Try with automation wich reload sensors. In my case every 2 seconds.
- id: ‘cron’
alias: cron
trigger:- platform: time_pattern
seconds: /2
condition: []
action: - data:
entity_id: binary_sensor.gpio12
service: homeassistant.update_entity - data:
entity_id: binary_sensor.gpio25
service: homeassistant.update_entity - data:
entity_id: binary_sensor.gpio17
service: homeassistant.update_entity
- platform: time_pattern
HA isn’t designed to capture fast triggers, but using a simple latching type as per below you’ll capture sub millisecond tiggers.
Once the latch is triggered, reset the trigger using an output pin on the GPIO.
Rob.
Applying a capacitor between GND and GPIO pin of binary sensor solves the problem. I putted a 1uF electrolytic capacitor or a SMD capacitor and with both works very stabil. Before that I had unreliable responses as well.
binary_sensor:
    platform: rpi_gpio
    ports:
      4: pibutton
This might solve the problem for you with 1 gpio but if you have a lot of GPIOs and a lot going on in HA I can guarantee this wont work. It is a software problem.
I also don’t care any more. I am now using an alternative 100% reliable mqtt-gpio bridge.
Which exact solution did you chose @tom_l? I am looking for a reliable solution for sensing 6 wired push buttons.
I use a couple of raspberry pis running a gpio to mqtt bridge:
https://community.home-assistant.io/t/custom-raspi-gpio-interfcae-pcb-project/88269
100% reliable.
Since writing that I’ve moved HA to a mini pc and both pis are running the mqtt bridge software.
I now have esphome, and my binary sensors triggers instantly for my doorbell … Max 2 sec update…
Wanna test rasperry too, but after reading some comments, it’s not a good idea? Since it uses scan interval?
I ran into this Pi HAT: https://www.amazon.com/gp/product/B01FE9EQ88/ref=ox_sc_act_title_1?smid=A1K1YGWF8WQZ7Q&psc=1
It is also a mini breadboard, so the capacitors and pullup resistors can be soldered on it. I will give it a try and let you know.
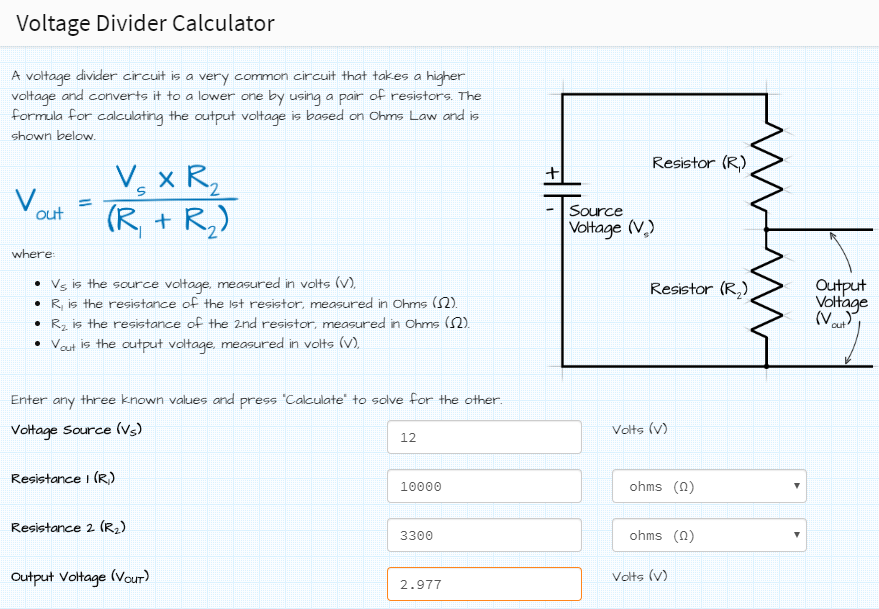
guys, can someone help me? i was using a nodemcu 8266, configured for smart doorbell, my doorbell gives when someone presses the doorbell 12 , with the schema below, i reduced to 3.0 v, this was working brilliant (10 kohm and 3.3 kohm)
now tried the same with the gpio , with remote gpio component, seems it works, but only for a short while
if i try the doorbell again after like 10 min, i dont see the binary sensor switching anymore
is it maybe because of the resisror choice? should i need to replace 3.3 with 3.8 , to give me 3.3 v ?
binary_sensor:
  - platform: remote_rpi_gpio
    host: !secret raspberry
    ports:
      18: doorbell