Hey, so it works for you now? Including LED?
I believe many of guys struggling here are actually having the problem with the XMOS firmware…
Thanks to you it is ! Or…it was. after a restart of HA it ain’t working anymore but we’ll figure it out! ![]()
The main problem was that Seeed provides a command to flash the wrong firmware. (but a link to download the right one)…
1 Like
Just got onto this thread as I needed help. Thanks for the yaml. A few questions if I may.
Do I turn off the Openwake word addon if I flash this?
Noticed seeed yaml install ota updates would not work, so pretty sure I am missing the
ota:
  platform: esphome
Do I change the wifi creds to the secret one I have from
wifi:
  ap:
    ssid: "Respeaker-Satellite-1"
    password: "SDCi3ZeMJi3d"
to
wifi:
  ssid: !secret wifi_ssid
  password: !secret wifi_password
as per my wifi creds?
Do I need to change any other bits?
Sorry not a dev here so just asking the questions
When I got the kit I read the instructions to Flash the I2S firmware but on the Win 11 machine it became a challenge as the DFU util which I could not get working so just did the esphome flash bit and well it started working. At this point I thought maybe they have flashed it already. It hasn’t gone well with it working some times and failing most times to pick up the entire command.
Actually still unsure if I need to Flash the I2S firmware. Sorry Noob here but keen to learn.
thanks
They have both but it typical Seeed fashion it’s not clear. On the first page of the wiki if you go to that section it has the command to flash the PC firmware but if you scroll to the bottom and go to the next page which is for the XIOS version it has the correct command.
I’m also know “DFUtil -l” will list attached units although I’m unsure if it shows the firmware version. Might want to type in “DFutil --help” or -h. There has to be an option that shows detailed about the board including the firmware installed.

Second page

EDIT: if you have Arduino installed the first example is a simple i2s test
This project is a test sketch for verifying the functionality of the I2S interface on the ReSpeaker Lite board, which integrates a XIAO ESP32S3 microcontroller and a microphone array. The sketch generates a square wave audio signal, writes it to the I2S interface, and then reads back the samples from the onboard microphone array to check the integrity of the I2S transmission and reception.
That’s ap: part. Nothing to do with your WiFi, it’s just fallback endpoint, that ESP will create to allow you adding WiFi creds on the go - but only if it couldn’t connect to your WiFi.
If it works - no need to flash XMOS. If not - flash with i2s firmware.
P.S. with my YAML device is using on-device wake word via Microwakeword. No need to use add-on, if you don’t need it for anything else.
1 Like
Probably the easiest method to determine firmware. It will detect the esp32 no matter what if it is plugged into a PC/laptop via USB C but I imagine it will error out pretty quickly if the PC firmware is installed when trying to install in ESPHome yaml above.
I know for a fact that I flashed the I2S firmware but wished I would have checked what was installed first. They could be flashing all boards with PC DFU or they could be flashing the XIOS version with i2s firmware after soldering it on. I wished I would have checked first. I do know the non XIOS version comes with the PC DFU for obvious reasons
Gotta agree. I am lost. I followed the link to install Driver.
Downloaded Zadig 2.9 and then not sure what I was doing so hit install driver.
Now the Respeaker lite shows Driver this

then I was able to open the command prompt and flash

So if I flash your code without any edits it would be ok?
Need to change API, OTA and AP pw I created a new device and just used those values like below. The part commented out is if you want to assign the IP statically. There is also the alarm part but you can fix that later. Files would go into config/www/sounds and need to change to either IP or mDNS name (IP is probably better.
api:
  encryption:
    key: "API key"
  on_client_connected:
    - script.execute: draw_display
  on_client_disconnected:
    - script.execute: draw_display

ota:
  - platform: esphome
    id: ota_esphome
    password: "OTA"

logger:

wifi:
  ssid: !secret wifi_ssid
  password: !secret wifi_password
  on_connect:
    - script.execute: draw_display
  on_disconnect:
    - script.execute: draw_display
  #ssid: !secret wifi_ssid
  #password: !secret wifi_password
  #manual_ip:
  #  static_ip: !secret respeaker_satellite_1_ip
  #  gateway: !secret gateway
  #  subnet: !secret subnet
  #  dns1: !secret dns1

ap:
  ssid: "Respeakerv3 Fallback Hotspot"
  password: "appwd"


#voice pipeline alarms
http://ha_ip:8123/local/sounds/timer-ding.mp3
EDIT: that’s the PC firmware , go to the next page (see previous post with screenshot) to download i2s firmware the run the same command switching the file name
dfu-util -e -a 1 -D ffva_i2s_v1.0.5.bin
1 Like
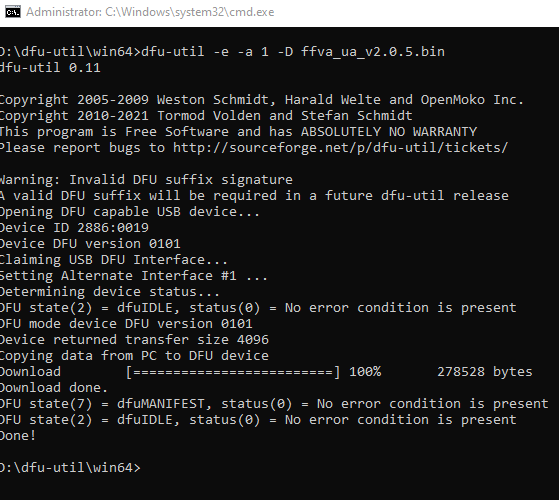
dfu-util -e -a 1 -D ffva_i2s_v1.0.5.bin I did see the command but when I downloaded the firmware from Getting Started with ReSpeaker Lite | Seeed Studio Wiki it takes me to https://files.seeedstudio.com/wiki/SenseCAP/respeaker/ffva_ua_v2.0.5.bin. So thought it was an updated one. flashed with dfu-util -e -a 1 -D ffva_ua_v2.0.5.bin
Was it right?
No, the way I look at it is the first page is for PC and the second is for i2s/XIOS. Go to the page below, there is an i2s firmware download link with the correct command listed which is just updating the bin file name to the i2s DFU
https://files.seeedstudio.com/wiki/SenseCAP/respeaker/ffva_i2s_v1.0.5.bin
this one? with the command dfu-util -e -a 1 -D ffva_i2s_v1.0.5.bin
1 Like
Yup, that’s the one.
1 Like
cool. I am afraid to ask. What did I flash with the Zadig 2.9 tool? It was plugged into the board.
Ok updated I think

Also with the
127 #voice pipeline alarms
128 http://ha_ip:8123/local/sounds/timer-ding.mp3
129
130 captive_portal:
its finding an issue/error while compiling
INFO ESPHome 2024.9.2
INFO Reading configuration /config/esphome/respeaker.yaml…
ERROR Error while reading config: Invalid YAML syntax:
while scanning a simple key
in “/config/esphome/respeaker.yaml”, line 128, column 1
could not find expected ‘:’
in “/config/esphome/respeaker.yaml”, line 130, column 1
Oh right the links in yaml do they have to have the full link or is it /local/sounds/timer-ding.mp3?
You need timer ding sound. Place it into your Home Assistant server, into config/www/sounds. Then replace ha_ip in code with your HA server IP.
Prepare for many things like this and troubleshooting - this device isn’t for inexperienced users.
2 Likes
Cool yes but the community is strong. Beware I ask a lot of questions. lol
Any links for a decent sound for timer-ding.mp3?
Just googled and got some options. Ignore…
What was the dfu-util -e -a 1 -D ffva_ua_v2.0.5.bin meant to be for?
What did I flash with the Zadig 2.9 tool? Sorry still bugging me…
I have no idea on Zadig. Maybe it’s drivers?..
‘ua’ firmware is for using this board as USB sound card for PC.
To clarify, that line should not be line 127. It starts on 319 or around there. The text above is already there. Use Samba share and put audio file in config/www/sounds (create sounds directory or paste in www and remove that directory). From a url perspective www is local so if Ip address of HA server was 192.168.0.10 and audio files was timer.mp3, the url would be
http://192.168.0.10:8123/local/sounds/timer.mp3
If audio file is at root of www it would be
http://192.168.0.10:8123/local/timer.mp3
I suggest creating a sounds (or similar) directory for organization purposes. Both will work functionality wiae
That line shouldn’t be between AP and captive_portal. I was just putting it in there as it needs to be changed but only for timers to work and get audio output from them. It works perfectly fine as a voice assistant if you don’t change those now. You just won’t be able to utilize timers until you do.
EDIT: I used Ubuntu but the above is correct, that just installed the correct Windows driver that you needed for the DFU utility or for the board in Windows to communicate. You don’t need it anymore (unless the driver is updated which is unlikely)
voice_assist_timer_finished_phase_id};
    - script.execute: draw_display
    - wait_until:
        not:
          microphone.is_capturing: nabu_mic_va
    - media_player.play_media: http://ha_ip:8123/local/sounds/timer-ding.mp3
    - delay: 2s
    - media_player.play_media: http://ha_ip:8123/local/sounds/timer-ding.mp3
    - delay: 2s
    - media_player.play_media: http://ha_ip:8123/local/sounds/timer-ding.mp3
Oh right I see that line at 340.
I added a m4a sound I got with samba to \config\www\sounds and compiling is still as issue
339    #voice pipeline alarms
340  http://IP:8123/local/sounds/timer-ding.m4a
341
342  micro_wake_word:
INFO ESPHome 2024.9.2
INFO Reading configuration /config/esphome/respeaker.yaml…
ERROR Error while reading config: Invalid YAML syntax:
while scanning a simple key
in “/config/esphome/respeaker.yaml”, line 340, column 1
could not find expected ‘:’
in “/config/esphome/respeaker.yaml”, line 342, column 1
Also where to add the
voice_assist_timer_finished_phase_id};
    - script.execute: draw_display
    - wait_until:
        not:
          microphone.is_capturing: nabu_mic_va
    - media_player.play_media: http://ha_ip:8123/local/sounds/timer-ding.mp3
    - delay: 2s
    - media_player.play_media: http://ha_ip:8123/local/sounds/timer-ding.mp3
    - delay: 2s
    - media_player.play_media: http://ha_ip:8123/local/sounds/timer-ding.mp3
- I doubt it’ll play m4a. Take flac or mp3.
- IP is still there, you need IP address there.
P.S on this stage I already don’t know which YAML you use. ![]()