I am trying to achieve this. When I am at home, connected to the local network I should be able to access Home Assistant without a password.
I know about trusted_networks, which is doing exactly this. My problem is that I use NGinx Reverse proxy to be able to reach my Home Assistant from a domain I own. Which means every request to Home Assistant is done internally, and adding 127.0.0.1 removes the password from outside access too.
So what are my options?
Can I add a specific device (from the MAC adress) to allow access?
I see this is the example config, but I do not know what the other things except 127.0.0.1 does?
trusted_networks:
- 127.0.0.1
- ::1
- 192.168.0.0/24
- 2001:DB8:ABCD::/48
Can anyone explain these 3:
- ::1
- 192.168.0.0/24
- 2001:DB8:ABCD::/48
127.0.0.1 is local Host. If you are using HA user/password (instead of http basic auth), then i believe that means you need to use the forwarded_for_x option in the config.
::1 is ipv6 where everything is 0 except that last 1.
192.68.0.0/24 is a IP/netmask, where the first 24 bits are the subnet. 192.168.0 is a common default subnet for households.
The last one I’m pretty sure is like the previous one only a 24 bit ipv6 subnet, but I don’t really use ipv6.
Out of everything there you probably only really want the 192.168.0 subnet.
If I understand correctly your nginx is running on the same host as HA, so not having 127.0.0.1 as a trusted networks fulfills the need of needing authentication when accessing the frontend. Now if you want to be able to use your domain to access the frontend internally, but not requiring authentication, 192.168.x.x/24 would need to be in the list of allowed networks. The next step then would be to set up an internal DNS server (which all relevant internal hosts use) that resolves your domain to your internal address of the HA host. So instead of being routed to your external IP (the one your domain usually points to), the DNS would send clients to the internal IP, and therefore consider the connecting client to be within the trusted network.
I added this to my configuration:
trusted_networks:
- 192.168.1.0/24
Because my router is 192.168.1.1, so I should have a 1 instead of 0?
Still requires me to enter a password when visiting both home.mydomain.com and locally through home.lan.
And I actually have a Reverse proxy internally too, so home.lan will take me to the IP adress and port of the Home Assistant server. Maybe a internal DNS server is a better option?
Or, remove the authentication from Home Assistant, move it to NGINX and tell NGINX that either coming from your local network, or having authentication, is required. That’s what I do, and I summarised it here yesterday. As always, all my configs can be found on my github (and are linked from that article).
I just stumbled upon this thread and perhaps this information is no longer relevant for you, but i at least wanted to help other people having this problem.
From what i understand you are using a reverse proxy and homeassistant on the same box. You also say you have another reverse proxy for your LAN. So there are 2 ways you can go about this.
Using local reverse proxy and local DNS
So in this situation you should either set up a local dns server wich would point your lan clients to te lan ip of your homeassistant box or add an entry to every client you want to have access without password. Some routers have this functionality natively, if you use Tomato or dd-wrt you can add to an entry to dnsmasq.conf on your router. (Like this: address=/<YOURDOMAIN>/<your box ip>) You also need the proxy to be configured to send the X-forwarded-for header, this is documented in the examples in the home assistant documentation.
You then need to configure home assistant. Set the following entries:
This was super helpful to know that I would need to set my local network as a trusted network when using an external (existing) reverse proxy. However, I also discovered that I needed to ensure that the reverse proxy also supported (enabled) Web Sockets!
In case it helps anyone else, I am using the “Nginx Proxy Manager” docker container for Unraid Server to manage my reverse proxy routes and to terminate my SSL cert. – to simplify Home Assistant configuration that I’m also setting up to run on Unraid server.
While I was able to access the login screen after configuration, it consistently failed all login attempts until I enabled the WebSockets support for the Proxy Host configuraiton for HASS.IO…
This was a mysterious issue that I thankfully took a random shot in the dark enableing that and validating . . .
The rest could be sort-of sorted out via errors in the log, but ultimately did have to use the helpful info in this thread to set up the Trusted Proxy & Trusted Networks . . . as stated above the ‘trusted_proxy’ needed to be correctly set to the IP address of the Docker Container running the Nginx Proxy Manager . . . To get this I gleaned it from the Unraid Docker tab and confirmed with a python script (as it was in the format 172.17.0.XXX; which seems to be standard for Docker containers).
However I did not have to turn on Trusted Networks… this resolved the login issues as soon as I correctly enabled web sockets on Nginx, and set use_x_forwarded_for, and trusted_proxies just as above…
http:
  #Uncomment this if you are using SSL or running in Docker etc
  base_url: https://yourhass.somedomain.com
  #Configure Reverse Proxy (External NGINX via Docker Container on Unraid)
  trusted_proxies:
    - 127.0.0.1
    #IP Of NGINX Proxy Manager Docker Container
    - 172.17.0.XXX
To add, you don’t have to specifically set the IP of the Docker container. You can also set it to the range of the Docker network. This because Docker containers don’t always have the same ip address.
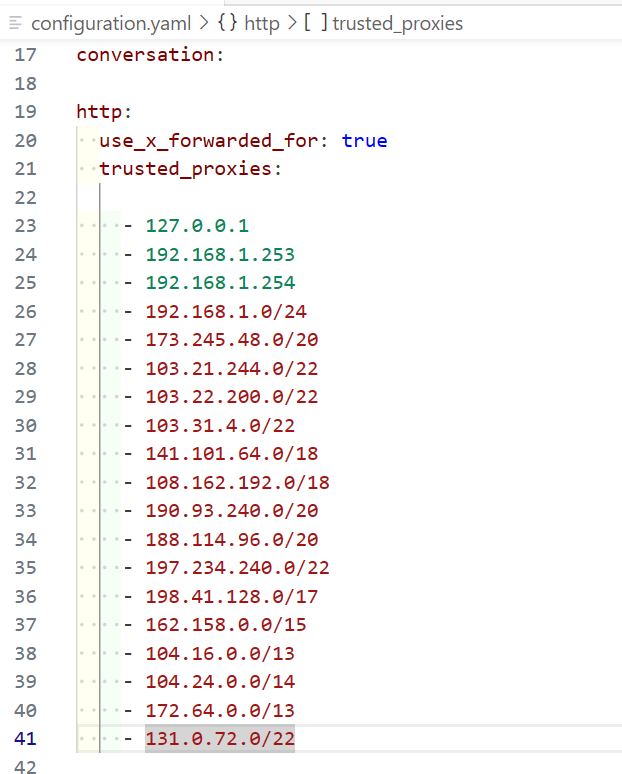
Does anyone know why the list turns red after 192.168.1.254?
It doesn’t accept anything with /24 /20 etc… when I try to copy paste Cloudflare IP list from here IP Ranges | Cloudflare