Yet Another Smart Camper Project

Awesome, thank you. Almost all my lights are the dome ones as well with the living area and bedroom having a ‘wall’ switch and the remaining 3 or 4 having the center button - and then there is the external LED strips.

The wall switched ones are my primary target at this time - and I would love dimming but alas, may have to settle for on/off only for now.

I think I’ll pick up 1 Shelly 1 for now and see how it goes. Looks like it won’t deliver until after my trip but thats all good… can work on it later.

Thanks!

If you happen to be local to the DC/Maryland/Virginia area, I have a few Shelly 1’s that I recently replaced that you can have for free.

Appreciate the offer but no unfortunately, I’m in Texas.

But - in my situation, would you go with the Shelly 1 Gen 3 or the Shelly 1 Plus?
They are currently the same price on Amazon but struggling to really see the application difference.

I used the original Shelly 1 because they were $10 ea on Amazon and could be flashed with tasmota. The gen3 and plus will also both work (and I’ve flashed plus devices with tasmota - but unsure on gen3). The plus includes Bluetooth - which I believe you could use as a BT proxy, but prob unnecessary. So I’d say go with whichever is cheaper or quicker to ship.

The Shelly firmware on all these devices work with HA out of the box, but I use tasmota for more programmatic control - eg double/triple tap to control other lights. I’m guessing you can do the same with esphome as well. Slowly migrating to esphome myself.

Edit: to use multi-tap, you’ll have to replace the switch with a single throw momentary switch. If you happen to get a device with multiple switch inputs (like the Shelly rgbw plus), you can do a double throw momentary switch for two separate “inputs”.

My experience with flashing is hit or miss. I have a few in place now but also a small box of things that may or may not be bricked.

My camper setup is pretty basic and in early stages as I don’t spend too much time in it so I think for the intro to Shelly with it I’ll go with the Gen3 - can always swap out if necessary.

Now I am definitely a fan of ESPHome - I think I have about a dozen projects I’ve built using it as the base with bare ESP chips. I’m sure you will enjoy it.

Nice project! I am updating my trailer next year and will have to look at all these goodies in here. Thank you for sharing!

Much Easier GPS Solution - Plus Compass

Another OP from another topic inspired me to order an M10-Q25 ($20 on Amazon) and try it out. This device is approximately 1”x1”x1/2” in size and is apparently popular among the drone community.

Of course, this device was a piece of cake to set up with esphome’s GPS and QMC5883L support. Hooked it up to an ESP32 and plugged it into a nearby outlet - in an interior closet on the first floor of a 2-story home - and despite this less-than-ideal location, within seconds it got a GPS lock and started streaming NMEA sentences. Compass works great as well. The hardest part was figuring out the baud rate… and then figuring out which way the board should be oriented for accurate compass readings.

Out of the box, this device sends GPS data 10 times per second. Even still, it runs at about a 0.5-0.7 watts (including the esp board). The next step is to get the ublox software installed and see if I can reduce this to once every 5 minutes or so - perhaps reduce this load even more.

Edit: I settled on every 10 seconds. That seemed to be the best option, and the measured load of this device (without the esp board) seems to bounce between less than 0.05w and 0.1w.

But I have to say, this is perhaps the easiest (must do) project for any RV/Camper.

Imagine with a compass bearing, one could automate window coverings dynamically based on the sun’s azimuth and elevation - regardless of location and trailer “heading”.

One could also set up speed-triggered automations to notify if an awning or slide was left out - every camper’s worst nightmare, but we’ve all seen someone do it.

Would you mind sharing how you are using CardMod to add the city/state?

My Starlink is only deployed and Active when we are at a campsite but I keep the ATT cellular connection on all the time (cheaper too). Since Starlink is offline and not providing GPS, I have revived an old cell phone using WIFI to the ATT router and then using HA Companion providing the GPS, have the dynamic GPS and Weather.

Just missing that last mod to the Weather Card. (I do have Places setup and reading from the HA Companion location).

Here is my dashboard yaml for the weather card. As I noted earlier, unless you specifically set your weather integration to follow your home location, the weather will not update as your GPS updates your home location. I tested/confirmed this by manually moving my home location all over the country.

  - type: weather-forecast
    entity: weather.forecast_home
    show_current: true
    show_forecast: true
    forecast_type: daily
    forecast_slots: 7
    name: " "
    grid_options:
      columns: 12
      rows: 3.5
    card_mod:
      style: |
        .name:before {
            content: {% if (states('sensor.geolocator_city')) %}"{{states('sensor.geolocator_city')}}"{% endif %}", {{states('sensor.geolocator_state')}}";
        }

Edit: make sure to set the weather card’s name to “ “.

Edit 2: I just remembered that I stopped using the Places integration.

I’d recommend this route instead. It has better city reverse geocoding.

This is great! I got both the Places and GeoLocator working for the weather - I’ll likely remove Places later.
Still trying to figure out the Time and TimeZone portion got a lot further along with your help.

Camper 12V TV (Connexx Brand)

Since I set up another esphome device for the M10 GPS module, I figured I’d take a shot at better control of the Living Area 12V TV that came with the camper. Previously, this was handled through HDMI-CEC using the connected Chromecast with Google TV. However, this limited my volume control to the Chromecast itself - less than ideal as I’d have to grab the TV remote to adjust TV volume occasionally.

Enter esphome…

Using an IR receiver hooked up to the esp board, I “learned” the TV’s volume and power codes. Then I disconnected the IR receiver and hooked up an IR transmitter - one of those little ones you can stick on the TV. Unfortunately, this TV does not appear to have discrete power codes - another problem to solve. So, I picked up a very simple USB-A 3v3 power supply and connected 3v3 to a pulled-down input on the esp board and GND to GND, and plugged it into the TV’s USB port. Now esphome/HA know when the TV is on.

My eventual goal is to combine all of the above with the other esphome device already in the camper and consolidate all of the below into one esphome device:

Bluetooth Presence
Hughes Surge Protector
Door Remote Lock/Unlock
TV Infrared Control and Power Status
GPS/Compass

@woodsby can you share your config.json (remove personal info of course) as I am struggling to reproduce your incredible OpenHasp screen layout on my 480x480. I apparently am not understanding what needs to be done to get this device connected and displaying anything. The OpenHasp documentation does not seem to support this device. Though there is firmware for it. Any guidance is appreciated.

See below - although I believe I set most (or all) of this stuff in the web gui. My pages and Openhasp are in a post above. A couple of notes - the board I used above is the Guition 480x480. If you use the similar board from panlee, that has a different firmware. For either board, you’ll have to download the corresponding firmware from the nightly builds page (or directly from the GitHub page). The web installer on the nightly builds page is easier, but one RC version behind. And of course, you must have an MQTT broker running.

Also, I installed the mdi fonts file (mdi.ttf) which are needed for a few of the icons/symbols.

{
    "wifi": {
        "ssid": "YOUR_SSID_HERE",
        "pass": "YOUR_WIFI_PASS"
    },
    "mqtt": {
        "host": "MQTT_BROKER_IP_ADDRESS",
        "user": "YOUR_MQTT_USER",
        "pass": "YOUR_MQTT_PASS”,
        "topic": {
            "node": "hasp/%hostname%/%topic%",
            "group": "hasp/plates/%topic%",
            "broadcast": "hasp/broadcast/%topic%",
            "hass": "homeassistant/status"
        },
        "port": 1883,
        "name": "camper_entry"
    },
    "telnet": {
        "enable": 1,
        "port": 23
    },
    "mdns": {
        "enable": 1
    },
    "http": {
        "enable": true,
        "port": 80,
        "user": "",
        "pass": "********"
    },
    "gpio": {
        "config": [
            0,
            0,
            0,
            0,
            0,
            0,
            0,
            0
        ]
    },
    "debug": {
        "ansi": 0,
        "baud": 115200,
        "tele": 300,
        "host": "",
        "port": 514,
        "proto": 0,
        "log": 0
    },
    "gui": {
        "idle1": 60,
        "idle2": 120,
        "bckl": 38,
        "bcklinv": 0,
        "rotate": 0,
        "cursor": 0,
        "invert": 0,
        "calibration": [
            0,
            65535,
            0,
            65535,
            0,
            0,
            0,
            0
        ]
    },
    "hasp": {
        "startpage": 1,
        "startdim": 255,
        "theme": 5,
        "color1": "#00b6ff",
        "color2": "#ff9962",
        "font": "",
        "pages": "/pages.jsonl"
    }
}

Good luck and post back if you need any more help.

I appreciate the assistance. I have a Guition 480x480 ESP32-4848S040C_I from aliexpress. Based on the other thread where folks are using the lvlg screens. I have been able to flash ESPHome and have those screens up and running but LVLg is a little outside my understanding of what to do. When I flash with the Guition ESP32-S3-4848S040 firmware from the https://nightly.openhasp.com address I can get the device up and running but after modifying the config.json, pages.json and Openhasp.yaml I don’t see anything on the screen. Honestly has been a PITA or there is an issue between the chair and keyboard.

For the mdi.ttf I assume you are using the MateriaDesign-Font from GitHub - Templarian/MaterialDesign-Font: Distribution Repo for the TTF font and just renamed the file and uploaded corrrect?

Yes on the mdi.ttf file, but not sure where I originally got the file - I did rename it to mdi.ttf.

Edit: TBH, I believe I downloaded the webfont version…

Edit 2: per Openhasp documentation looks like the webfont file is the winner - link referenced in the url you posted.

After installing Openhasp and power cycling the device, does the connected IP address pop up on the screen? If not, we have a problem that’s likely unrelated to the pages file. If it does appear, then we know we have a different problem. After editing/saving the pages.jsonl file, you do have to reload all pages - should be at the top of the file editor - in order for the pages to populate.

And hey, the pages file is pages.jsonl, not .json. Sorry if my last post was misleading.

I got it to load finally. Whew that was a LOT more effort than expected. Thank you.

Local NTP Server

So, I figured since the GPS module is hooked up and running, why not set up a GPS based local NTP server. Using @RobertJN64’s esphome NTP server component, it took about 5 minutes.

I also adjusted HA’s fallback NTP servers to include this esphome device.

Camper Bearing and Sun Azimuth on Map

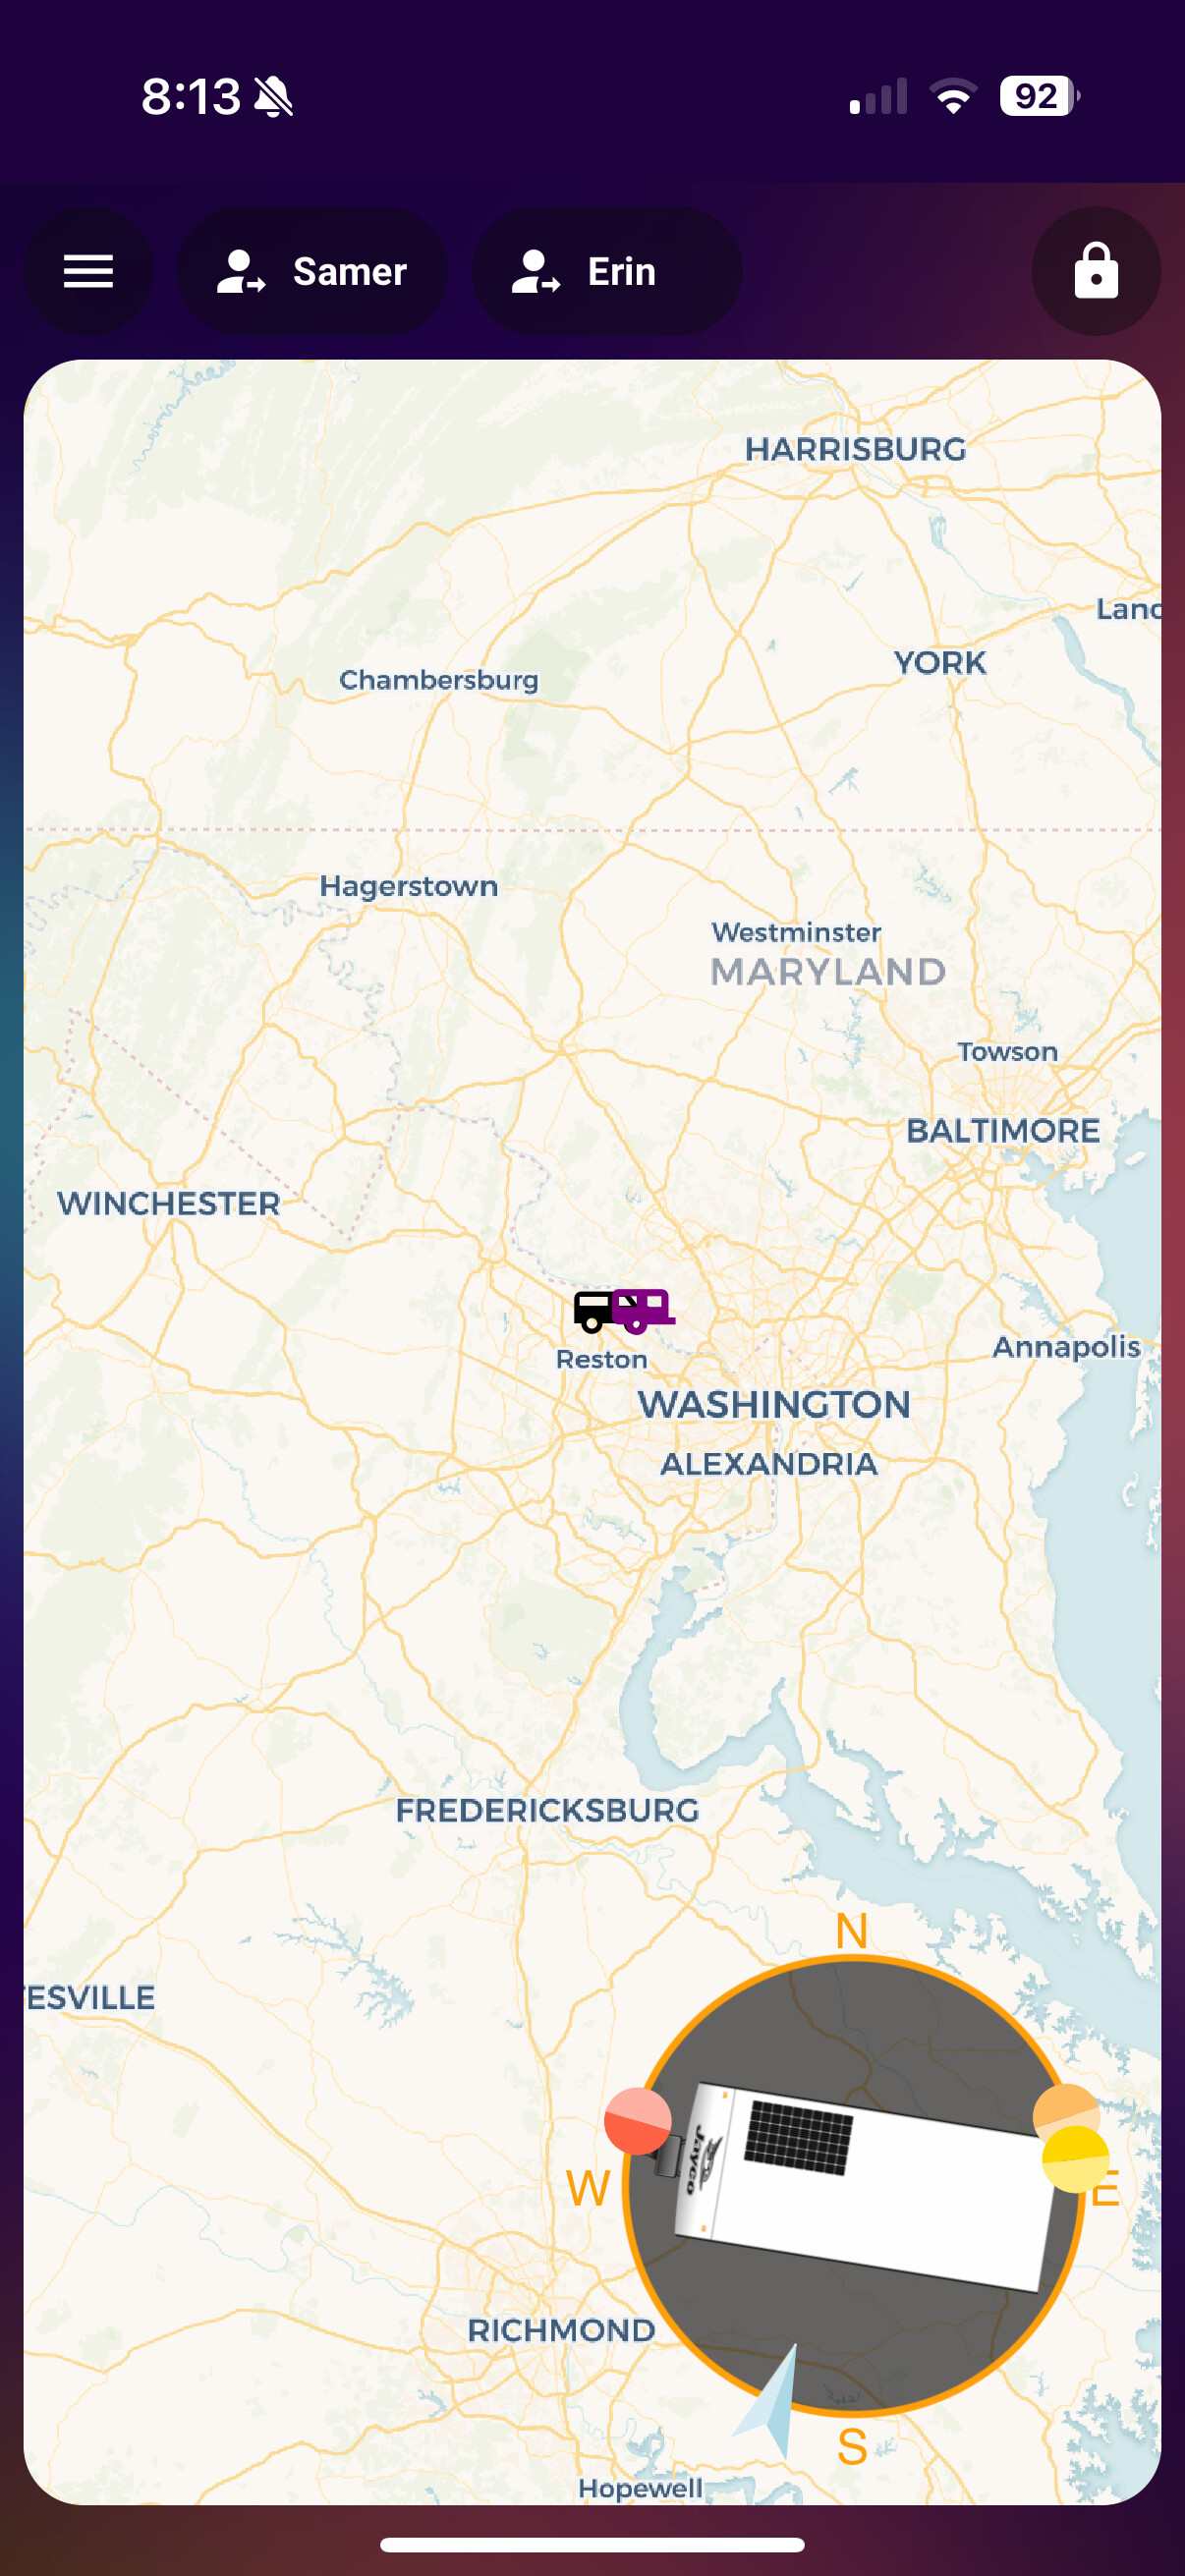
This one is pretty cool. Furthering my compass project, I wanted a way to see on a map which direction my camper is facing relative to sun’s azimuth. Using card mod and compass card, I was able to put something together.

The birds-eye-view camper image in the bottom right rotates based on compass heading and the orange ball around the circle represents the sun’s azimuth. Just need to clean it up a little, but it did come out pretty good!

Edit: This has now been modified to show last sunrise and sunset positions, the current azimuth if the sun is up, moon azimuth when the sun is down, and wind direction color coded by wind speed - all relative to camper bearing.

Edit 2: I finally convinced the little one to go out camping again and was able to test this in the real world… I’m pleased to report it works extremely well. Camper is shown on the map oriented perfectly and after watching the camper’s shadow throughout the day, the sun’s azimuth is accurately represented relative to my orientation.

Propane Detection

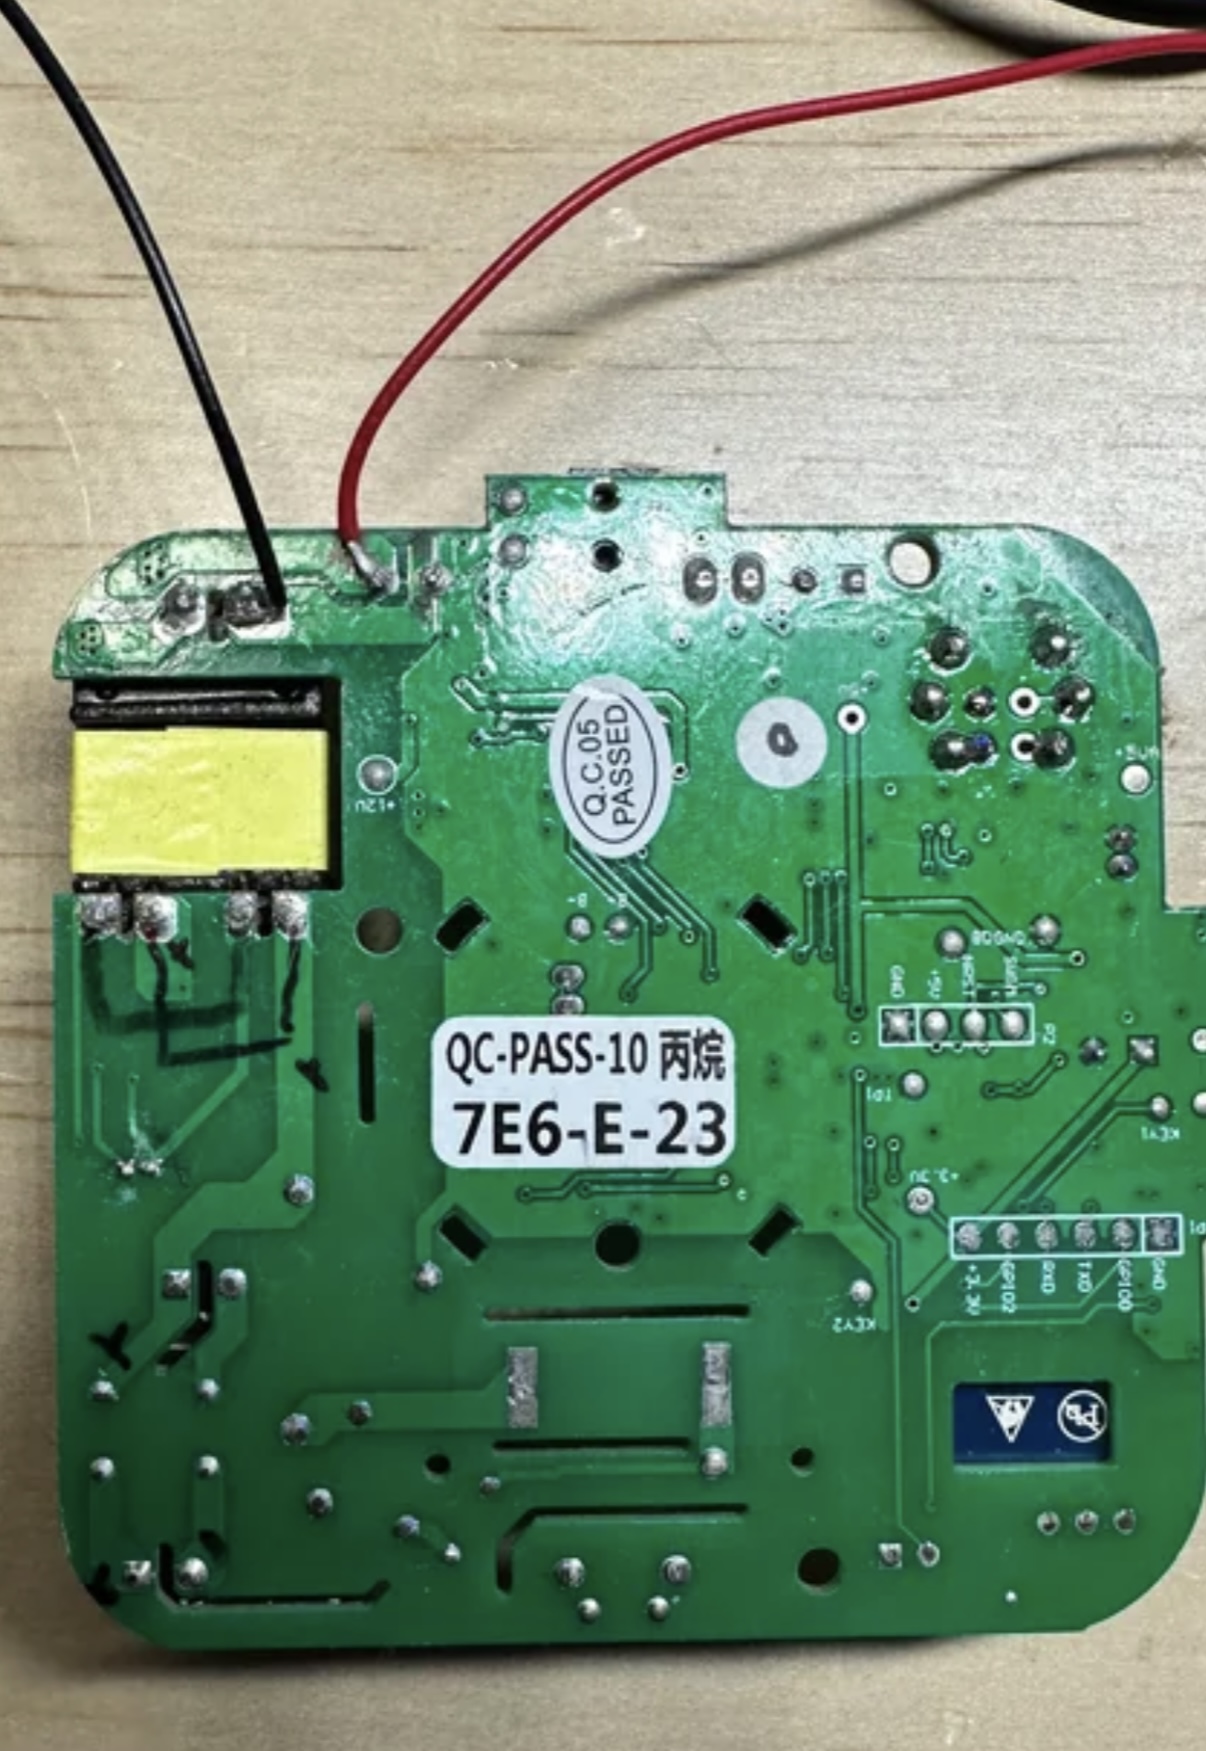
So I finally decided to come up with something for gas (LPG) detection inside the camper. Ended up being pretty easy. I found a Reddit post where someone had already done all the “legwork” in feeding a Shelly Gas from 12v.

I removed the LEDs because they were extremely bright, wired this direct to 12v battery power and added to HA.

I did have to take a dremel tool to the back to cut off the ac plug portion so I could screw directly to the wall.

Tested with a lighter and it works really well!

Replace Network Hardware and FINAL GPS solution:

So, after a week at a site cursing and periodically restarting my Verizon Hotspot, I decided it’s time to rip it all out and start over. I was using both a powerline adapter at home and a Verizon Mifi connected to a gl inet router operating in WAP/Switch mode with tasmotized usb dongle controlling providing power to an inline switch between Mifi and WAP. The dongle pings a device on my home network and if found, disables the Mifi and if not found, enables it. Although it seems like poor/cumbersome network management, it worked very reliably. The Mifi hotspot just happens to be junk under heavy use.

New solution:
I bought a gl.inet gl-x3000 5g cellular router. I popped the SIM card that was in my Mifi into the new router and immediately got way better connectivity/bandwidth. I set up failover with my powerline (wan) connection as priority > then WiFi hotspots if available > then cellular.
I enabled Gpsd on the new router and was able to quickly connect the HA GPSD integration to it. GPS accuracy is within a few feet.