You can also read the EWT temperature in the 0x00 0xD1 Temperaturen abrufen command: Byte[7] Temperatur EWT (°C*)
There is also a parameter EWT speed up (%) - does it make sense to have it as well?
Why don’t you open a feature request in the github repo, hopefully someone will pick it up (if you don’t know how to do it yourself).
Yeah, the speed up is relevant too. What it does is when the EWT is active the ventilation fan can spin harder to get more cool air in (duringsummer) or more hot air in (during winter).
Might pick this up once I’m settled with my basic HA setup. I don’t have a python background though (c# dev).
I’ve started to work on EWT support. You can already check the dev branch adorobis/hacomfoairmqtt at dev (github.com) it should already read the EWT temperature sensor and expose 3 number entities (low temp, high temp and speed up %) but without reading or controlling it yet. I’ve also renamed the script to ca350.py for better recognition by text editors.
Edit:
@brechtvhb
The dev branch has now the controls implemented as well. Once you run it you should see additional entities in the comfoair device:
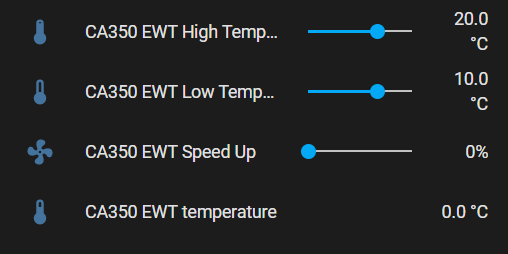
Below is also a piece of info from configuration, based on which I’ve defined min and max values of the parameters (P61-63):

You can test now and let me know if it works as expected. I don’t have the EWT so it is quite hard to test it, although the unit still accepts and reports back those settings.
Hi,
I have a problem with the settings, HA does not see the recuperator. Communicates via ESPHome. I have an ESP8266 NodeMCU, I have connected the RX (GPIO3) and TX (GPIO1) and GND to GND ESP cables correctly.
File Location:
/config/esphome/custom_components/comfoair.h
/config/esphome/comfoair.yaml
Display error on recuperation “check cables”
Please help me 
INFO Reading configuration /config/esphome/comfoair.yaml…
INFO Starting log output from 192.168.8.56 using esphome API
INFO Successfully connected to 192.168.8.56
[21:34:08][I][app:102]: ESPHome version 2022.9.4 compiled on Oct 17 2022, 21:22:23
[21:34:08][C][wifi:502]: WiFi:
[21:34:08][C][wifi:360]: Local MAC: 9C:9C:1F:47:4A:CE
[21:34:08][C][wifi:361]: SSID: ‘Westeros2’[redacted]
[21:34:08][C][wifi:362]: IP Address: 192.168.8.56
[21:34:08][C][wifi:363]: BSSID: FE:92:BF:11:12:A4[redacted]
[21:34:08][C][wifi:365]: Hostname: ‘comfoair’
[21:34:08][C][wifi:367]: Signal strength: -47 dB ▂▄▆█
[21:34:08][C][wifi:371]: Channel: 6
[21:34:08][C][wifi:372]: Subnet: 255.255.255.0
[21:34:08][C][wifi:373]: Gateway: 192.168.8.1
[21:34:08][C][wifi:374]: DNS1: 0.0.0.0
[21:34:08][C][wifi:375]: DNS2: 0.0.0.0
[21:34:08][C][logger:275]: Logger:
[21:34:08][C][logger:276]: Level: DEBUG
[21:34:08][C][logger:277]: Log Baud Rate: 0
[21:34:08][C][logger:278]: Hardware UART: UART0
[21:34:08][C][uart.arduino_esp8266:102]: UART Bus:
[21:34:08][C][uart.arduino_esp8266:103]: TX Pin: GPIO1
[21:34:08][C][uart.arduino_esp8266:104]: RX Pin: GPIO3
[21:34:08][C][uart.arduino_esp8266:106]: RX Buffer Size: 256
[21:34:08][C][uart.arduino_esp8266:108]: Baud Rate: 9600 baud
[21:34:08][C][uart.arduino_esp8266:109]: Data Bits: 8
[21:34:08][C][uart.arduino_esp8266:110]: Parity: NONE
[21:34:08][C][uart.arduino_esp8266:111]: Stop bits: 1
[21:34:08][C][uart.arduino_esp8266:113]: Using hardware serial interface.
[21:34:08][C][comfoair:204]: ComfoAir:
[21:34:08][C][comfoair:205]: Update Interval: 0.6s
[21:34:08][C][comfoair:207]: Bootloader v0.00 b 0
[21:34:08][C][comfoair:209]: Firmware v0.00 b 0
[21:34:08][C][comfoair:211]: Connector Board v0.00
[21:34:08][C][mdns:100]: mDNS:
[21:34:08][C][mdns:101]: Hostname: comfoair
[21:34:08][C][ota:089]: Over-The-Air Updates:
[21:34:08][C][ota:090]: Address: 192.168.8.56:8266
[21:34:08][C][api:138]: API Server:
[21:34:08][C][api:139]: Address: 192.168.8.56:6053
[21:34:08][C][api:143]: Using noise encryption: NO
[21:34:08][D][comfoair:603]: getting bypass control
[21:34:09][D][comfoair:578]: getting fan status
[21:34:10][D][comfoair:586]: getting valve status
[21:34:11][D][comfoair:626]: getting ventilation level
[21:34:11][D][comfoair:631]: getting temperatures
[21:34:12][D][comfoair:593]: getting error status
[21:34:13][D][comfoair:603]: getting bypass control
[21:34:13][D][comfoair:578]: getting fan status
[21:34:14][D][comfoair:586]: getting valve status
[21:34:15][D][comfoair:626]: getting ventilation level
[21:34:16][D][comfoair:631]: getting temperatures
[21:34:16][D][comfoair:593]: getting error status
[21:34:17][D][comfoair:603]: getting bypass control
[21:34:17][D][comfoair:578]: getting fan status
[21:34:18][D][comfoair:586]: getting valve status
[21:34:19][D][comfoair:626]: getting ventilation level
[21:34:20][D][comfoair:631]: getting temperatures
[21:34:20][D][comfoair:593]: getting error status
[21:34:21][D][comfoair:603]: getting bypass control
[21:34:22][D][comfoair:578]: getting fan status
[21:34:22][D][comfoair:586]: getting valve status
[21:34:23][D][comfoair:626]: getting ventilation level
[21:34:24][D][comfoair:631]: getting temperatures
[21:34:25][D][comfoair:593]: getting error status
[21:34:25][D][comfoair:603]: getting bypass control
[21:34:26][D][comfoair:578]: getting fan status
[21:34:26][D][comfoair:586]: getting valve status
[21:34:28][D][comfoair:626]: getting ventilation level
[21:34:28][D][comfoair:631]: getting temperatures
[21:34:29][D][comfoair:593]: getting error status
I believe you are using the esphome integration so I would suggest that you contact the author of it on his repo. Before that you can try to swap the TX/RX cables, this is the most common mistake with serial connections.
Unfortunately, I tried, no change. Maybe someone from the forum also tried esp and is able to help?
Hi,
i got a little bit active on this integration.
Reasons
I try to consolidate a lot of machines (real/virtual/nas) at home, to save some energy and run the whole Home Assistant stack solely on a raspberry pi 4 with Home Assistant OS. I saw the Zigbee2MQTT Addon and thought, this would work for hacomfoairmqtt as well
What did I do?
I build a simple Addon Wrapper for hacomfoairmqtt to run/integrate in Home Assistant OS.
- The Repository of @adorobis is cloned on build, in an python docker.
- The Docker Addon Images are build for aarch64, amd64, armhf, armv7, i386
- Configuration is done in Home Assistant

What is missing?
I still want a nightly build, so the current git head of hacomfoairmqtt is build every night. I somehow did not manage to overwrite the docker tags on an nightly build and did not want to create another 5 Docker Repositories :-/
If someone wants to integrate hacomfoairmqtt in Home Assistant OS as well, my repro can be found here: homeassistant-addon/comfoair2mqtt at main · TimWeyand/homeassistant-addon · GitHub
1 Like
Cool! I am also slowly moving various home automation components from my TrueNAS Core to a low power mini PC. Comfoair is one of the last things to move, my PC does not have a RS232 port though so I need to check the FTDI converters I have somewhere. I’m using Debian with Docker so won’t benefit from the add-on but I believe your Dockerfile should be a good starting point.
Thanks!
I’m not so familiar with all the automatic/nightly builds, especially when it comes to building Docker images and pushing them to Docker hub. Is that something entirely done in github?
And how important is it to build images for different platforms? So far I’ve created one image for speedtest with official CLI but I’ve based it on official python docker image and I’m building it so far manually on my Debian machine. Does it mean it gets only specific to the platform I build it on?
The Image would probably not work for you, since it has some specific HA calls in it. But if you want, I can build a Dockerfile for the hacomfoairmqtt repository. Than you could add an GitHub Action or pull/buildit in Dockerhub.
Multi-Arch is easier and more comfortable to be done in GitHub/gitlab CI and then pushed to dockerhub (or any other location). I got the automatic build if I do something (push/manually trigger) done. Daily would not be that difficult either, but I don’t want to overwrite the release tag, but I can’t change it (yet) with the HA build tools.
If you build for yourself, it does not matter, then you build only for your Platform. In the HA Space you have so many different CPU-Architectures - for example you are on amd64 (PC) and i am on aarch64 (RaspberryPI). The Software is the same in both, but not the underlying binary code.
Yes your Docker would not run, on ARM Devices or (much) older Intel/AMD CPUs. Debian does not matter, but the CPU Architecture. Many Dockers are build for Multi-Architecture, so you can use it as base on all Architectures.
But it gets more complicated to build multi-arch locally, then to build for just one architecture.
Many thanks for explanations!
Thanks for proposal, I’m not there yet, need to find a free evening as I’m not sure if the cabling will work from first try ![]() I might come back to you when I’m ready
I might come back to you when I’m ready ![]()
Btw, when looking at examples on how to run python in Docker, there are some guides from official Docker that make it a bit more simple e.g. no need for a venv etc. The image with quite a few dependencies for speedtest.net cli is just 67MB
Indeed, I’ve just checked and the python:slim that I’m using is multi-architecture.
I may lookup some python tweaks you found out ![]() I only use Python for Home Assistant, my main Platforms are more IT-Architecture, PHP, Go, Databases,… . I know how to change some things in Programming languages I am not “fluent” in, but not in installation optimization in them
I only use Python for Home Assistant, my main Platforms are more IT-Architecture, PHP, Go, Databases,… . I know how to change some things in Programming languages I am not “fluent” in, but not in installation optimization in them ![]()
That’s good, that means if you build multi-arch, it should run on the build platforms.
I have simply looked at the exemples provided on the Docker hub for the official python image(s):
https://hub.docker.com/_/python
Hello everyone!
First off I want to thank you Adorobis for the great work and everyone who helped to make this happen.
I am currently trying to implement the solution in a virtual debian machine on my NAS and got my fair share of problems in getting a correct pin configuration in my rs232-to-rj45-adapter.
As the cabling got different colors than the lan-lines usually, I somehow am not able to wrap my head around the translation of your cabling picture above and my adapter.
The only thing I now about my adapter is, that it follows the Yost-Standard.

Does anyone know which of these colors I need to put where exactly? I just got fear, that I somehow short the comfoair circuit, when I connect a faulty patched adapter. 
When it’s finished I understood that I actually have to unplug the front display from the comfoair 350 board, as it is only possible to have one rs232 device connected, right?
I only got the front rj45 port on the board and will try to use it.
Thanks in advance and best regards
Chris
Thanks in advance
You should not look at the colors but at location of pins:

rj45 pin 2 → rs232 pin 3 - yellow
rj45 pin 3 → rs232 pin 2 - white
rj45 pin 8 → rs232 pin 5 - green

1 Like
I would first like to thank everyone on this forum who has put so much information and time into this project. When I tried it out it worked very quickly after a few config file changes.
I now have the problem that I do not get a state_feedback (I think that’s what it s called). How is it possible to see the selected position or the status of the CA350 fan mode (Off, low, Medium, High)?
like on the picture below

Hi @4Homer,
Which card do you use to see it in HA?
The selected position is stored in the ca350_climate entity (attribute fan_mode):


yes i know. the question is now how to show me on the Dashboard itself which fan_mode is active.
if i open the climate.CA350 Entity i can see which state i currently have.

right now, if i change the “show_state” at true, then is see on the Dashboard “Only Ventilator” But i would like to see the Fan Modus like “High, medium, low” or the icon which chanche the color. Like the Lovelace card from @adorobis
You can use this custom card from here:
or if you want to create your own layout of buttons you can do a bit more additional config in HA. I’ve created 4 template binary sensors:
- platform: template
  sensors:
    vent_away:
      friendly_name: Ventilation Away
      value_template: "{{ is_state('climate.ca350_climate', 'off') }}"
- platform: template
  sensors:
    vent_low:
      friendly_name: Ventilation Low
      value_template: "{{ is_state_attr('climate.ca350_climate', 'fan_mode', 'low') }}"
- platform: template
  sensors:
    vent_medium:
      friendly_name: Ventilation Medium
      value_template: "{{ is_state_attr('climate.ca350_climate', 'fan_mode', 'medium') }}"
- platform: template
  sensors:
    vent_high:
      friendly_name: Ventilation High
      value_template: "{{ is_state_attr('climate.ca350_climate', 'fan_mode', 'high') }}"
which I can put on a dashborad as standard buttons and as a tap action I call respective service e.g.:
fan_low:
  sequence:
  - service: climate.set_fan_mode
    data:
      entity_id: climate.ca350_climate
      fan_mode: low
The end result is based just on standard lovelace cards:

Thanks to @Dapolux & @adorobis . Finaly it works…
I admire your work in this chat. I can imagine that an extremely large amount of time has been invested here, which many can now use to implement this project.
2 Likes
I kindly wanted to thank you for helping me out, with this problem. I finally got it working (through the front RS232-Port WITH connected front display) and it just works perfectly (in a VM with USB-passthrough).
Amazing work!
1 Like