Love it ![]() … looks like your are getting the hang of the blueprint… nice work and thanks for the update.
… looks like your are getting the hang of the blueprint… nice work and thanks for the update.
Blacky ![]()
Love it ![]() … looks like your are getting the hang of the blueprint… nice work and thanks for the update.
… looks like your are getting the hang of the blueprint… nice work and thanks for the update.
Blacky ![]()
FAQ: How to use the Ambient Options
What are Ambient Options?
The Ambient Options set conditions that restrict automation to run only when it is dark or below specific ambient light levels. These levels are typically measured in LUX, and such sensors may also be referred to as LUX sensors. These are global conditions and can work alongside other selected conditions if configured.
Ambient Light Sensor
Using a primary outdoor sensor to detect the actual outdoor LUX value can be beneficial, as it allows you to apply a consistent measurement across all lighting automation setups. Indoor sensors may be used when the outdoor LUX value is not relevant, such as when lights are used in enclosed spaces like a garage or when blinds are closed.
Ambient Light Sensor - Site Conditions
Sometimes, when lights turn on, they can affect the ambient light sensor, increasing its LUX value and causing the lights to turn off prematurely. To address this, select an option that best suits your installation.
NOTE: If you are using a buffer zone between the high and low lux values, select “NO” for this option.
Ambient Light - Low & High Lux Values
These settings allow you to create a buffer zone between two lux values to manage light activation and deactivation more effectively.
Ambient Light - Low Lux Value: Set this value to determine when the lights should turn ON. The light will activate when the lux level falls below this set value. This value should be equal to or lower than the “High Lux Value” below. A typical guide value is 20 lux (dusk).
Ambient Light - High Lux Value: Set this value to determine when the lights should turn OFF. The light will deactivate when the lux level rises above this set value. This value should be equal to or higher than the “Low Lux Value” above. Setting a higher value creates a buffer zone to prevent immediate light deactivation. A typical guide value is 80 lux (dawn).
Enjoy
Blacky ![]()
Back to FAQ: Click Here
Back to “The Settings & Best Practice Guidelines” Click Here
I will look out for it. though the last one is screenshot for Utility room failed and is also a simple light and motion sensor. no Night mode, just on and off.
Just shifted all the ones with scenes to a simple light. Using the relevent colour and brightness levels.
They don’t survive a restart. Just stay permanently on.
Could it be that because the lights are on a zigbee2mqtt connection that the automation starts too soon, before the lights state is recognised as being on?
Perhaps a longer or configurable delay is needed to deal with how long it takes HASS to settle after a reboot?
That could be the case. In this next update maybe try and put in some toggle helpers into “Scenes & Scripts - Toggle Helper”.
Let me know if that works.
Blacky ![]()
Your lighting experience, your way – take control and customize it to perfection! ![]()
![]()
New Feature ![]()
Changes to Scenes & Scripts
We have added three new inputs.
The purpose of adding these inputs is to ensure the proper functioning of automations when using scenes or scripts. The benefits of adding these inputs include:
Maintenance ![]()
If you like this blueprint? Consider hitting the ![]() button in the top post
button in the top post ![]()
If you like my blueprints, and would like to show your support or just say thank you? Click Here ![]()
Enjoy
Blacky ![]()
Awesome @Blacky I do have a feature request for your add-on movie theater blueprint. Reed’s smart home on YouTube had a new video that does a similar thing to your blueprint, BUT he added the ability to have different lights/scenes based on the app on the Apple TV or Chomecast that is open. For example, for Spotify or Apple Music you could not dim the lights, but with Netflix, do a full movie dim. I think app specific conditions would be amazing.

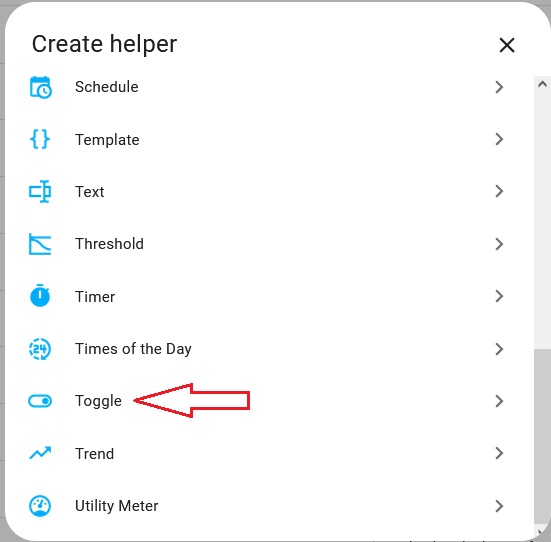
FAQ - How To Create A Toggle Helper?
When using scenes and scripts, it is recommended that you create a toggle helper. Below, I’ll show you how to do this.
Go to Settings / Devices & Services / click on the “Helpers” tab at the top / create helper and select toggle.
Input the name you would like to call it, select an icon if you like and click create.

Enjoy
Blacky ![]()
Back to FAQ: Click Here
Back to “The Settings & Best Practice Guidelines” Click Here
FAQ - Setting Up a Schedule Helper with Sun Condition
You can use a schedule helper as the trigger. Below, I’ll show you how to do this.
Go to Settings / Devices & Services / click on the “Helpers” tab at the top / create helper and select schedule.
Input the name you would like to call it, select an icon if you like and click create.
If you would like to turn your your lights, switches, scenes, or scripts ON when the sun sets, then you would select a time well before the sunset and enable the sun condition. This ensures that the trigger is ON well before the sun sets but waits for the sun condition to turn your light ON. Then, the schedule will turn your lights OFF as per your schedule.
Example
This will activate your lights, switches, scenes, or scripts when the sun elevation is below -1.5 because the trigger schedule is active having an ON time 4pm. Conversely, it will deactivate them at the end of your schedule, well before the sun rises above -4.0.
Enjoy
Blacky ![]()
Back to FAQ: Click Here
Back to The Settings & Best Practice Guidelines Click Here
I have a timing problem that I need help with.
I would like the automation to be active between 5 am am 8 am, than again from 4 pm to 9 pm. The automation is off otherwise. How can I achieve this? Time settings only allow one time range. I need it to be triggered by the motion Detector, so a schedule helper doesn’t seem to be the answer.
You can use a schedule helper but your ON time will be the opposite to when you would like the automation to be active. Then you would put the schedule helper into the bypass option 2. Below is a example of the schedule. Then you wouldn’t use the time option ![]()
Blacky ![]()
This is just great. Just what I needed. Thank you so much for this. ![]()
Unfortunately I think I may have found a bug in Version 5.9 of this blueprint. This will prevent to turn ON lights using bypass ON.
To reproduce use blueprint with scripts to turn on, therefore a toggle helper and a bypass ON and bypass OFF helper.
Expected
The light turns on again.
best regards
Actual
The light stays off. I noticed, the toggle helper is still on. If I turn the toggle helper off manually, the lights turn on again.
Thank you. That works great!
Yep you are correct there is a bug in the bypass when using scripts and scenes. Sorry about that ![]() … I will have to fix this ASAP.
… I will have to fix this ASAP.
Thanks for letting me know ![]() and keep an eye out for the next update.
and keep an eye out for the next update.
Blacky ![]()
You just rock. Thanks so much ![]()
This has been resolved, a new update is coming out now. Let us know if I got everything.
Again thanks for your help.
Blacky ![]()
Your lighting experience, your way – take control and customize it to perfection! ![]()
![]()
Bugs Fixes ![]()
If you like this blueprint? Consider hitting the ![]() button in the top post
button in the top post ![]()
If you like my blueprints, and would like to show your support or just say thank you? Click Here ![]()
Enjoy
Blacky ![]()
Thanks for all this, looks great. Haven’t made it work yet. Can the entity be a dimmer switch? If so, how is the light level set?