Add wifi to an older roomba

Have a 6 series roomba which didn’t have wifi support. Having HA wanted to implement a smarter solution - start when nobdy is home. Well simply said it was easier than i thought. All is needed - a buck converter
like this Aliexpress

And a wemos d1 mini which is an esp 8266 development board.

Need to solder only 6 wires.

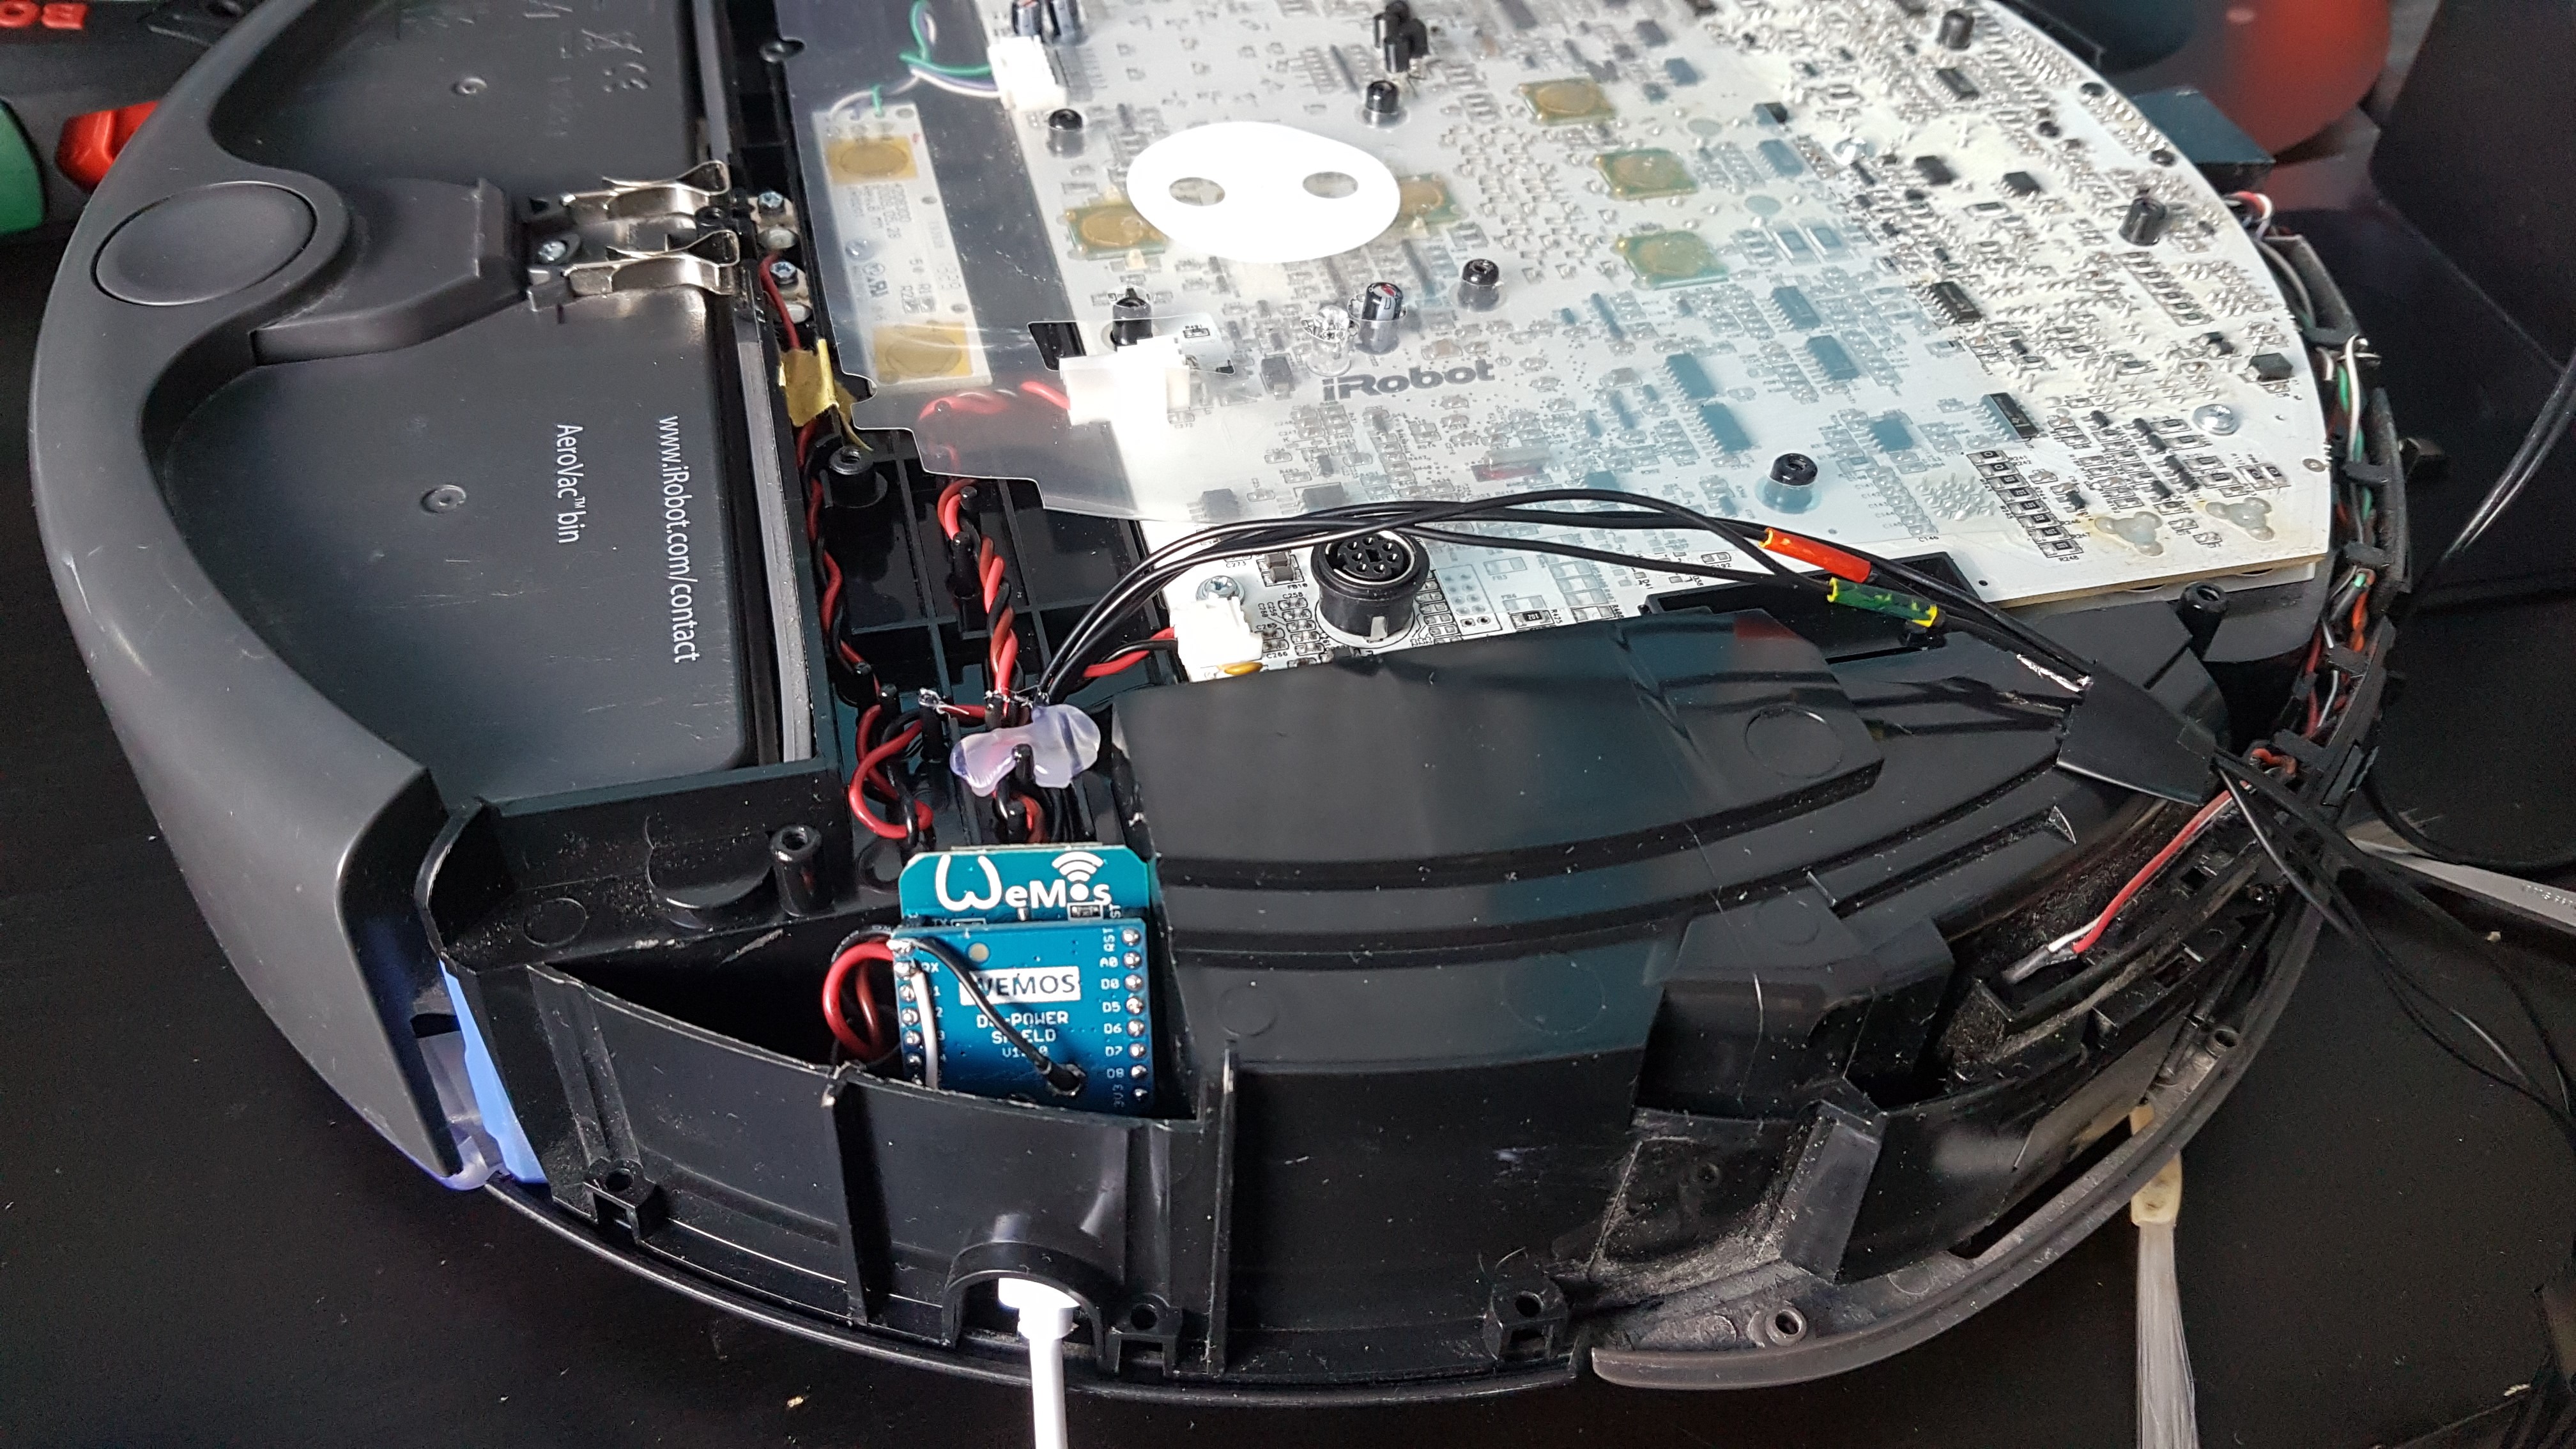
From what i have seen on the internet - this adaptation always had several boards stuck out of the case or an ugly overhead construction. Really don’t understand why. Just use cat5 wire dor wiring and stick it into the din slot. And the buck and wifi board go to the niche near the wheel (do not disconnect the power socket from there. Just leave it there) The cover fits nicely like it was there

The only problem - all i could find for the code was github below. And although it is ok - has only 2 commands (clean and dock). So if anybody has a better code or knows off an interesting project which also proveides sensor readings - please share

20 Likes

I used to have a roowifi until it broke (definately to do with sitting on top of the roomba exposed!), so I might make one of these too.

You can see the commands in the git repo you linked here, as you mentioned only start and dock have been implemented.

The implemented structure looks to be [128], [131], [command], where 128 is a start code, 131 enables safe mode. The implemented commands are 135 for clean and 143 for dock.

The full SCI spec can be found here, you can find the commands there, it also gives you the spec for querying sensors.

The source code for roowifi also shows the implemented commands.

1 Like

Do you have anymore pics of how the wemos and buck converter are mounted?

Just to give a rough idea. This was for fitting - nothing soldered yet

Thanks for the info. I was thinking of that but the code contains built in web server so will need to put more buttons. Hopefully this project will evolve and it will be a copy paste

Funny… I did exactly the same in April :smiley: I didn’t want to see the Wemos on top of the Roomba :wink:
But I also just can use the functions start/stop/dock so far

1 Like

I see you used a dc power shield @nicohirsch. I am looking to do the same, how did you a guide on how you connected it?

Hi there,
anyone thinking about rewriting the roomba component to support mqtt - and then update the wemos to support mqtt?

Hi, I have a Roomba 555 and pilot through Broadlink RM PRO.
I do not always manage to return to the base because when I send the command is hidden behind a mobile, but no problem is going to start. Simple and easy. :slight_smile:

1 Like

Plus me in a generic MQTT esp8266 will be extremly fun

@HickHackerz I connected the input pins of the power shield to the unregulated power pins of roomba (1 / 2 for power and 6 / 7 for ground)

3 Likes

Reading the current “sensor” gives an idea of its position or action - positive value = in dock, more than a use of 500mA(-500) signales movement, around -100mA active but not running.

1 Like

I have arduino 1.8.3 and after uploading to esp, it crashes. Is 1.6.5 mandatory?

wdt reset
load 0x4010f000, len 1384, room 16 
tail 8
chksum 0x2d
csum 0x2d
v09f0c112
~ld

On a side-note: does anyone know if the 780 can be controlled over infrared?

Thanks!

Nope compiled it on 1.8.3 with no problems

Turns out the esp was broken. Used another unit and it worked fine. Did a small fork, added spot and stop commands.

void handle_roomba_spot()
{
  mySerial.write(128);
  delay(50);
  mySerial.write(131);
  delay(50);
  mySerial.write(134);
  Serial.println("Spot cleaning");
  handle_root();
}

void handle_roomba_stop()
{
  mySerial.write(128);
  delay(50);
  mySerial.write(131);
  delay(50);
  mySerial.write(133);
  Serial.println("STOP");
  handle_root();
}

My roomba goes to sleep after some time, do you know how to wake it up? (model 780).

You can wake up the Roomba by sending a low pulse to pin 5 (Device Detect input)

void wakeUp (void)
{
  setWarningLED(ON);
  digitalWrite(ddPin, HIGH);
  delay(100);
  digitalWrite(ddPin, LOW);
  delay(500);
  digitalWrite(ddPin, HIGH);
  delay(2000);
} 

Source: https://www.hackster.io/mjrobot/controlling-a-roomba-robot-with-arduino-and-android-device-56970d

1 Like

Thanks. That did wonders! Now I just have to minify my setup to fit inside somehow :smiley:

I didn’t see your fork with the changes, so I did a fork with the changes made.

I’m little lost on adding the wakeup. Its pretty essential since the goal I had was to have roomba power back on when stuck and lost in the house. Seems to happen in same spots.

Thanks for posting the link to the modified version. Hopefully it will evolve and maybe sensors and mqtt will be added at some point…

Diff here: https://github.com/yahat/roomba-esp8266/commit/45bd636c9946d20e31b79dc3830a2476e00f8cf7

Fork here: https://github.com/yahat/roomba-esp8266 - but you only need the above file.

#define Wake_Pin 16

String roombacontrol = "<a href='/roombastart'<button type='button' class='btn btn-default'><span class='glyphicon glyphicon-play' aria-hidden='true'></span> Start</button></a><a href='/roombastop'<button type='button' class='btn btn-default'><span class='glyphicon glyphicon-stop' aria-hidden='true'></span> Stop</button></a></div><a href='/roombaspot'<button type='button' class='btn btn-default'><span class='glyphicon glyphicon-search' aria-hidden='true'></span> Spot</button></a></div><a href='/roombadock'<button type='button' class='btn btn-default'><span class='glyphicon glyphicon-home' aria-hidden='true'></span> Dock</button></a></div>";

in setup

  pinMode(Wake_Pin, OUTPUT);
  digitalWrite(Wake_Pin,LOW);
  server.on("/roombaspot", handle_roomba_spot);
  server.on("/roombastop", handle_roomba_stop);

void handle_roomba_wake(){
  digitalWrite(Wake_Pin, HIGH);
  delay(100);
  digitalWrite(Wake_Pin, LOW);
  delay(500);
  digitalWrite(Wake_Pin, HIGH);
  delay(100);
}

void handle_roomba_start()
{
  handle_roomba_wake();
  Serial.println("Starting");
  mySerial.write(128);
  delay(50);
  mySerial.write(131);
  delay(50);
  mySerial.write(135);
  Serial.println("I will clean master");
  handle_root();
}

void handle_roomba_dock()
{
  handle_roomba_wake();
  mySerial.write(128);
  delay(50);
  mySerial.write(131);
  delay(50);
  mySerial.write(143);
  Serial.println("Thank you for letting me rest, going home master");
  handle_root();
}

void handle_roomba_spot()
{
  handle_roomba_wake();
  mySerial.write(128);
  delay(50);
  mySerial.write(131);
  delay(50);
  mySerial.write(134);
  Serial.println("Spot cleaning");
  handle_root();
}

void handle_roomba_stop()
{
  handle_roomba_wake();
  mySerial.write(128);
  delay(50);
  mySerial.write(131);
  delay(50);
  mySerial.write(133);
  Serial.println("STOP");
  handle_root();
}

Hardware pic

Image:

1 Like