Advanced Ventilation/AC Management Blueprint
Click here to import directly into Home Assistant:
![]()
Celcius
![]()
Fahrenheit
 Overview
This Home Assistant blueprint provides intelligent control of fans and air conditioners based on indoor temperature, outdoor conditions, forecasted heatwaves, and window/door sensor status. The system automatically adjusts cooling devices to maintain optimal comfort while being energy-efficient and responsive to environmental conditions.
 Key Features
 Multi-Device Support
Controls various types of fans and AC units with graduated response levels
 Weather Integration
Proactive cooling based on heatwave predictions from weather forecasts
 Smart Energy Saving
Window/door awareness prevents energy waste when openings are detected
Intelligent Thresholds
Different cooling levels based on temperature with hysteresis control
 Supported Devices
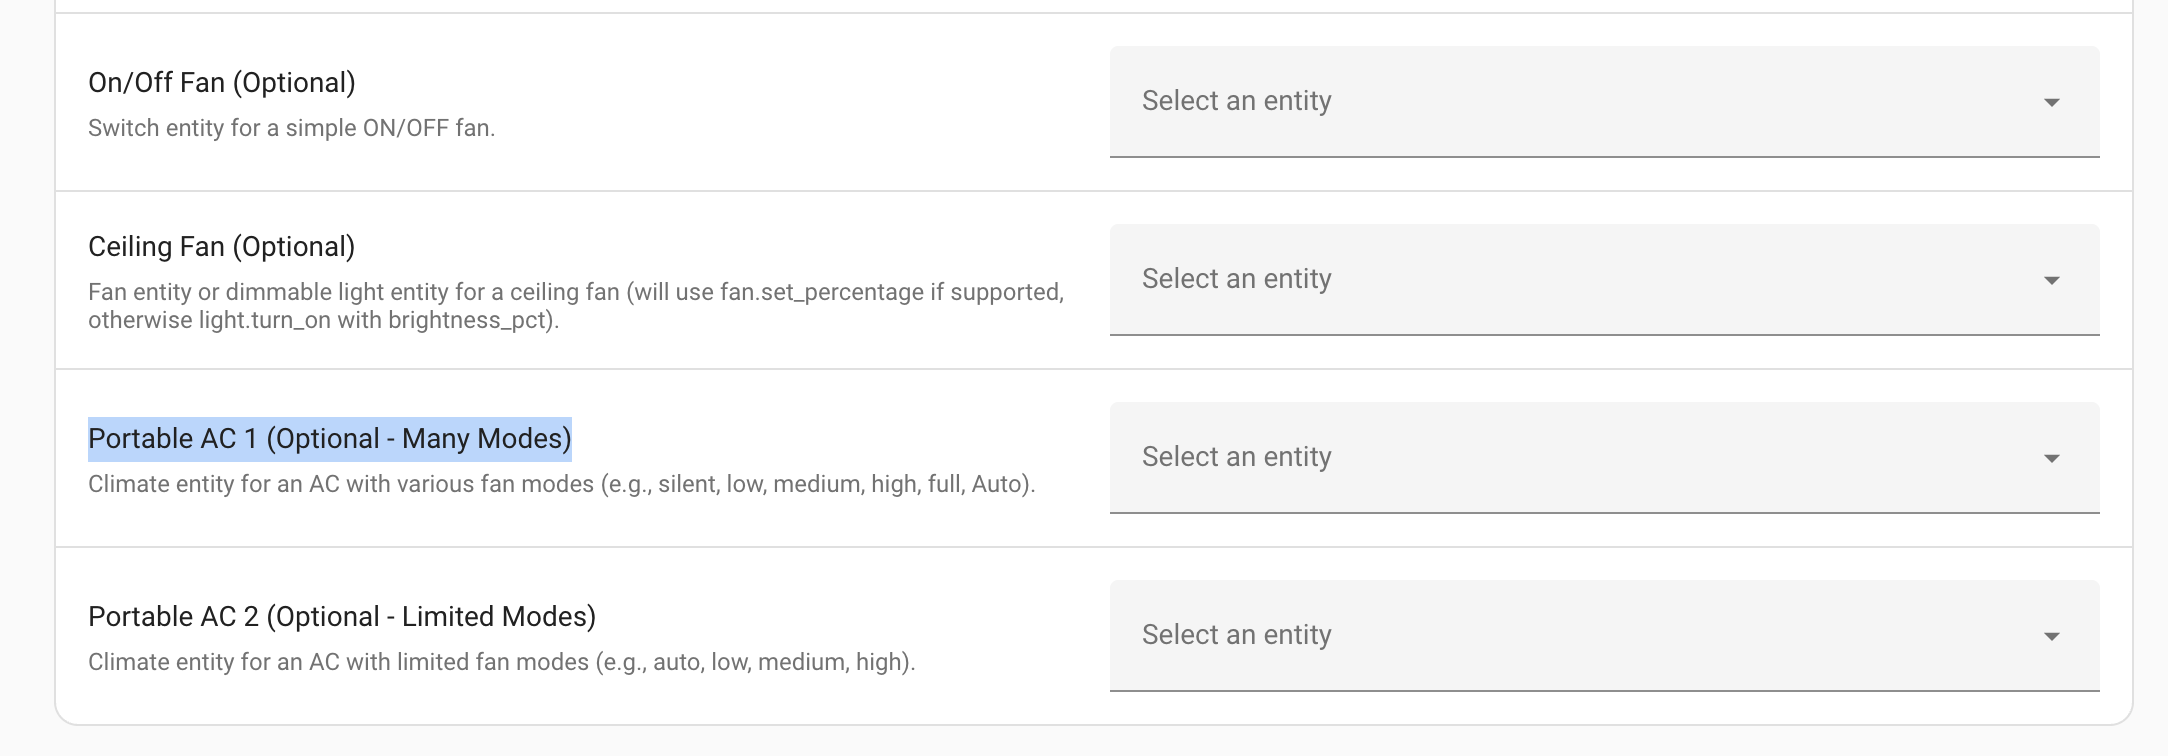
Fan Types (All Optional)
- On/Off Fan: Simple switch-controlled fans (exhaust fans, basic fans)
- Ceiling Fan: Variable speed control with percentage-based speeds (25%, 50%, 75%, 100%)
AC Types (All Optional)
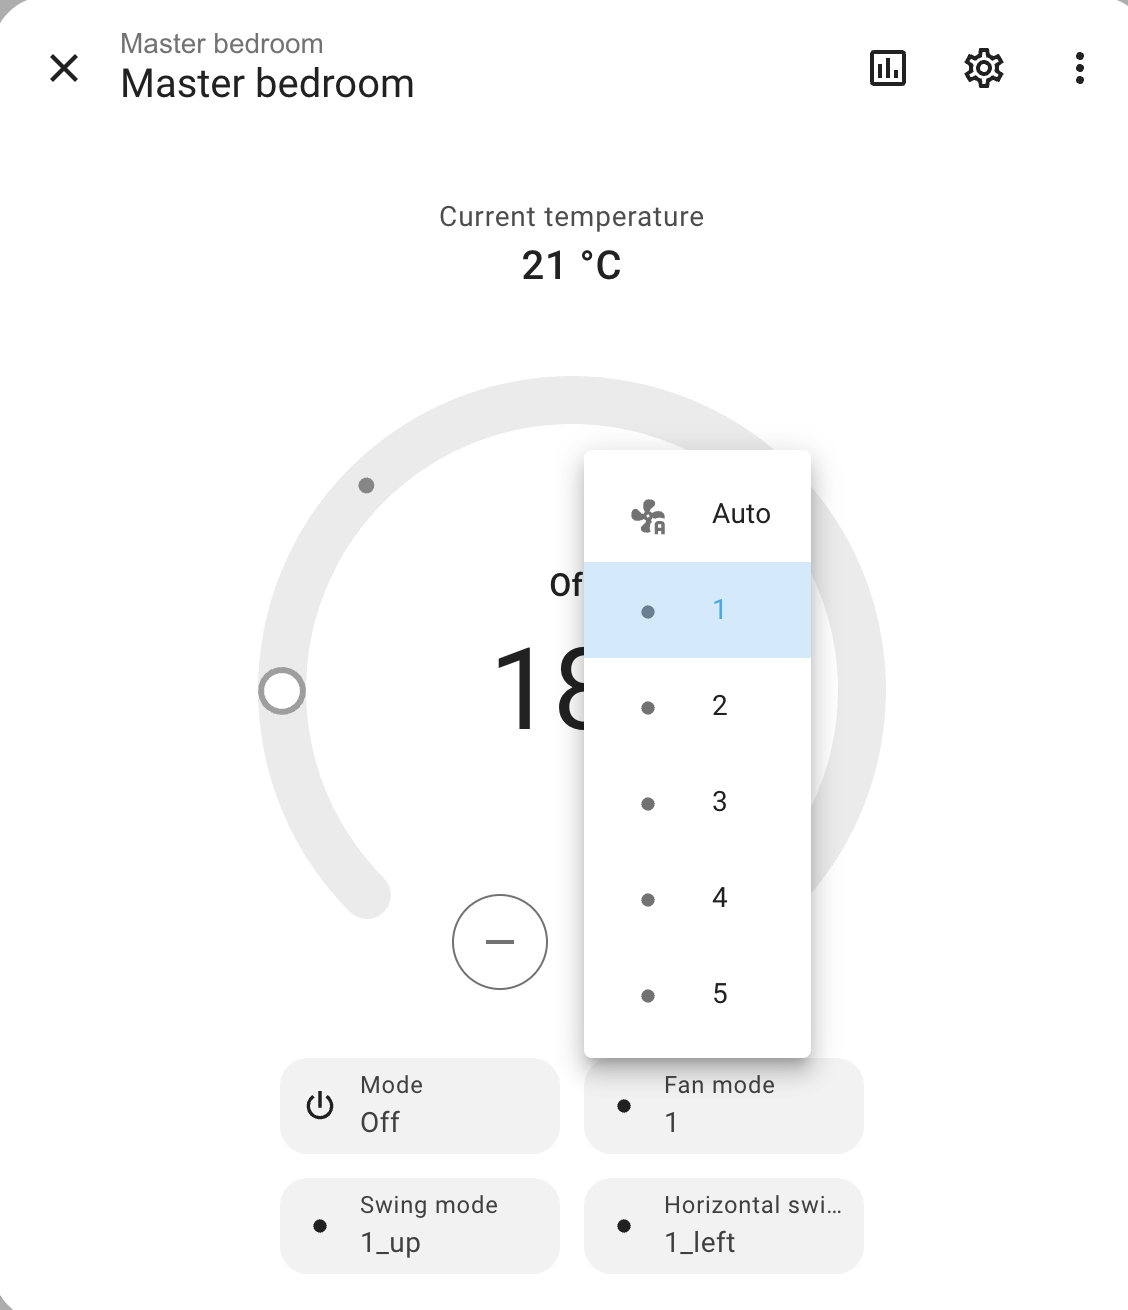
- Portable AC 1 (Advanced): Full fan mode options (silent, low, medium, high, full, Auto)
- Portable AC 2 (Basic): Limited fan modes (auto, low, medium, high)
 Configuration Parameters
| Parameter | Default | Description |
|---|---|---|
| Fan Start Threshold | 24.0°C | Indoor temperature to start fans |
| Fan Stop Threshold | 22.0°C | Indoor temperature to stop fans |
| AC High Temperature | 26.0°C | Temperature for AC high cooling mode |
| AC Heatwave Threshold | 22.0°C | AC activation temp during heatwave |
| Max Outdoor Temp for Ventilation | 25.0°C | Maximum outdoor temp to allow ventilation |
| Heatwave Forecast Threshold | 30.0°C | Forecasted temp triggering heatwave mode |
 Decision Tree Logic
![]() TRIGGER EVENT
TRIGGER EVENT
├── Indoor temperature change
├── Outdoor temperature change
├── Weather forecast update
└── Window/door sensor state change
▼
![]() INITIAL VALIDATION
INITIAL VALIDATION
├── Check if automation entity is available
├── Verify sensor states are not ‘unavailable’ or ‘unknown’
└── Continue if all checks pass
▼
![]() VARIABLE CALCULATION
VARIABLE CALCULATION
├── current_room_temp = Indoor temperature sensor value
├── current_outdoor_temp = Outdoor temperature sensor value (or default)
├── is_heatwave = Check if forecasted temp ≥ heatwave threshold
└── is_window_open = Window/door sensor state
▼
![]() ON/OFF FAN CONTROL (if configured)
ON/OFF FAN CONTROL (if configured)
├── IF current_room_temp ≥ fan_start_threshold (24°C)
│ AND current_outdoor_temp ≤ max_outdoor_temp (25°C)
│ └── ACTION: Turn ON fan
└── IF current_room_temp < fan_stop_threshold (22°C)
│ └── ACTION: Turn OFF fan
▼
![]() CEILING FAN CONTROL (if configured)
CEILING FAN CONTROL (if configured)
├── IF current_room_temp > (ac_high_threshold + 2°C) [>28°C]
│ └── ACTION: Set speed to 100% (Maximum cooling)
├── IF current_room_temp > ac_high_threshold [>26°C]
│ └── ACTION: Set speed to 75% (High cooling)
├── IF current_room_temp > (ac_high_threshold - 2°C) [>24°C]
│ └── ACTION: Set speed to 50% (Medium cooling)
├── IF current_room_temp > (ac_high_threshold - 4°C) [>22°C]
│ └── ACTION: Set speed to 25% (Low cooling)
└── IF current_room_temp < fan_stop_threshold [<22°C]
│ └── ACTION: Turn OFF ceiling fan
▼
![]() PORTABLE AC CONTROL (AC1 & AC2 - if configured)
PORTABLE AC CONTROL (AC1 & AC2 - if configured)
│
├── ![]() WINDOW/DOOR CHECK
WINDOW/DOOR CHECK
│ ├── IF is_window_open = TRUE AND turn_off_ac_on_window_open = TRUE
│ │ └── ACTION: Turn OFF AC immediately
│ │ └── REASON: Prevent energy waste with open window
│ │
│ └── IF is_window_open = FALSE
│ └── PROCEED TO TEMPERATURE CONTROL
│
└── ![]() TEMPERATURE-BASED AC CONTROL
TEMPERATURE-BASED AC CONTROL
│
├── ![]() HEATWAVE MODE (Priority)
HEATWAVE MODE (Priority)
│ ├── IF is_heatwave = TRUE AND current_room_temp heatwave_threshold (22°C)
│ │ └── ACTION: Set HVAC mode = ‘cool’, Fan mode = ‘medium’
│ │ └── REASON: Proactive cooling during forecasted heatwave
│
├── ![]() EXTREME HEAT MODE
EXTREME HEAT MODE
│ ├── IF current_room_temp > (ac_high_threshold + 2°C) [>28°C]
│ │ └── ACTION: Set HVAC mode = ‘cool’, Fan mode = ‘Full’ (AC1) / ‘high’ (AC2)
│ │ └── REASON: Maximum cooling power for extreme temperatures
│
├── ![]() HIGH HEAT MODE
HIGH HEAT MODE
│ ├── IF current_room_temp > ac_high_threshold [>26°C]
│ │ └── ACTION: Set HVAC mode = ‘cool’, Fan mode = ‘high’
│ │ └── REASON: Strong cooling for high temperatures
│
├── ![]() MODERATE HEAT MODE
MODERATE HEAT MODE
│ ├── IF current_room_temp > (ac_high_threshold - 1°C) [>25°C]
│ │ └── ACTION: Set HVAC mode = ‘cool’, Fan mode = ‘medium’
│ │ └── REASON: Moderate cooling for warm temperatures
│
├── ![]() MILD HEAT MODE
MILD HEAT MODE
│ ├── IF current_room_temp > (ac_high_threshold - 2°C) [>24°C]
│ │ └── ACTION: Set HVAC mode = ‘cool’, Fan mode = ‘low’
│ │ └── REASON: Gentle cooling for mildly warm temperatures
│
├── ![]() FAN-ONLY MODE
FAN-ONLY MODE
│ ├── IF current_room_temp ≤ (ac_high_threshold - 3°C) [≤23°C]
│ │ AND current_room_temp > fan_stop_threshold [>22°C]
│ │ └── ACTION: Set HVAC mode = ‘fan_only’, Fan mode = ‘Auto’
│ │ └── REASON: Air circulation without cooling
│
└── ![]() OFF MODE
OFF MODE
└── IF current_room_temp < fan_stop_threshold [<22°C]
└── ACTION: Turn OFF AC
└── REASON: Comfortable temperature reached
 Example Scenarios
Scenario 1: Normal Day ![]()
Indoor: 25°C, Outdoor: 23°C, No heatwave
Result: Ceiling fan at 50%, AC in cool mode with medium fan
Scenario 2: Heatwave Predicted ![]()
Indoor: 23°C, Outdoor: 35°C forecast, Heatwave detected
Result: AC activates proactively in cool mode with medium fan
Scenario 3: Window Open ![]()
Indoor: 27°C, Window sensor: Open
Result: AC turns off immediately (if configured), fans continue
Scenario 4: Cool Evening ![]()
Indoor: 21°C, Outdoor: 18°C
Result: All devices turn off, comfortable temperature achieved
 Setup Recommendations
Basic Setup (Minimal Configuration)
- Configure room temperature sensor
- Set fan start/stop thresholds based on comfort
- Add one cooling device (fan or AC)
Advanced Setup (Full Features)
- Configure all relevant devices
- Set up outdoor temperature sensor
- Configure weather forecast integration
- Add window/door sensors for energy efficiency
- Fine-tune all temperature thresholds
![]() Configuration Tips:
Configuration Tips:
• Fan thresholds: Start 1-2°C above your comfort temperature
• AC thresholds: Set 2-4°C above fan start threshold
• Heatwave threshold: Set 2-4°C below normal AC threshold
• Ensure stop thresholds are lower than start thresholds to prevent cycling
 Troubleshooting
Common Issues
- Devices not responding: Verify entity IDs are correct and devices are available
- Rapid cycling: Ensure stop thresholds are lower than start thresholds
- AC not starting: Check window sensor status and outdoor temperature limits
- Weather integration not working: Verify weather entity provides forecast data
Testing Tips
- Use Home Assistant’s automation trace feature to debug logic
- Monitor entity states during temperature changes
- Test window sensor integration by manually opening/closing windows
 Smart Features
Heatwave Detection
Uses weather forecast entity to predict high temperatures and proactively activates AC at lower indoor temperature (22°C vs 26°C) to maintain comfort before extreme heat arrives.
 Window/Door Integration
Monitors window/door sensors to prevent energy waste with configurable behavior: immediate AC shutdown or prevent startup only.
 Hysteresis Control
Different thresholds for starting (24°C) and stopping (22°C) devices prevents rapid on/off cycling and ensures stable operation.
Multi-Zone Logic
Considers both indoor and outdoor temperatures to prevent inefficient ventilation when outdoor air is too hot, optimizing energy usage based on conditions.
 Compatibility
Supported Integrations
- Climate entities: Any Home Assistant climate integration
- Fan entities: Standard fan platforms with percentage control
- Weather entities: Most weather integrations with forecast data
- Binary sensors: Standard door/window sensors
Device Requirements
- Temperature sensors: Must report in Celsius with numeric values
- Climate devices: Must support hvac_mode and fan_mode services
- Fan devices: Must support percentage control or dimmer functionality
Ready to install? Click here:
![]()
Celcius
![]()
Fahrenheit
This blueprint ensures optimal comfort while maximizing energy efficiency through intelligent automation. Perfect for those who want a comprehensive climate control solution that adapts to both current conditions and weather predictions!