How do I configure Agent DVR to work with Deepstack?
How can I display a list of identified persons without brackets?
-
Go to the general settings of Agent DVR
-
Choosing intelligence
-
We specify the IP and port of the deepstack of our server and save it
-
Go to the camera settings
-
Click edit camera
-
Choosing actions
-
Adding the actions we need
-
Creating an action for face recognition. We will transmit to HA via MQTT. You can create any topic. It is important to correctly specify the topics when creating an MQTT sensor.
-
Creating an action for face recognition. When the movement stops, the status will be turned off. If this is not done, the name of the identified person will remain. You don’t have to use this action if you don’t want the name to disappear when the movement stops
-
Creating a motion detection sensor. This will be useful for us in order to launch the Deepstack Face integration for face recognition in HA
-
Creating a sensor for stopping motion detection.
-
Open the"Face Recognition" section
-
In the face recognition settings, select detect, specify confidence and enable the face recognition function
-
Open the "Tracking device"section
-
We specify to fix only objects. If we specify a simple mode, then everything will be recorded, even turning on and off lights and animals. Objects capture only what we specified in the objects filters, it can only be people or people and a dog or a car. Recognizes only the specified object from the filter.
-
Open the "Objects"section
-
In this “Objects” section, we specify which objects the camera should respond to.
-
Then we need to apply the saved parameters. You can also restart the Agent DVR
-
Reloading the Agent DVR


We create sensors for Agent DVR and output them to Lovelace
# Sensors via MQTT
sensor:
  - platform: mqtt
    name: "agentdvr eufy camera hall motion"
    state_topic: "Agent/cameras/eufy camera hall/motion"
    icon: mdi:webcam

  - platform: mqtt
    name: "agentdvr eufy camera hall face detected"
    state_topic: "Agent/cameras/eufy camera hall/face"
    icon: mdi:webcam

  - platform: mqtt
    name: "agentdvr eufy camera hall motion detected"
    state_topic: "Agent/cameras/eufy camera hall/motion detected"
    icon: mdi:webcam

  - platform: mqtt
    name: "agentdvr eufy camera hall object detected"
    state_topic: "Agent/cameras/eufy camera hall/object detected"
    icon: mdi:webcam
This is how the panel and the sensor itself look in the developer panel


How can I add identified persons to the list without brackets?

A visual example in the template. Without brackets and with brackets
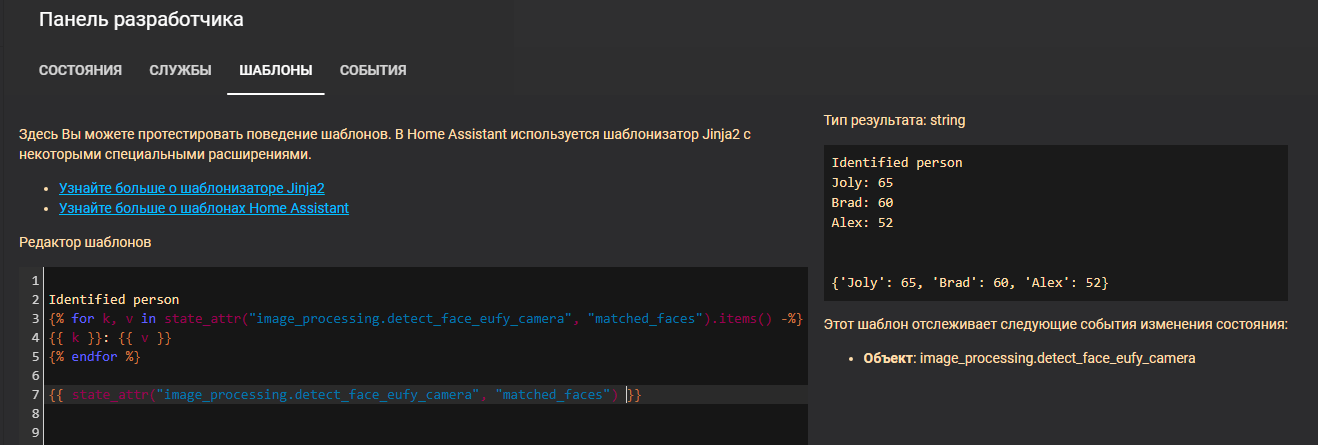
If we use this code, a list without brackets will be displayed
{% for k, v in state_attr("image_processing.detect_face_eufy_camera", "matched_faces").items() -%}
{{ k }}: {{ v }}
{% endfor %}
This code will display a list with brackets
{{ state_attr("image_processing.detect_face_eufy_camera", "matched_faces") }}
Текст на русском (Text in Russian)
Как настроить Agent DVR для работы с Deepstack?
Как вывести список опознанных лиц без скобок?
-
Заходим в общие настройки Agent DVR
-
Выбираем интеллект
-
Указываем IP и порт deepstack своего сервера и сохраняемся
-
Заходим в настройки камеры
-
Нажимаем редактировать камеру
-
Выбираем действия
-
Добавляем нужные нам действия
-
Создаем действие для распознавание лица. Передавать в ХА будем через MQTT. Топик можно создать любой. Важно при создании MQTT сенсора верно указать топики.
-
Создаем действие для распознавания лица. При прекращении движения, статус будет выключен. Если этого не сделать, то имя опознанного лица останется. Можете не использовать это действие, если не хотите, чтобы имя исчезало при прекращении движения
-
Создаем сенсор обнаружения движения. Это нам пригодится для того, чтобы запускать в ХА интеграцию Deepstack Face для распознавания лица
-
Создаем сенсор прекращения обнаружения движения.
-
Открываем раздел “Распознавание лиц”
-
В настройках распознавание лиц выбираем детектировать, указываем уверенность и включаем функцию распознавание лица
-
Открываем раздел “Следящее устройство”
-
Указываем фиксировать только объекты. Если укажем простой режим, то фиксировать будет все, даже включение и выключение света и животных. Объекты фиксируют только то, что мы указали в фильтры объекты, это может быть только люди или люди и собака или машина. Распознает только указанный объект из фильтра.
-
Открываем раздел “Объекты”
-
В этом разделе “Объекты” мы указываем на какие объекты камера должна реагировать.
-
Потом нам надо применить сохраненные параметры. Можно еще и перезапустить Agent DVR
-
Перезагружаем Agent DVR
Создаем сенсоры для Agent DVR и выводим их в Lovelace
# Сенсоры через MQTT
sensor:
  - platform: mqtt
    name: "agentdvr eufy camera hall motion"
    state_topic: "Agent/cameras/eufy camera hall/motion"
    icon: mdi:webcam

  - platform: mqtt
    name: "agentdvr eufy camera hall face detected"
    state_topic: "Agent/cameras/eufy camera hall/face"
    icon: mdi:webcam

  - platform: mqtt
    name: "agentdvr eufy camera hall motion detected"
    state_topic: "Agent/cameras/eufy camera hall/motion detected"
    icon: mdi:webcam

  - platform: mqtt
    name: "agentdvr eufy camera hall object detected"
    state_topic: "Agent/cameras/eufy camera hall/object detected"
    icon: mdi:webcam
Вот так выглядит панель и сам сенсор в панели разработчика
Как вывести опознанные лица в список без скобок?
Наглядный пример в шаблоне. Без скобок и со скобками
Если будем использовать этот код, то отобразится список без скобок
{% for k, v in state_attr("image_processing.detect_face_eufy_camera", "matched_faces").items() -%}
{{ k }}: {{ v }}
{% endfor %}
Этот код отобразится список со скобками
{{ state_attr("image_processing.detect_face_eufy_camera", "matched_faces") }}