I’m hoping someone might be able to please help me. I have a bunch of Arlec Model PC399HYA (Tuya based) switches and power plugs installed in my house. I’ve recently purchased a smart plug with power metering and also recently made the switch to Tuya Local.
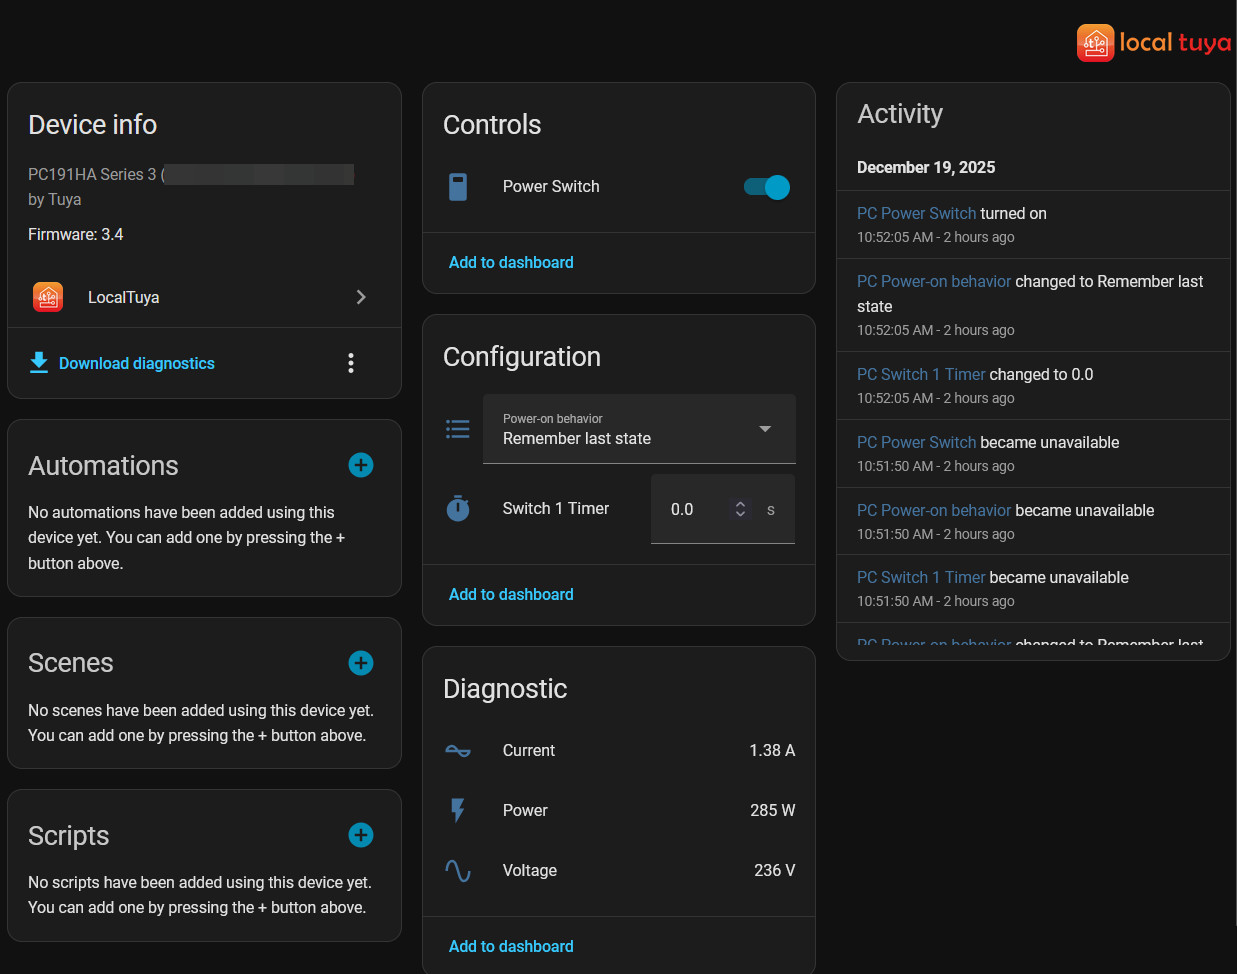
Ideally I’d like to know what all the attributes are, but I’d happily settle for the Current, Current Consumption and Voltage, as per the diagram. (Pretty sure that the voltage is Value 20)
I’ve been battling for hours to try and get Arlec GridConnect PC399HYA and PC191HA Smart Plug-in socket with energy meter recognised by TuyaLocal today.
The plug’s switch module was discovered easily, but I could not work out the right settings to get the energy/power monitors to work. I was going down custom-code rabbit-holes that didn’t need to be touched.
In the end, it was very, very simple - Everything was configured via the GUI with no custom YAML needed.
Summary:
Configure the existing switch entity to add the following IDs:
ID 1: Switch (already exists)
ID 18: Current (A) + Scaling factor 0.001 (Bug: must copy & paste this value into the UI)
ID 19: Power (W) + Scaling factor 0.1
ID 20: Voltage (V) + Scaling factor 0.1
Assumptions:
LocalTuya is already installed.
Your device has already been added to LocalTuya.
You can see and control the ‘Switch’ entity of the device.
Refer here for LocalTuya installation instructions:
Lots more detail in this thread too:
Step-by-step guide:
In Home Assistant, navigate to Settings > Devices & Services.
Open LocalTuya.
Thanks for detailing this, helped me get started. there have also been a couple of extra DPID’s to use/configure, not sure if they are new, or were always there.
I have found (using xZetsubou’s local Tuya) it is easier to create a template in /config/localtuya/templates/arlec.yaml and configure them all in one go when you add each device, as per this template:
- sensor:
    friendly_name: Voltage
    entity_category: diagnostic
    unit_of_measurement: V
    device_class: voltage
    scaling: 0.1
    id: '20'
    platform: sensor
    icon: ''
- sensor:
    friendly_name: Power
    entity_category: diagnostic
    unit_of_measurement: W
    device_class: power
    scaling: 0.1
    id: '19'
    platform: sensor
    icon: ''
- sensor:
    friendly_name: Current
    entity_category: diagnostic
    unit_of_measurement: A
    device_class: current
    scaling: 0.001
    id: '18'
    platform: sensor
    icon: ''
- switch:
    friendly_name: Power Switch
    entity_category: None
    restore_on_reconnect: false
    is_passive_entity: false
    device_class: outlet
    id: '1'
    platform: switch
    icon: ''
- number:
    friendly_name: Switch 1 Timer
    entity_category: config
    min_value: 0.0
    max_value: 86400.0
    step_size: 1.0
    restore_on_reconnect: false
    is_passive_entity: false
    unit_of_measurement: s
    scaling: 1.0
    id: '9'
    platform: number
    icon: mdi:timer
- select:
    friendly_name: Power-on behavior
    entity_category: config
    select_options:
      'off': 'Off'
      'on': 'On'
      memory: Remember last state
    restore_on_reconnect: false
    is_passive_entity: false
    id: '38'
    platform: select
    icon: ''