Bambu Lab X1 X1C MQTT

Curious if anyone else has a Bambu Lab 3D printer and has figured out how to get the sensors from MQTT?

Someone on Discord said it was possible but so far I have not had any luck. I assume it is because my HA MQTT runs on 1883 and I believe the Bambu Lab uses 8883.

Now I run 1883 on quite a few devices but they are all locked down behind my firewall on a separated VLan and do not care to revisit them to change if at all possible but if that’s the only solution, okay.

Any thoughts?

3 Likes

I have managed to make a connection to the printer in Home Assistant. Combination of node red plus its addon for ‘creating entities’.

Within Node Red I have made a mqtt in connecting to the printer on its ip and port 1883 (yes I know its insecure, but its running locally). From there I have it go to a function node that checks for the print event and then passes it to a bunch of sensor nodes.

For working out a list of potential entities that can be used you can attach a debug node after the mqtt in node.

Function Node: X1 Carbon Print Parser

if (msg.payload.print !== undefined) {
    node.send(msg.payload.print);
} else {
    return null;
}

Node Red Layout

Example Sensor:


PS. I am looking in to making a integration for home assistant to help with deployments.

4 Likes

I don’t currently use NodeRed but may check it out. Thanks!

Wow, I never thought of using NodeRed for the X1C’s MQTT server. Good excuse to learn NR since I consider myself new to it.

There’s a lot of data available via its MQTT, some useful and some not so much. I still need to tinker around since during printing, the message structure seems to change. For basic information this is what I’ve cobbled together for now.

Dashboard

It’s definitely possible and worth it to setup! One thing I quite like is since the AMS exposes the colour and type of each filament, you can do some fancy styling. Now if only the RFID tags could be reverse engineered for any filament to fill out the other details such as brand/weight/diameter.

1 Like

I’m new to Node Red - I have this set up with a Debug but only getting:

[node: debug 1]
msg.payload : undefined
undefined

What should I do? Printer is on and about 4 hours into a long print.

Never mind, I think I figured it out. I had the debug in the wrong location. I have the Nozzle Current Temp via Node Red Companion now. At least that is a start.

1 Like

@WolfwithSword So many questions… How did you format the start time and work out the time remaining? And the AMS? I have 1 now and likely will add a 2nd soon.

Start time (gcode_start_time) is in unix epoch time, which is just seconds. You will need to install the NR palette node-red-contrib-moment then add a ‘Date/Time Formatter’. Just have the input go in, then the output as if it weren’t there :slight_smile:

Date/Time Formatter Config

image

Time remaining is in seconds (mc_remaining_time), so for the entity config I just set the class to duration with seconds as the unit. This auto formats in HA in an entities list. Since it’s both in seconds, you could add them together in NR to get the estimated end time, and do another date/time formatter on that.

For the AMS, it’s a bit crude as I’m also new to NR. I just have functions that split the number of AMS units, then more for each tray individually (lot of entities to manually make in NR…)

Node Red Flow

I made the X1C and the AMS separate devices in NR/HA. For the AMS, I made the following entities:

  • Humidity
  • Temperature
  • Tray 0
  • Tray 1
  • Tray 2
  • Tray 3

Each tray has as attributes everything useful I could get from the JSON.

Get AMS’s Function

if (msg.ams !== undefined) {
    node.send(msg.ams);
} else {
    return null;
}

Get AMS 0 - first AMS detected

if (msg.ams !== undefined) {
    node.send(msg.ams[0]);
} else {
    return null;
}

Get AMS Tray X - Replace 0 with 0-3 for each tray

if (msg.tray !== undefined) {
    if (msg.tray[0].tray_type == undefined || msg.tray[0].tray_type == "") {
        msg.tray[0].tray_type = "Empty";
    }
    node.send(msg.tray[0]);
} else {
    return {};
}

Filament Tray Enttiy Config

image

Filament Tray Sensor Node Config

State: $not($contains($lowercase(msg.tray_type), $lowercase("Empty")))
Colour: To be useful, I appended a # to the front. $pad(msg.tray_color, -$length(msg.tray_color) -1, '#')

This results in the Tray entity in HA looking like this (From an official Bambu spool, otherwise not all the values are useful):

For using the Type as a label or colouring the icon based on the colour attributes, it’s a lot of card-mod styling and custom-button-card / templating customization. Still trying to get it to look better for me, such as adding a background image. Right now I’m trying to load custom SVGs to replace the nozzles with no success yet :stuck_out_tongue:

image

2 Likes

Wow - thank you! I’ll keep plugging away at it with this information!

1 Like

Great stuff, thanks! Especially to @WolfwithSword for sharing parts of your config, that really helped me get going. Would you mind sharing some of your other functions like “Fetch GCODE attributes”?

Also has anyone found a way to detect what filament type is currently loaded or in use? I have a mind to create an Esphome device to turn my Bentobox filter on or off via a relay if, for example, ABS is being used for the current job, but so far I haven’t found what I need.
I could key off nozzle or bed temperature however that won’t always be accurate enough (some PETG prints as hot or hotter than ABS, etc.)

Here’s what I have in HA currently:

Thanks again!

1 Like

Thanks @planetix ! Here’s some of the other functions. Keep in mind, I make heavy use of making some variables into attributes rather than standalone entities, so some of the structure is made for that.

Flow is the same as in my previous post. Here’s the functions I didn’t show last time :slight_smile:

(Updated) Fetch GCode Attrs

Function
if (msg.gcode_state !== undefined) {
    var data = {};
    data['gcode_state'] = msg.gcode_state;
    data['gcode_file'] = msg.gcode_file;
    data['gcode_file_prepare_percent'] = msg.gcode_file_prepare_percent;
    if (msg.gcode_start_time == 0) {
        data['gcode_start_time'] = "N/A";
    }
    else {
        data['gcode_start_time'] = msg.gcode_start_time;
    }

    if (msg.gcode_start_time !== undefined
        && msg.mc_remaining_time !== undefined
        && msg.gcode_start_time != 0) {
        var endTime = parseInt(msg.gcode_start_time) + ( parseInt(msg.mc_remaining_time) * 60 );
        if (endTime == 0) {
            data['gcode_end_time'] = "N/A";
        }
        else {
            data['gcode_end_time'] = endTime.toString();
        }
    }
    else {
        data['gcode_end_time'] = "N/A";
    }
    
    node.send(data);
} else {
    return {};
}

This goes into a switch on just msg.gcode_start_time. If it’s equal to N/A then I pass it directly to the HA entity. In this case, it was 0 or unavailable, which the moment library would still try to turn into an unrealistic time. If it is not equal to N/A, then I pass it through two of the date time moment nodes. One for GCODE Start time, the other for gcode_end_time, which I calculate in the fetch_gcode_attrs.

image

Translate X1C Speed Profile

Function
if (msg !== undefined) {
    switch (msg.spd_lvl) {
        case 1:
            node.send({"profile": "Silent", "mod": msg.spd_mag});
            break;
        case 2:
            node.send({ "profile": "Standard", "mod": msg.spd_mag });
            break;
        case 3:
            node.send({ "profile": "Sport", "mod": msg.spd_mag });
            break;
        case 4:
            node.send({ "profile": "Ludicrous", "mod": msg.spd_mag });
            break;
        default:
            node.send({ "profile": "Undefined", "mod": msg.spd_mag });
            break;
    }
} else {
    return {};
}

This is pretty straight forward. The spd_mag is just the magnitude/modifier % and I have that as an attribute should I want it.

Get Chamber Light Status

Function
if (msg.lights_report !== undefined) {
    for (var element of msg.lights_report) {
        if (element.node == "chamber_light") {
            node.send(element);
        }
    }
} else {
    return {};
}

I didn’t bother to get the work-light status, which is I think always equal to flashing unless it’s broken.

Get XCam Info aka the LIDAR Camera

Function
if (msg.xcam !== undefined) {
    node.send(msg.xcam);
} else {
    return {};
}

This isn’t special, it just sends the msg.xcam through so there’s less bulk to sift through.

Convert XCam Status

Function
if (msg.xcam_status !== undefined) {
    if (msg.xcam_status == "0") {
        msg.xcam_status = "Inactive";
    }
    if (msg.xcam_status == "1") {
        msg.xcam_status = "Active";
    }
    node.send(msg);
} else {
    return {};
}

This one I just threw in because it was available, don’t actually see a use for it to be honest. Haven’t actually tested it/noticed it.

Get IPCam Info

Function
if (msg.ipcam !== undefined) {
    switch (msg.ipcam.ipcam_dev)
    {
        case "1":
            msg.ipcam.ipcam_dev = "On";
            break;
        case "0":
            msg.ipcam.ipcam_dev = "Off";
            break;
        default:
            break;
    }
    node.send(msg.ipcam);
} else {
    return {};
}

This is actually quite useless I find. I think it actually just means if it’s installed or not (like with the lidarr/xcam. The detection of an AMS has a similar field), rather than if it’s active/on. Not sure about the attributes recording/timelapse, never seen those not “disable” despite enabling them. Probably just missed it.


As for which filament is currently in use or not, I’m not sure yet. I want to do some testing on the weekend to see what different messages come through during printing to see if I can find exactly that. I suspect if it comes through at all, it would either be in the AMS (if present) or gcode properties. I would also love XYZ positions, but I don’t know if they are there during a print. I’ve had limited time to print since I had this setup :slight_smile:

I’ve so far been spending my time making picture-elements for both the AMS and the X1C. Almost got them just as I want, just need to figure out changing the icon in a state-icon based on state :stuck_out_tongue:

I also want to look into the camera feed and somehow making it accessible… So far all I know is you can create a virtual camera via bambu slicer and setup it as a stream media source on a PC. If there is no other way, I’m honestly considering dockerizing bambuslicer and trying to make it accessible via that. Since I run my HA in Unraid, I’ve been considering dockerizing bambuslicer for a while actually, so I can “slice” from anywhere.

1 Like

So I’m doing a quick 20m print to test just to satisfy my curiosity. I noticed that in the AMS settings it has a new property “tray_now” (print.ams.tray_now) which matches to the “id” of a tray in the trays array. Since it is outside the tray array, it probably scales with multiple AMS’s. I think I will revise my AMS functions in node-red to get them based on the “id” instead of just indexing.

It’s still sorted by index properly, but if you wanted to get technical, you can match the “tray_now” to the filament in the AMS being used currently in a print via this tray id @planetix

Also confirmed stuff like my lidar activity stuff is pretty useless :stuck_out_tongue: The timelapse finally went to “enable” though!

Other notes I’ve observed:

  • Time Remaining seems to be in minutes, not seconds. So for the function for end time, need to multiply by 60. Also need to adjust the entity in nodered/homeassistant to be a duration of MIN not S.
  • I messed up my end time math. Need to add by casting to ints, then turn back into a string for the datetime conversion. Been a while since I coded in JS :confused:
  • GCode Filename is useless if you upload from bambuslicer. It will always be the “temporary” name of the first gcode you’ve ever uploaded up there. It will only change for manually saved files on the sd card. The “Current Task” subtask name is much better for this, as it will be the name of the object being printed.

I’ve updated the Function code in the previous reply that works. Sometime tomorrow I will make a function to get “current AMS Tray In Use” which will just return the whole AMS tray details. Unfortunately, I think this is only possible for AMS users.

Wow, that is more detailed than I hoped! Thank you!

Curious why (in your previous screenshot) you have two date/time formatters chained? I know its to convert from epoch time but I can’t puzzle out how you have the flow working.

I’ve checked the feed while printing using MQTT explorer and I can’t zero in on how (or if) it is reporting what AMS slot is loaded. That information is available to the apps so it must be exposing the active roll somehow.

Lucky that I am too curious, just setup some scripts for the current AMS slot in use.

But first, the reason for two date/times is I have one for start_time and one for end_time. The end_time I calculate by adding the minutes of time_remaining to start_time. The date/time nodes can only do one property at a time I think, so yeah, have to chain them.

UPDATE #2 I just realized I did a dumb, don’t create an end_time entity as I completely forgot time_remaining decreases, so end time will not actually work past the first minute… Better to do this calculation in HA itself I think.

But the main thing!

Updated Get AMS Tray Function

Get AMS Tray By ID

Change 0 to whatever ID you want, 0-3 for a single AMS unit. If you have more than one AMS, I assume (but not confirmed) it will be say, 0-7 for two, etc.

if (msg.tray !== undefined) {
    for (var tray of msg.tray) {
        if (tray.id == 0) {
            if (tray.tray_type == undefined || tray.tray_type == "") {
                tray.tray_type = "Empty"
            }
            node.send(tray);
            break;
        }
    }
} else {
    return {};
}

Get Current AMS Tray Filament In Use

Get Current AMS Tray

See the updated node flow for how to hook this up.

if (msg.tray_now !== undefined) {
    for (var ams of msg.ams) {
        for (var tray of ams.tray) {
            if (tray.id == msg.tray_now) {
                if (tray.tray_type == undefined || tray.tray_type == "") {
                    tray.tray_type = "Empty"
                }
                node.send(tray);
                return tray;
            }
        }
    }
} else {
    node.send({"tray_type": "Empty"});
}

Updated Node Flow

Node Flow Updates

Instead of making the “current tray” attached to AMS device, I attached it to the X1C, since it felt more like a “in use by X1C” thing to me.

image

And the new entity for current filament. It’s exactly the same as the previous ones for each tray I showed before, but I added “id” property to it (and all others). This way I can completely confirm the right IDs.

1 Like

This is the good stuff :slight_smile:

I have two AMS units and can confirm the first one is unit 0 and the second unit 1 (and so on). I assume I can duplicate the update tray function to return each one.

What I’m ultimately going for is an entity with the state being the type of filament loaded (none, PLA, ABS, etc.) that I can trigger off of.

The tray function would end up for each tray, and each AMS unit has 4 trays, which means an unfortunate amount of copying, but doable. I’d assume if you printed from say, AMS 1 Tray 3 (both index 0), the “tray_now” property would end up as 7, since there’s only one “tray_now” variable.

I need to update my code a bit to make it so when “tray_now” is not present, to set it to -1 or something, so it doesn’t break in non-print times.

As a side-note, thanks to now knowing I can get current tray in use, I’m finally starting to get somewhere with my dashboard. This is only part of it as I still have many test panels on the sides.

1 Like

As it happens I have a print going from my 2nd AMS so I can confirm your assumption: tray_now is set to 7, which is the last of the 8 slots I have (and correct).

Sorry for keeping bugging you but I feel like we’re both making progress :slight_smile: - how are you pulling in the filament type for each slot i.e. if I know tray_now is 7, and I know that corresponds to id 3 in AMS 1, and the type of filament in that slot is ABS, how do I pull all that together? I am pretty new to Node-Red though not to writing code, and I see you appear to have done it so wondering if it is simple before I dive in.

No worries! I also just updated the code (again) as I messed up an if statement for if (tray.tray_type == undefined || tray.tray_type == ""), forgot to check undefined which is the actual case.

But that’s what gets you the filament type - tray.tray_type. This gets filled in regardless of RFID or not, as you set that type of filament manually in bambu slicer when you insert a new roll into the AMS.

So for your case, I would get the tray_now number and do a count of your AMS units, do some math to get which AMS id and which tray id. Then when you’re there, it’s just the json property tray_type.

In my setup, I have tray_type, colour, etc as attributes, and in HA I get the state attribute value by like state_attr('sensor.you_filament_tray_number', 'type'), assuming you add msg.tray_type as attribute name “type” on the HA entity. You could also make the tray_type the default state of the entity, which honestly is far easier to use.

Assuming you make the tray_type / filament type the default state, you would be looking at this:


This way, your state is the filament type itself. Much easier to deal with :slight_smile:
Just note, the tray_type will be undefined for empty AMS trays. This is why in my functions I set it to “Empty” if undefined.

And in HA, I match the current filament tray id to the tray id (both state attributes) to figure out which one is active.

Example matching against my 0th tray: {% if is_state_attr('sensor.filament_tray_0', 'id', state_attr('sensor.current_ams_filament_in_use', 'id')) %}

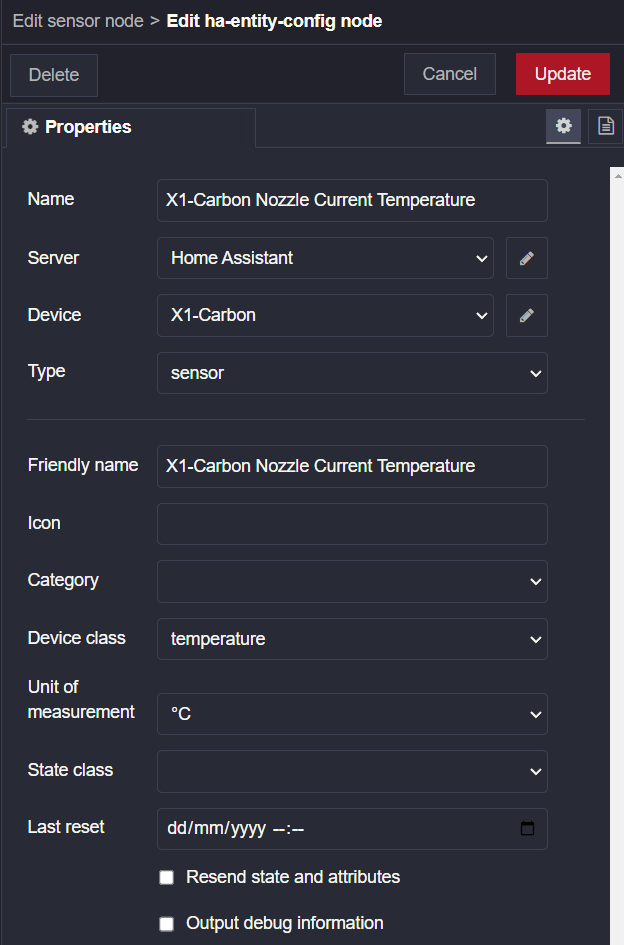
Interesting, I’d done this using MQTT Sensors via the template’s.

Anyway, in the interest of sharing things I can’t see in the thread at the moment;

      payload_on: '{"system":{"sequence_id":"2003","command":"ledctrl","led_node":"chamber_light","led_mode":"on","led_on_time": 500,"led_off_time": 500,"loop_times": 0,"interval_time":0},"user_id":"123456789"}'
      payload_off: '{"system":{"sequence_id":"2003","command":"ledctrl","led_node":"chamber_light","led_mode":"off","led_on_time": 500,"led_off_time": 500,"loop_times": 0,"interval_time":0},"user_id":"123456789"}'

Sent to device/DEVICEID/request will toggle the chamber lights. User ID seems to not matter.

I also have the ones for starting prints from files off the SD card, though I’m not sure how useful that would be for this setup. If your interested in prodding that tho, there is some bad Python here darkorb/bambu-ftp-and-print: A Python script to upload 3mf’s to X1 printers and trigger a print start via MQTT (github.com) which has the start print command in.

I can log the MQTT requests for cancelling/stopping prints though if there is interest, I’ve been intercepting the traffic from Handy to get the “Do things” commands. I’ll note I’ve reached out to Bambu as well to a) ask they don’t remove MQTT from local mode and b) see if they can provide some actual docs around what is what for things that are more obscure. I’ll post if/when I hear back.

Edit: Actually, the stop command might not be accurate, so snipped it. However, here’s some other fun ones for you instead. Or least I think they are fun/interesting.

Set Filament Type for a slot in the AMS

ABS: {"print":{"sequence_id":"2010","command":"ams_filament_setting","ams_id":0,"tray_id":3,"tray_info_idx":"GFB99","tray_color":"161616FF","nozzle_temp_min":240,"nozzle_temp_max":270,"tray_type":"ABS"},"user_id":"1234567890"}
ASA: {"print":{"sequence_id":"2006","command":"ams_filament_setting","ams_id":0,"tray_id":3,"tray_info_idx":"GFB98","tray_color":"161616FF","nozzle_temp_min":240,"nozzle_temp_max":270,"tray_type":"ASA"},"user_id":"1234567890"}
PA:  {"print":{"sequence_id":"2016","command":"ams_filament_setting","ams_id":0,"tray_id":3,"tray_info_idx":"GFN99","tray_color":"161616FF","nozzle_temp_min":270,"nozzle_temp_max":300,"tray_type":"PA"},"user_id":"1234567890"}
PA-CF: {"print":{"sequence_id":"2017","command":"ams_filament_setting","ams_id":0,"tray_id":3,"tray_info_idx":"GFN98","tray_color":"161616FF","nozzle_temp_min":270,"nozzle_temp_max":300,"tray_type":"PA-CF"},"user_id":"1234567890"}
PC: {"print":{"sequence_id":"2019","command":"ams_filament_setting","ams_id":0,"tray_id":3,"tray_info_idx":"GFC99","tray_color":"161616FF","nozzle_temp_min":260,"nozzle_temp_max":280,"tray_type":"PC"},"user_id":"1234567890"}
PETG: {"print":{"sequence_id":"2020","command":"ams_filament_setting","ams_id":0,"tray_id":3,"tray_info_idx":"GFG99","tray_color":"161616FF","nozzle_temp_min":220,"nozzle_temp_max":260,"tray_type":"PETG"},"user_id":"1234567890"}
PLA: {"print":{"sequence_id":"2003","command":"ams_filament_setting","ams_id":0,"tray_id":3,"tray_info_idx":"GFL99","tray_color":"F72323FF","nozzle_temp_min":190,"nozzle_temp_max":250,"tray_type":"PLA"},"user_id":"1234567890"}
PLA-CF: {"print":{"sequence_id":"2021","command":"ams_filament_setting","ams_id":0,"tray_id":3,"tray_info_idx":"GFL98","tray_color":"161616FF","nozzle_temp_min":190,"nozzle_temp_max":250,"tray_type":"PLA-CF"},"user_id":"1234567890"}
PVA: {"print":{"sequence_id":"2022","command":"ams_filament_setting","ams_id":0,"tray_id":3,"tray_info_idx":"GFS99","tray_color":"161616FF","nozzle_temp_min":190,"nozzle_temp_max":250,"tray_type":"PVA"},"user_id":"1234567890"}
TPU: {"print":{"sequence_id":"2023","command":"ams_filament_setting","ams_id":0,"tray_id":3,"tray_info_idx":"GFU99","tray_color":"161616FF","nozzle_temp_min":200,"nozzle_temp_max":250,"tray_type":"TPU"},"user_id":"1234567890"}

Change Spool. Very much untested, just what I snaffled on some tests a second ago.

{"print":{"sequence_id":"2026","command":"gcode_line","param":"M620 P3 \n"},"user_id":"1234567890"}
{"print":{"sequence_id":"2027","command":"gcode_line","param":"M620 S3\nM104 S250\nG28 X\nG91\nG1 Z3.0 F1200\nG90\n\nG1 X70 F12000\nG1 Y245\nG1 Y265 F3000\nM109 S250\nG1 X120 F12000\n\nG1 X20 Y50 F12000\nG1 Y-3\n\nT3\n\nG1 X54  F12000\nG1 Y265\nM400\nM106 P1 S0\nG92 E0\nG1 E40 F200\nM400\nM109 S220\nM400\nM106 P1 S255\nG92 E0\nG1 E5 F300\nM400\nM106 P1 S0\nG1 X70  F9000\nG1 X76 F15000\nG1 X65 F15000\nG1 X76 F15000\nG1 X65 F15000\n\nG1 X70 F6000\nG1 X100 F5000\nG1 X70 F15000\nG1 X100 F5000\nG1 X70 F15000\nG1 X165 F5000\nG1 Y245\n\nG91\nG1 Z-3.0 F1200\nG90\nM621 S3"},"user_id":"1234567890"}

All those are sent to the /request part of the topic as per above.
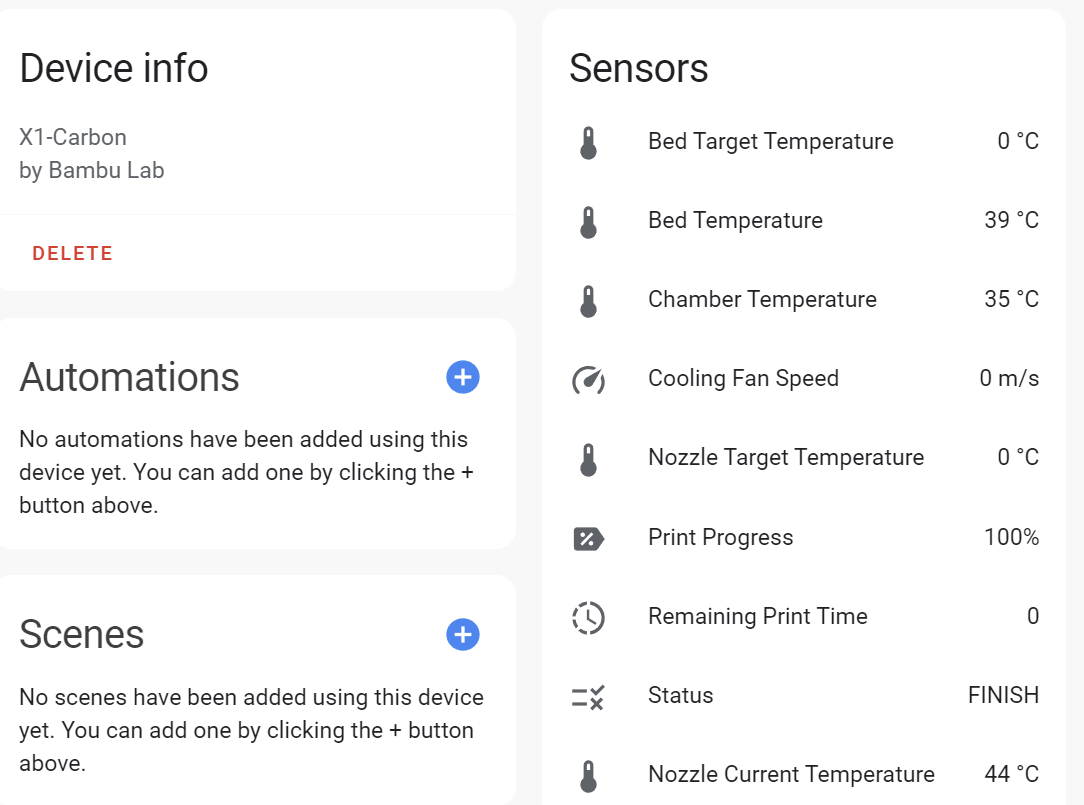
3 Likes

Further:
{"liveview": {"sequence_id": 0, "command": "prepare", "ttcode": "AVERYLONGSTRING", "passwd": "lolno", "authkey": "catsruleokay"}}

Seems to trigger streaming to be enabled with the response akin to:

{
    "liveview": {
        "authkey": "catsruleokay",
        "command": "prepare",
        "passwd": "lolno",
        "reason": "already started",
        "result": "succeed",
        "sequence_id": 0,
        "ttcode": "AVERYLONGSTRING"
    }
}

I’ve got a stream working with the credentials I snaffled from this, they do change it seems. I’m not sure about the ttcode yet as to what it is or where it comes from. Is it per printer? Is it per new session?

Either way, as you can see this renders using GraphStudioNext - which I saw mentioned on the Discord ages back. This is using BambuSource.dll here on the Windows machine as the source for the stream contents. A disclaimer being I’m yet to test this with zero internet access on the printer, so unsure if there is something interacting with that.

With the credentials from MQTT you can graft them into a URI of sorts which you can have that play back for you.

The format being:

bambu:///TTCODE?authkey=AUTHKEY&passwd=PASSWD&region=us

There are a handful of regions, which seems to relate to where the proxy servers for remote streaming reside (in my case, from NZ they are at FDCServer’s in the US).

Don’t have much time to dig into this further right now, but the stream in this example is coming direct from the printer, 37911/UDP. I can screenshot the video stream details if someone more familiar with stream protocols wants to have a poke.

Other commands:

{"camera":{"command":"ipcam_record_set","control":"disable","sequence_id":"20007"}}
{"camera":{"command":"ipcam_record_set","control":"enable","sequence_id":"20008"}}

These generate a reply like:

{
    "camera": {
        "command": "ipcam_record_set",
        "control": "enable",
        "result": "SUCCESS",
        "sequence_id": "20008"
    }
}