I have installed “SSH Server” and through “Putty” I access the console “Hass.io” as “root”.
In it appears “core-ssh:~#dir”.
From here, I don’t know how to get to “mv/etc/modules-load/” and add “rpi-i2c.conf”.
Can you help me? Thank you.
@El_Viejo do the following:
cd …
cd /etc/modules-load.d/
from here on i’m struggeling myself. i created the rpi-i2c.conf file at this spot, but it is empty and i don’t know what is supposed to go in there. Apparently one should copy another file here, but i didn’t understand which…
What is: " mv /etc/modules-load.d/* /etc/modules-load.d/rpi-i2c.conf" supposed to do?
Secondly, @brunofosi writes about editing “mnt/boot/config.txt” which doesn’t exist on my system…
I guess, this solution is based around using a so called configuration usb stick, wich i don’t use or know anything about.
To my own problem:
I try to connect a Bosch BME680 to my RaspberryPi 2B running the latest Hass.io OS
I added it to my config.yaml and checked the i2c Address of my Sensor in Raspbian. It is 0x76, wich i noted in my config.yaml It looks like this:
sensor:
  - platform: bme680
    name: BME680 Sensor
    i2c_bus: 1
    i2c_address: 0x76
    monitored_conditions:
      - temperature
      - humidity
      - pressure
      - gas
      - airquality
but my Sensor is not working. In my log file it says:
2019-02-01 02:41:01 ERROR (SyncWorker_7) [homeassistant.components.sensor.bme680] BME680 sensor not detected at 0x76
I don’t know what could possibly be the problem. as far as i understand, this is supposed to be working fine. Thanks in advance for any advice.
Here https://github.com/home-assistant/hassos/issues/142#issuecomment-425816257 a number of changes are proposed here that seem to be working.
Following your instructions, I have managed to modify the file "config.txt".
However, I don’t know everything about “rpi-i2c.conf”, so I asked for help.
In my opinion, there are unresolved problems with Hass.io and these devices. In addition, many different manufacturers use Bosch sensors. It seems certain that those manufactured by Adafruit, always use the address 0x77 and those of other manufacturers the address 0x76.
I’m still waiting for a solution
Hi all!
when you list the directory using this command:
ls /etc/modules-load.d/
you will notice that there is a file named: * so, something is wrong! what i did was renaming that file to: rpi-i2c.conf using the mv command:
mv /etc/modules-load.d/* /etc/modules-load.d/rpi-i2c.conf
try it! if it still doesn’t works! create a usb drive named CONFIG and create a file named: config.txt under this directory: mnt/boot/ with the following contents:
dtparam=i2c1=on dtparam=i2c_arm=on dtoverlay=pi3-disable-bt
I have some bme680! but i think its values are 2º or even 3º higher than what i would expect! don’t know how to calibrate it
Thank you very much for your interest fosi. But, due to my limited knowledge of the Linux environment and my poor level of English, I have not been able to follow your instructions (I am a 78 year old Spaniard).
Extracting the microSD card, I modified the file “config.txt” in my PC, adding the three parameters “dt…”.
I’m running Hass.io (0.86.4).
From my PC, with Putty, I have accessed the Hassio console. The console displays “core-ssh:~#dir”. Here I typed the command ls /etc/modules-load.d/, but nothing happens.
Where should I write the commands?
Thanks again.
Thank you very much for your interest.
I have made a first reading of the instructions and I will try to put them into practice.
But I will have to be very careful because it is a complex task and my knowledge of the English language is limited.
Now, I get down to the task and, despite my age (77), I am going to put all my efforts into it.
I have read your step-by-step instructions carefully and several times. To avoid mistakes, I am writing a document in Spanish.
My first question is about the autorized_keys file. Should it contain only the characters of the private_key?
If this is correct, what should I do with the public_key?
Probably more doubts will appear and I will be grateful for the patience and help of the experts of this forum.
I have done with the greatest care the first 5 steps of your guide. In step 6, I run Putty from a second computer (port 22222) and the following message appears: "Network error: Connection refused".( port 22 connects correctly)
My doubts and questions:
1.- In step 3, I copied and saved all the characters of the window using a plain text processor (EditPad Lite) in a file authorized_keys.txt. I saved it in the root directory of a USB drive, formatted with CONFIG.
Is that correct?
2.- In step 5, when you click on the HARDWARE button, the disk section appears the following: /dev/sda and /dev/sda.
Is it correct?
Where are my errors?
Thank you very much for your help.
Hi again,
The generated public key must be copied in a file called authorized_keys (without .txt or any other extension). Then copy the authorized_keys file to your USB flash root directory, after that connect this flash to the USB port of your Raspberry Pi and click Import from USB in your hassio WEB interface.
Once it is done, use your private key to ssh to your hassio’s port 22222.
If you use PuTTY, configuration should looke like this:

If it still doesn’t respond to 22222, then try to restart your hassio. Maybe after restart it will work. Good luck.
It is wonderful that in this forum there are people who dedicate their time to help and who have enough patience to attend the queries of newbies.
Following your instructions, I have corrected my mistakes and I have achieved a clear advance. Now I access the Hass.IO console, as you can see in the image.
My problem is that I don’t know how to navigate through the folders, to modify the config.txt file and add the rpi-i2c.conf file.
I’ve typed ‘help’, I’ve tested some commands, but I haven’t been able to find the solution. I resigned to avoid corrupting the whole system.
Do you still have the patience to keep helping?
In any case, thank you very much.

Nice! Now in this console you need to type the command login as it says in it and press the enter key.
After that change directory with:
cd /mnt/boot
Then follow the steps #8 and #9 from my solution.
Unfortunately, my lack of Linux knowledge keeps me from moving forward. I’ve gone as far as you can see in the picture.

But, from here, I’m not able to modify the config.txt file or add the rpi-i2c.conf file. I typed help again, but I don’t know which commands to use.
Thank you very much for your patience and help.
Ok. Here’s how you do it
Check contents of the config.txt file:
cat /mnt/boot/config.txt
Append config.txt with 2 necessary lines:
echo “dtparam=i2c1=on” >>/mnt/boot/config.txt
echo “dtparam=i2c_arm=on” >>/mnt/boot/config.txt
Create rpi-i2c.conf and add necessary lines:
echo “i2c-dev” >>/etc/modules-load.d/rpi-i2c.conf
echo “i2c-bcm2708” >>/etc/modules-load.d/rpi-i2c.conf
Check again both modified files for changes you made:
cat /mnt/boot/config.txt
cat /etc/modules-load.d/rpi-i2c.conf
Restart your raspberry. After restart i2c should be enabled. Now just configure your sensor properly.
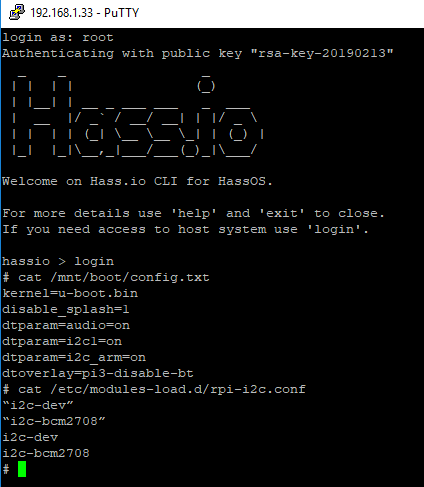
I followed your instructions with this result.
I understand it is the right one. However, after rebooting the system, the following error still appears
Wed Feb 20 2019 17:53:29 GMT+0100 (hora estándar de Europa central)
Error while setting up platform bme280
Traceback (most recent call last):
File “/usr/local/lib/python3.6/site-packages/smbus/smbus.py”, line 81, in open
self._fd = os.open(path, os.O_RDWR, 0)
FileNotFoundError: [Errno 2] No such file or directory: ‘/dev/i2c-1’
During handling of the above exception, another exception occurred:

Traceback (most recent call last):
  File "/usr/local/lib/python3.6/site-packages/homeassistant/helpers/entity_platform.py", line 128, in _async_setup_platform
    SLOW_SETUP_MAX_WAIT, loop=hass.loop)
  File "/usr/local/lib/python3.6/asyncio/tasks.py", line 358, in wait_for
    return fut.result()
  File "/usr/local/lib/python3.6/site-packages/homeassistant/components/sensor/bme280.py", line 92, in async_setup_platform
    bus = smbus.SMBus(config.get(CONF_I2C_BUS))
  File "/usr/local/lib/python3.6/site-packages/smbus/smbus.py", line 56, in __init__
    self.open(bus)
  File "/usr/local/lib/python3.6/site-packages/smbus/smbus.py", line 83, in open
    raise IOError(e.errno)
OSError: 2
My sensor configuration is:
  - platform: bme280
    name: Clima
    i2c_bus: 1
    i2c_address: 0x77
The installed sensor is the original Adafruit sensor, which always uses the 0x77 address (I checked it in a direct installation in another Raspberry). I also checked the jumpers connections.
I think I will desist from enabling this sensor in Home Assistant. But your patience and help have allowed me to learn new things and move forward. Again, thank you very much.
Hello El_Viejo
it doesn’t work because you copy the text.
if you paste the text into putty screen remove the ?
Reboot and it works 

Looks like there is a formatting issue - when you copy the command here, it copies another type of quotation marks. Actually - my bad, I just could have skipped using them in my example.
You can fix your added lines by removing these quotation marks like this:
sed -i ‘s/\“//g’ /mnt/boot/config.txt && sed -i ‘s/\”//g’ /mnt/boot/config.txt
sed -i ‘s/\”//g’ /etc/modules-load.d/rpi-i2c.conf && sed -i ‘s/\”//g’ /etc/modules-load.d/rpi-i2c.conf
Just tested and looks like the same problem is with these commands. You need to replace these “smart” single quotes with the straight ones in these 2 commands above. Hope you can manage it.
After this just make sure the quotes are gone and then reboot
Hello vitaalz and rubendijk:
I have managed to do this.
Now, the error message does not appear and in Home Assistant I can see the three sensors of temperature, humidity and pressure.
vitaalz, using your commands, I get the error: "unsupported command".
With the suggestion of rubendijk, not removed the quotation marks, but I added the two correct lines.
Now I have to reconfigure Lovelace and later I will try to learn about templates.
Thanks a lot to both of them. Their patience is comparable to that of Job (the biblical character)
Hello.
I’m trying to make a BME280 sensor work on HASS.IO, but I can’t do it in any way.
I wrote the files mnt / boot / config.txt and etc / modules-load.d / rpi-i2c.conf
but hassio on reboot eliminates them both.
I wrote them both through PuTTY (as ‘root’) and from Web UI of the confugurator in Hassio.
Can anyone help me?
thanks
hello vitaalz,
I’m trying to do the same via PuTTY, but when i type ‘login’, it ask me login: and password:
but I haven’t
can you help me please?
