Hello,
I’m hoping someone has some insight on this item, I’ve been working over the last couple weeks (in my downtime) to calibrate and integrate the CircuitSetup Energy Meter de5b30 into my energy monitoring, but have been running into consistent issues where the watts stat is significantly lower than my Solar system and utility report for me.
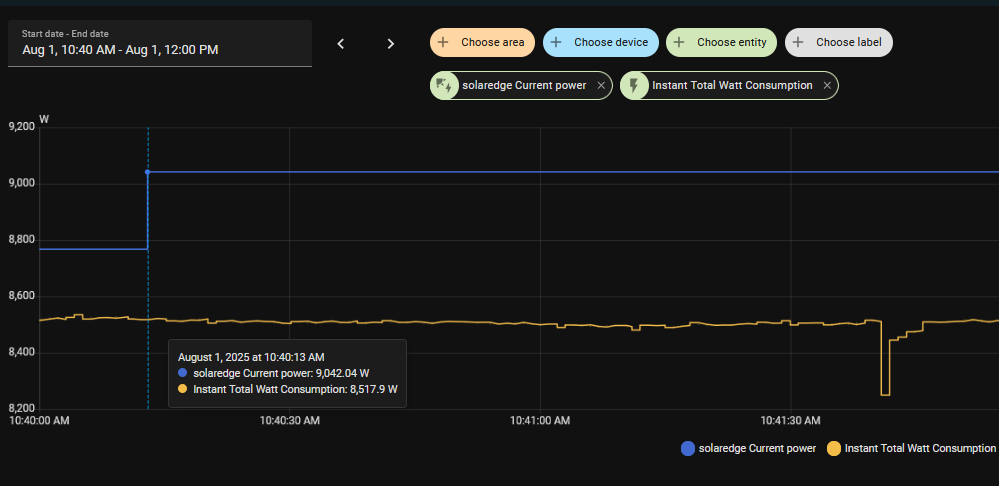
Before running to my utility screaming they’re overcharging me i figured i would do some basic arithmetic and found that the watt statistic doesn’t align.
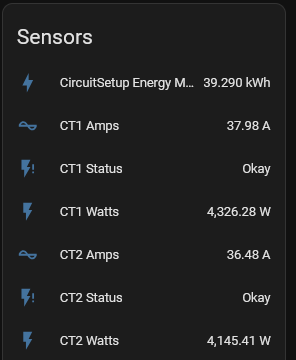
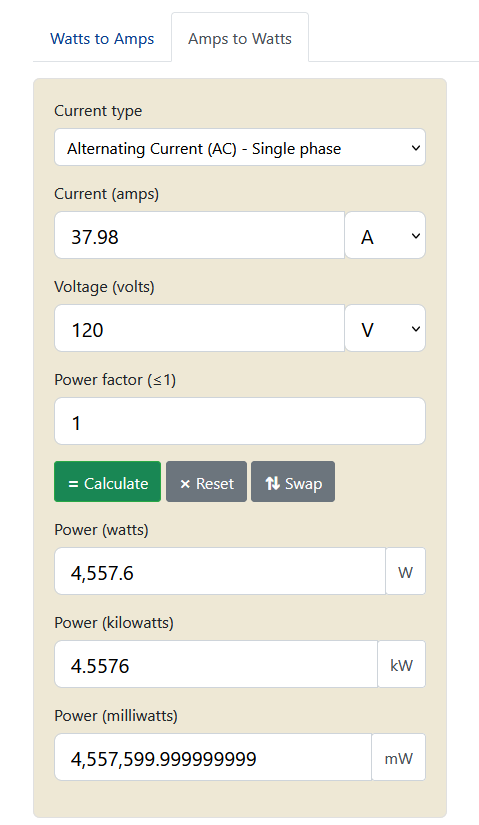
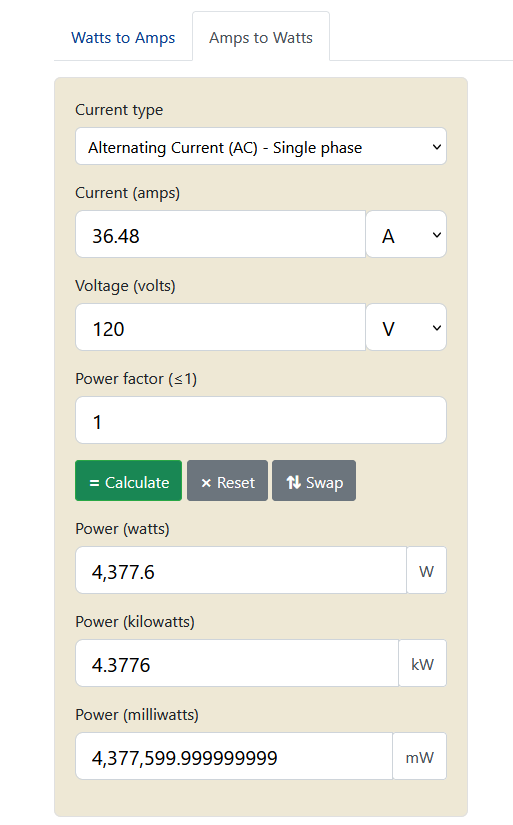
Just plugging my amp measurement into an online calculator (i don’t trust myself with basic multiplication) shows I’m measuring almost ~230w low on each clamp. This difference in reporting aligns with what my solar system reports which is about ~500w more than what the CTs report.
Any guidance or assistance is greatly appreciated.
.yaml config for reference.
# CircuitSetup 6 Channel Energy Meter Main Board config
# See all options at https://esphome.io/components/sensor/atm90e32.html

substitutions:
# Change the disp_name to something you want
  disp_name: esphome-web-de5b30
  friendly_name: "CircuitSetup Energy Meter"
# Interval of how often the power data is updated
  update_time: 1s
# Frequency of your electrical grid - 60Hz in North America, 50Hz otherwise
  electric_freq: '60Hz'

## The below names and IDs can be changed to whatever you want. IDs should not have spaces
  main_meter_name1: Meter 1-3
  main_meter_name2: Meter 4-6
  main_meter_id1: meter_main1
  main_meter_id2: meter_main2
  ct1_name: CT1
  ct2_name: CT2
  ct3_name: CT3
  ct4_name: CT4
  ct5_name: CT5
  ct6_name: CT6

## Semi-Automatic Calibration ##
# See https://esphome.io/components/sensor/atm90e32.html#calibration
# WHEN CALIBRATION IS ENABLED, calculated values for offset and gain stored in memory take priority over config values
# To save calculated calibration values, copy them from the logs to your config
# then use the clear buttons to clear the calibration values from memory
# Values are stored in the variables for gain below and offsets in their corresponding files
# under /calibration/6chan_xxxx_offset_calibrations.yaml
  offset_calibration: "true"
  gain_calibration: "true"

## Gain Calibration Values ##
# Change current_cal_ctX value to the corresponding CT's that you're using
# For more precise calibration, see documentation for Semi-Auto calibration
# Current Transformers:
#  20A/25mA SCT-006: 11143
#  30A/1V SCT-013-030: 8650
#  50A/1V SCT-013-050: 15420
#  50A/16.6mA SCT-010: 41334
#  80A/26.6mA SCT-010: 41660
#  100A/50ma SCT-013-000: 27518
#  120A/40mA: SCT-016: 41787 -- default for clamp 1-2
#  200A/100mA SCT-024: 27518
#  200A/50mA SCT-024: 55036
#  current_cal_ct1: '41787' #default
#  current_cal_ct2: '41787' #default
  current_cal_ct1: '45000' #calculated
  current_cal_ct2: '49965' #calculated
  current_cal_ct3: '41787'
  current_cal_ct4: '41787'
  current_cal_ct5: '41787'
  current_cal_ct6: '41787'
# This only needs to be changed if you're using something other than the
# Jameco 9VAC Transformer:
  voltage_cal1: '7305'
  voltage_cal2: '7305'

esphome:
  name: ${disp_name}
  friendly_name: "${friendly_name}"
  name_add_mac_suffix: true
  min_version: '2025.5.0'
  project:
    name: circuitsetup.6c-energy-meter
    version: "1.6"

packages:
  remote_package:
    url: https://github.com/CircuitSetup/Expandable-6-Channel-ESP32-Energy-Meter
    ref: master
    refresh: 1d
    files:
      - Software/ESPHome/6chan_common.yaml
      - Software/ESPHome/meter_sensors/6chan_main_sensor.yaml

      ## Additional power quality sensors per CT/Phase
      ## Uncomment to enable
      ## details: https://esphome.io/components/sensor/atm90e32.html#configuration-variables
      #- Software/ESPHome/power_quality/6chan_main_power_quality.yaml

      ## Enables text status fields for each CT/Phase
      ## details: https://esphome.io/components/sensor/atm90e32.html#text-sensor
      - Software/ESPHome/status_fields/6chan_main_status.yaml

      ## Adds semi-automatic calibration buttons and reference fields
      ## If enabled, make sure offset & gain calibration are set to "true" above
      ## details: https://esphome.io/components/sensor/atm90e32.html#calibration
      - Software/ESPHome/calibration/6chan_main_calibration.yaml

      ## Additional offset calibration fields that should be copied per CT/Phase from the ESPHome logs
      #- Software/ESPHome/calibration/6chan_main_offset_calibrations.yaml

dashboard_import:
  package_import_url: github://CircuitSetup/Expandable-6-Channel-ESP32-Energy-Meter/Software/ESPHome/6chan_energy_meter_main_board.yaml@master
  import_full_config: true

# Enable Home Assistant API
# An encryption key is recommended and can be generated here:
# https://esphome.io/components/api.html#configuration-variables
api:
#  encryption:
#    key: "YOUR_ENCRYPTION_KEY_HERE"

# Enable OTA updating
ota:
  - platform: esphome

# Set up a wifi access point
wifi:
  ssid: !secret wifi_ssid
  password: !secret wifi_password
  manual_ip:
    static_ip: !secret ip_eh_nrgnode
    gateway: 192.168.88.1
    subnet: 255.255.255.0
#    dns1: !secret ip_dns1

# In combination with the `ap` this allows
# provisioning wifi credentials to the device.
captive_portal:

# Sets up Bluetooth LE to provision wifi credentials
# to the device.
esp32_improv:
  authorizer: none

# Sets up the improv via serial client for wifi provisioning
improv_serial:

web_server:
  port: 80

sensor:
## The max value for current that the meter can output is 65.535. If you expect to measure current over 65A,
## divide the current_cal_ctx (above) by 2 (120A CT) or 4 (200A CT) and multiply the current and power values
## by 2 or 4, uncommenting the below and changing the id and phase_x accordingly
#- id: !extend ${main_meter_id1} # CTs 1-3
#  phase_a: # CT1
#    current:
#      filters:
#        - multiply: 2
#    power:
#      filters:
#        - multiply: 2
#
## uncomment if monitoring 2 voltages
#- id: !extend ${main_meter_id2}
#  phase_a:
#    voltage:
#       name: Voltage 2
#       id: ic2Volts
#       accuracy_decimals: 1
#  frequency:
#    name: Frequency 2

#kWh
####
- platform: total_daily_energy
  name: ${friendly_name} Total kWh
  power_id: totalWattsMain
  filters:
    - multiply: 0.001
  unit_of_measurement: kWh
  device_class: energy
  state_class: total_increasing