CO2 monitoring with SCD30 sensor and HA integration

These day I tested a nice sensor, the SCD30 from Sensirion.


https://www.sensirion.com/en/environmental-sensors/carbon-dioxide-sensors/carbon-dioxide-sensors-co2/
It’s a nice small unit capable of sense very well carbon dioxide levels in the air, as well as temperature and humidity.
The average cost per unit is around 60 Euro, but I managed to find it for less than half price on an online chinese supplier, have a look on aliexpress/taobao/bangood.
I choose this sensor compared to other mainly for these characteristics:

  • I2C/UART interface
  • calibrated output in ppm
  • high precision of +/- 30ppm
  • operating voltage between 3.3v and 5.5v (therefore good with Arduino and ESP8266 board which only provides 3.3v like ESP01/ESP12).
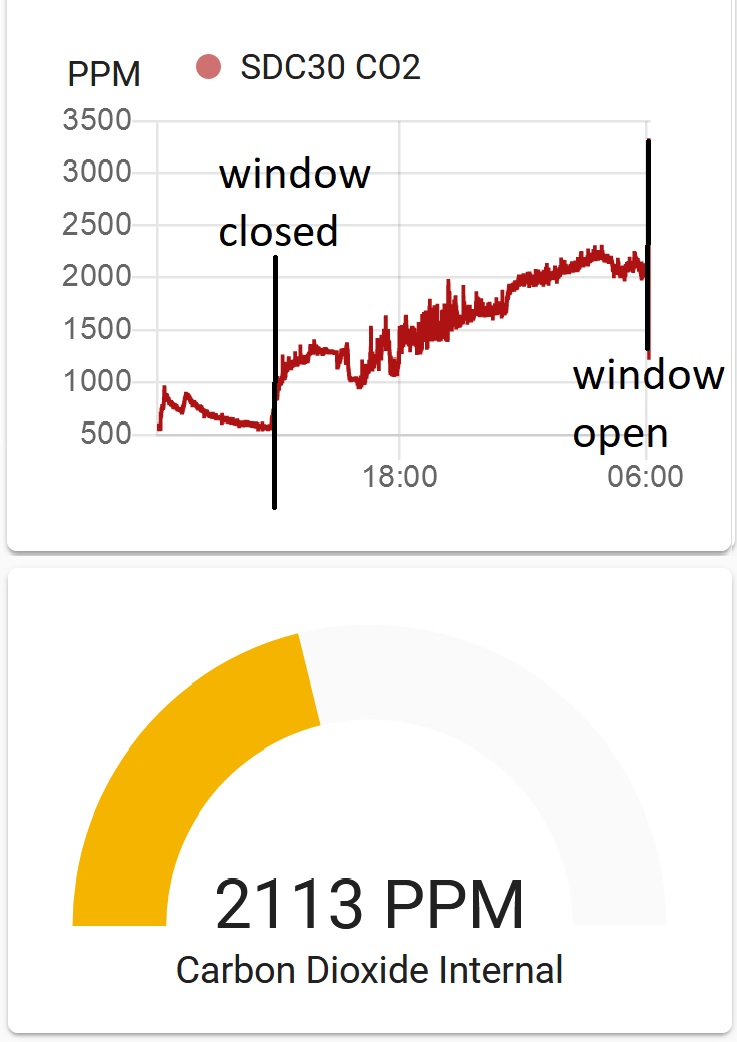
    The sensor reading seems very accurate. In the following example I closed door and windows of my bedroom before going to sleep, and then opened again once awake:

    Slowly the concentration of CO2 coming from breathing saturates the room, a nice idea could be to trigger a sound or notification to ventilate the room, or starting an air extractor.

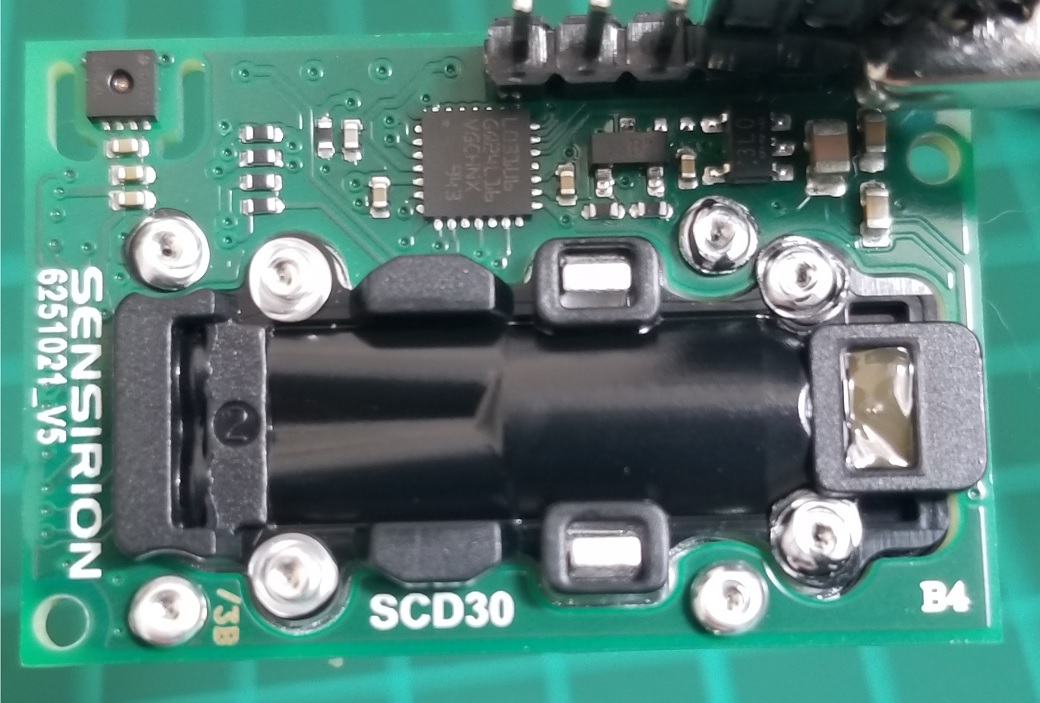
Here’s a detail of the sensor in operation, the glowing light is the infrared source necessary to analyze the air samples:


I tested the unit with my beloved NodeMCU wiring it this way:

ESP SCD30
gnd gnd
3v3 +3v
D1 SCL/tx
D2 SDA/rx
Next step is to realize some coding to read the CO2 data, and publish it as MQTT topic.
I made this little code which you can upload on any ESP/Arduino board:

// * * * * * * * * * * * * * * * * * * * * * * *
// SDC30 carbon dioxide sensor to MQTT
// by Ombra for Home Assistant Community - 2020
// * * * * * * * * * * * * * * * * * * * * * * *

#include <ESP8266WiFi.h>
#include <Wire.h>
#include <PubSubClient.h>

#define scd_debug 0
#include “paulvha_SCD30.h”
SCD30 airSensor;

// Network and MQTT broker parameters
#define wifi_ssid “YOUR SSID”
#define wifi_password “YOUR PASSWD”
#define mqtt_server “YOUR MQTT BROKER”
#define mqtt_user “YOUR MQTT USERNAME”
#define mqtt_password “YOUR MQTT PASSWD”

#define co2_topic “chemical_SCD30/CO2”
#define temp_topic “chemical_SCD30/TEMP”
#define humi_topic “chemical_SCD30/HUMI”

int co2, temp, humi;

// --------------------------------
WiFiClient espClient;
PubSubClient client(espClient);

void setup() {

Wire.begin();
Serial.begin(9600);
Serial.println(“SCD30 values:”);

airSensor.setDebug(scd_debug);
airSensor.begin(Wire);

// ------------------------------------
setup_wifi();
client.setServer(mqtt_server, 1883);
}

void setup_wifi() {
delay(10);
// Connect to WiFi network
Serial.println();
Serial.print(“Connecting to network: “);
Serial.println(wifi_ssid);
WiFi.begin(wifi_ssid, wifi_password);
while (WiFi.status() != WL_CONNECTED) {
delay(500);
Serial.print(”.”);
}
Serial.println(“”);
Serial.println(“WiFi connected”);
Serial.println("IP address: ");
Serial.println(WiFi.localIP());
}
void reconnect() {
while (!client.connected()) {
Serial.print(“Connecting to MQTT broker…”);

// no user and pass use this:
// if (client.connect("ESP8266Client")) {
//
if (client.connect("ESP8266Client", mqtt_user, mqtt_password)) {
  Serial.println("Connected!");
} else {
  Serial.print("failed, rc=");
  Serial.print(client.state());
  Serial.println(" retry 5 in seconds");
 // set a different delay if having fast connection
  delay(5000);
}

}
}

void loop() {

co2 = airSensor.getCO2();
temp = airSensor.getTemperature(), 1;
humi = airSensor.getHumidity(), 1;

if (!client.connected()) {
reconnect();
}
client.loop();
long now = millis();

delay(2000);

// Publish MQTT topic
Serial.print(“CO2(ppm):”);
Serial.println(String(co2).c_str());
client.publish(co2_topic, String(co2).c_str(), true);

  Serial.print("Temperature:");
  Serial.println(String(temp).c_str());
  client.publish(temp_topic, String(temp).c_str(), true);


  Serial.print("humidity:");
  Serial.println(String(humi).c_str());
  client.publish(humi_topic, String(humi).c_str(), true);

}

The script provides 3 topics with the values of CO2, temperature and humidity.
To integrate it in HA make this entry inside the configuration.yaml

sensor 3:
  platform: mqtt
  name: "SDC30 CO2"
  state_topic: "chemical_SCD30/CO2"
  qos: 0
  unit_of_measurement: "PPM"
sensor 4:
  platform: mqtt
  name: "SDC30 temperature"
  state_topic: "chemical_SCD30/TEMP"
  qos: 0
  unit_of_measurement: "C"
sensor 5:
  platform: mqtt
  name: "SDC30 humidity"
  state_topic: "chemical_SCD30/HUMI"
  qos: 0
  unit_of_measurement: "%"

And here is the final result:

10 Likes

2.200ppm in your bedroom :scream: that sure is a very high level which is not so healthy to sleep in…

Great tutorial by the way!

Indeed it’s a high level, I made it intentionally closing the bedroom door and sealing any ventilation (for the love of science!).
Bear in mind that any room is generally not 100% sealed, therefore consider some miniman air exchange from below doors.

“Parameters” used for this sampling:

  • Bedroom size approx. 4m x 4m x 3m
  • Occupants: two
  • Sampling period: 9 hours
  • Internal values: 28c temp - 57% humi - 1007Hpa press
    Once windows opened for recirculation the values dropped to approx 500ppm
1 Like

Case suggestion for the sensor. After several tries the most reliable way is to provide a double grid to create a sort of small airflow, yet avoiding large readings if accidentally breathing on it.


(the mesh comes from a frying strainer).

3 Likes

Hi Ombra, nice project - I’ve done a similar one (details on GitHub). Currently I’m thinking how to make a proper case - this is my first every Arduino project, so I’m fairly new to all this and thus looking what I can use as a box.

One comment on your box: According to the manufacturer’s website, it is not recommended to put the SCD30 into some kind of airflow - did you made any bad experience with your design?

The scd30 is supported in ESPhome.

I got a $4 nodemcu. Connected sensor to D1, D2, 3.3V, and Gnd pins.
Took only 10 mins to setup/configure.
Instantly appeared in the esphome addon/integration and instant HA sensor entities.
Easiest DIY ever. And nice sensor.

2 Likes

Hi formbar,
My fault, while using the word “airflow” I wanted to mention something else:
I made a comparison with the reading from 1.The bare sensor, 2.The sensor inside a plastic box and 3.The sensor in a box with a big aperture (the one in the last pic I posted).
I noticed to have the same reading between case 1 and 3, therefore empirically a small hole isn’t big enough.
As you correctly stated that sensor isn’t meant to be used to measure CO2 in airflows.

1 Like

@Ombra great, thanks for clarifying! I’ll try to squeeze my construction into some kind of plastic box (into which I’ll need to drill some holes) on the weekend - I’m really curious about the measurements and how they differ (currently, I’m trying to force myself not to order more of the sensor just to be able to make a lot of simultaneous measurements using slightly different constructions^^)

Your abstract on github is really interesting and well made (altough 60 eur for a single sensor is very overpriced!).
Have you tried the MH-Z19B? it works on the same NDIR principle for a fraction of the cost.

2 Likes

I just found it for 45 EUR for a single sensor and will update the paper (and also couldn’t resist to order 2 more units…)

Interesting! No, not yet tried, but I will definitely try to get my hands on one of those!

There are several reasons to go with the SCD30 over the MH-Z series. Depending on the use none of them may be critically important, but here they are:

SCD30:
uses 1/2 the power
has better accuracy
has a longer operational lifespan
has 5X higher detection range
has onboard humidity compensation
has I2C bus in addition to UART
has accurate and detailed English documentation

I2C bus and up to 10K ppm are the big ones, for home or industrial use these are important, for standalone office ‘too many people not enough airflow’ sensing, probably not

3 Likes

really cool! I have been looking for a way to monitor co2 inside of HA, I ordered a MH-Z before I saw this from banggood but after reading this I ordered the SCD30 from digikey.

Has anyone designed a 3d printed case to house both the sensor and a node mcu? Also, there is no reason a D1 mini couldnt be used instead of the larger node mcu, correct?

1 Like

That’s correct, any ESP or Arduino board can be used, including Wemos D1 and the smaller ESP01, allowing room for low power applications.

The case I used is a generic one, I used a bigger one to leave some space between the board and the sensor. Although the D1 doesn’t really warm up I didn’t want to alter the temperature sensor readings.

1 Like

@mikehaguy Accidentally, I had also built one of the CO2-monitors in my collection with a Wemos D1. Concerning the case, I found that standard cases for an Arduino work very well - just ensure that it has some openings to let fresh air in.

@Ombra Concerning the temperature readings: I found that I need to adjust the temperature offset for different realizations of my CO2-monitors (the offset varies from 5-7 degrees in my cases)

@alf That much deviation?
I found a discrepancy of 2c compared with a DHT22 placed close to the SCD30.
Anyway you can fix it with a template, monitor it for 24hrs and see if the trend compared to another reference thermometer is satisfactory.

@Ombra As you said, the offset is no big deal as it can be easily changed with the function setTemperatureOffset(). Interesting though that you only have 2 degrees (I measured my offset also with a DHT22 and with an additional cheap temperature device from the supermarket).

the offset is greater if there is poor airflow, proximity to other heat sources, and is also dependent on the orientation of the sensor, since the hotter parts should be at the top (diode) and the temp sensor on the bottom, and there should be no insulation there to cause heat buildup, it radiates about 60mW

I got my SCD30 setup and I am seeing an interesting thing on my graph. The Co2 levels in my basement spike from 500-600ppm to around 1200ppm randomly throughout the day. I THINK I have correlated it to my boiler running. It seems when my steam boiler runs for a while, then stops, about 5 min later the CO2 level spikes.

I was under the impression the SCD30 is temperature compensated but it sure seems it gives a high reading when the basement gets warm after the boiler runs for a while… anyone any ideas?

it may be picking up actual carbon dioxide or even possibly monoxide, do you have a CO detector in that area?

I have a nest protect in the area. AFAIK they are pretty sensitive when it comes to detecting CO. That being said, I think you are right. I have a feeling my boiler has an issue.