Comms Badge Voice Assistant

Description
A wearable voice assistant satellite in the shape of a comms badge from the sci-fi TV series Farscape.
Current Status: In Progress
I have been working on this project avidly since almost as soon as the Voice Assistant Contest was announced, but because I am largely learning as I go, I haven’t been able to crank out a prototype and had to skip breadboarding a proof-of-concept due to time constraints. The good news is that I have PCBs and components on the way that I will build as soon as they arrive, and am starting to work on the initial code in anticipation.
As such, I do not have an even somewhat finished product to present, but since the rules of the contest don’t seem to require a currently functional project as much as a workable idea in progress, I hope this will be sufficient. Regardless of the outcome, I will continue to develop this until my satisfaction, albeit at a more manageable pace.
I will hold off on providing the PCB and Gerber files until I have received mine and built a working prototype. I don’t want anyone to waste money trying to make their own if something turns out to be drastically wrong, and I intend to make a small modification that will bring down the cost of making the PCBs somewhat by fitting into the 50x50mm limit. In the mean time, I have posted the current schematic in the GitHub repository and will be working on filling out the information necessary for building one in the Wiki section.
Check it out here:
Features
- Wifi
- Capacitive Touch Sensor for Voice Assistant Activation
- Microphone and Speaker
- Battery Powered
- Rechargeable
- USB-C
- RGB Status LED
- Wake-Word-Controlled on USB Power
Design
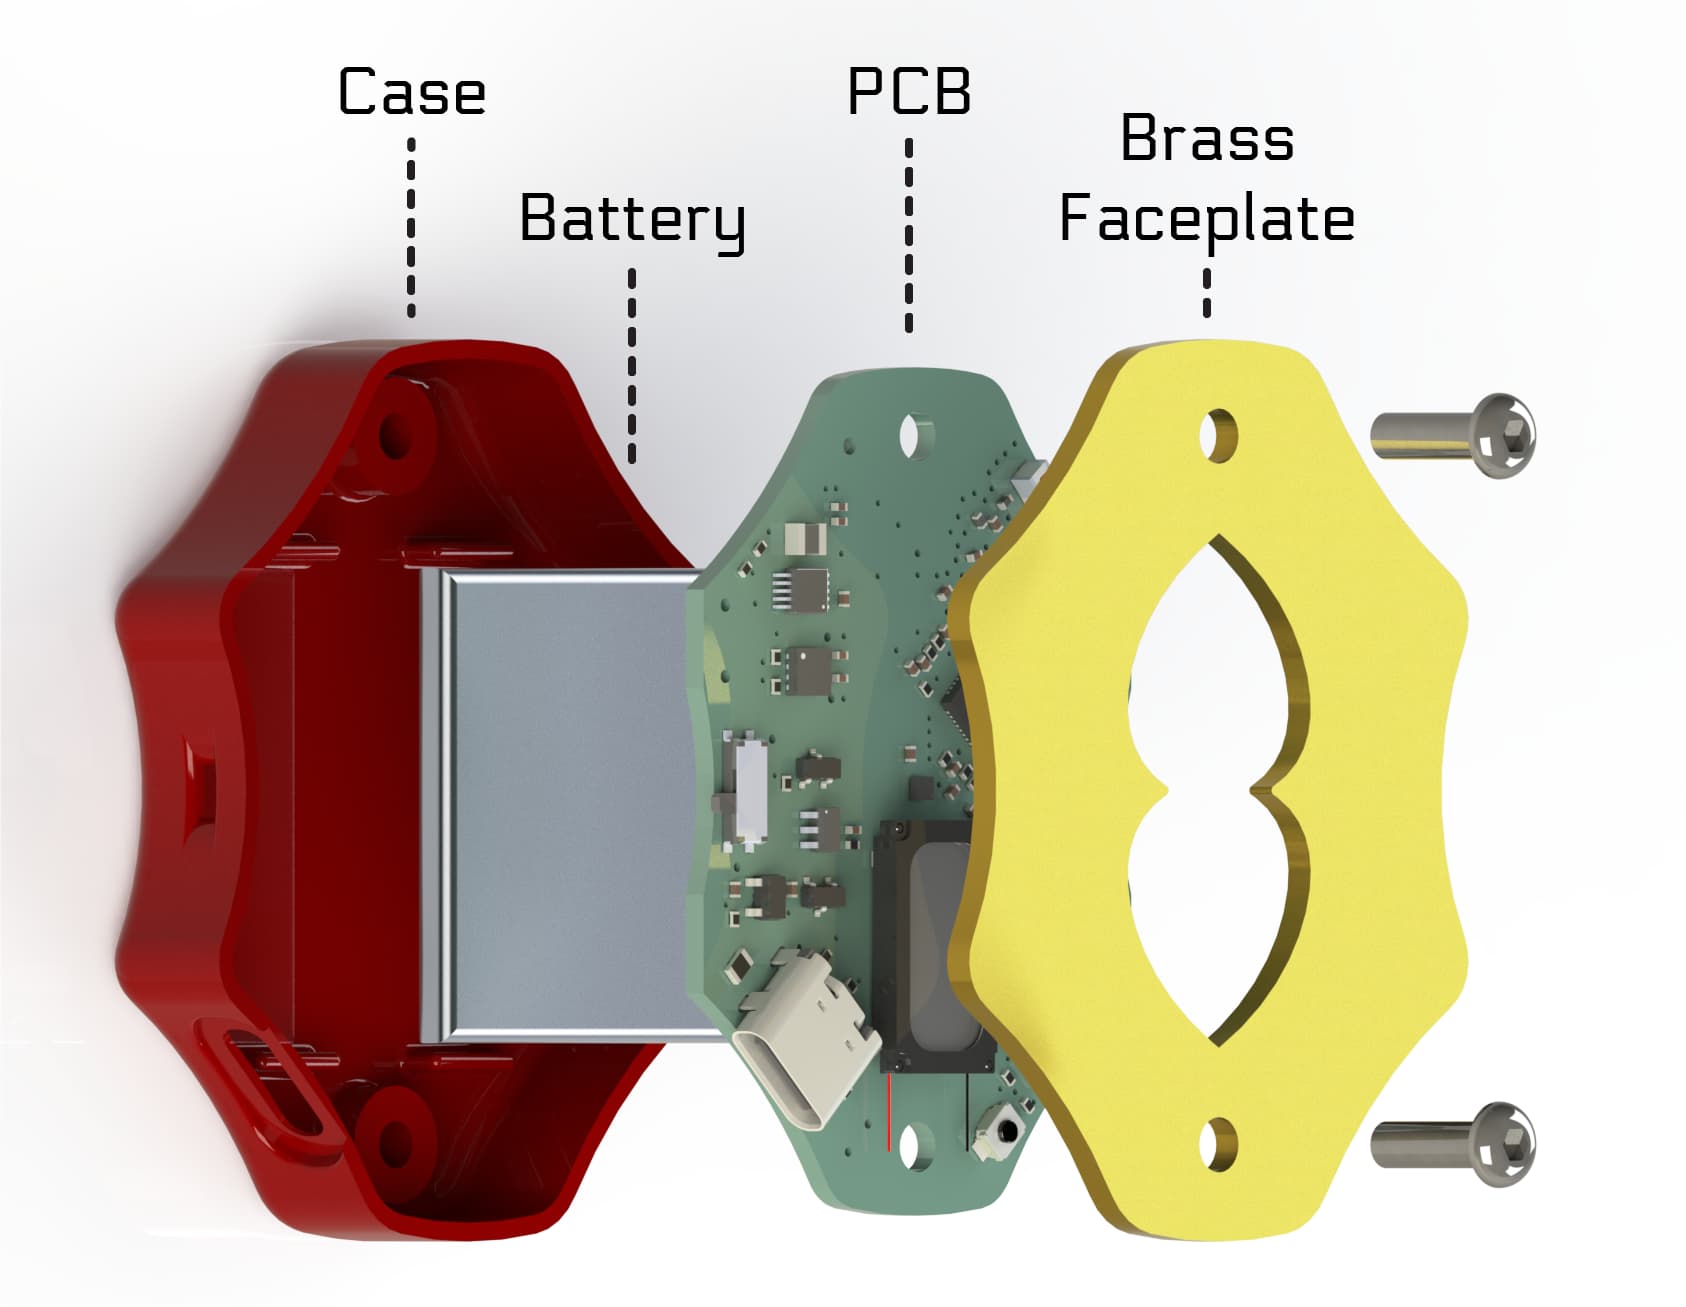
The physical design of the Comms Badge is based on those from Farscape. It features a brass plate making up the front face of the Badge with a stainless steel wire mesh in the keyhole. The brass plate will also act as part of the capacitive touch sensor used to activate the voice assistant functions. A 3D-printed case makes up the body of the device, featuring holes for the slide switch and the USB-C port as well as stand-offs to support the PCB over the battery and into which the brass plate is screwed. Speaker fabric can be adhered to the underside of the brass plate to hide the contents; Red can be used to produce a faithful recreation or other colors can be used to customize the badges for different users.

How it Will Work
On Battery Power:
- Press the touch sensor to activate: The device will generally be in a low power mode with everything deactivated except for the touch sensor. When a touch is sensed, it will wake up the device and activate the voice assistant routine.
- Wait for the chirp: Because the Comms Badge is intended to be worn, it will be most functional to hear a tone to notify the user that it is ready for a command. In keeping with the theme, I intend to use the chirp made by the comms in Farscape as this alert. At least for initial testing purposes, having the status LED lit as a visual indicator as well will be of benefit, though, for regular use, I am inclined to leave it off to conserve battery power. Every little bit counts.
- Say your command
- Wait for a response
- After a short delay, go back to sleep
On USB Power:
Please note that since there is only one little microphone, it is most likely that any use of the wake-word function will have to be within a few feet. The intention of this mode is not for it to be used as a full-fledged stationary satellite to cover a whole room but rather that it could be charging nearby, say on a side table, and it might as well have some functionality while doing so.
- Say the wake word: Since wearing a device while charging it isn’t going to be very feasible, the Comms Badge will automatically sense that it is on USB power and switch to using wake word detection to activate the voice assistant routine. The touch sensor function will be disabled as it is unnecessary. Because the device is built around an ESP32-S3 with extra flash and PSRAM, the Comms Badge should be more than capable of supporting on-device wake word detection using the newly released microWakeWord.
- Wait for the chirp: Just as on battery, having an audible signal is beneficial when you aren’t directly next to the charging Comms Badge. The status LED will also turn on as a visual cue which will change color and pattern depending on what step in the process it is currently running.
- Say your command
- Wait for a response
- After a delay, go into power-saving mode
Components
Microcontroller
ESP32-S3
The ESP32-S3 was chosen for its extensive capabilities. Not only does it have numerous GPIOs available assuring that it will be able to handle as many peripherals as needed, but it has built-in capabilities that are being made good use of, including two I2S interfaces for the speaker and microphone, several touch-sensing IOs, WIFI and Bluetooth, a USB Serial/JTAG controller, and the ability to add additional flash and PSRAM for expansion. It simply turned out to be the perfect microcontroller for the job and that was before microWakeWord was announced.
Microphone and Speaker
Microphone
SPH0645LM4H-B: Taking up the first I2S interface on the ESP32-S3, the SPH0645LM4H-B microphone is not only small but easy to integrate into the system. The only foible for this microphone is that it is a bottom-port configuration, meaning it must be placed on the underside of the PCB and, therefore, is limited in location choices so that it doesn’t interfere with the battery but can still listen through the keyhole.
Speaker Amplifier
MAX98357A: The second I2S interface is used by the speaker amplifier. Having a very small footprint of 3x3mm and programmable gain, the MAX98357A is an easy and versatile choice for running the speaker.
Speaker
16x9mm speaker: The most important factor in deciding the speaker for this device was always going to be the size. Determined during PCB layout, a space measuring 16mm x 9mm was comfortably able to be left open for use for the speaker.
Power Supply and Management
Battery
303030 Li-Po Battery: Based on the shape and dimensions of the Farscape comms as well as the limitation provided by a bottom-port microphone that needed to be positioned where it would likely be able to pick up decent audio, a 30x30mm battery could comfortably fit underneath the PCB to power the wearable. In order to try to limit the thickness of the overall device, I tried to find the thinnest battery available, which turned out to be 3mm. It’s a good place to start, but after getting a device working and somewhat refined, if I find the battery capacity to be abysmal, I will have to consider using a thicker option.
Charge Control Management
MCP73831: Most Li-Po batteries come with some sort of charge control and battery protection circuit pre-attached. Not knowing exactly what components are used but safely assuming that they will be very cheap and at best sufficient, I decided to add my own circuit for managing the charging current and active battery protection. This way, I know just what should be going on and can also use the status LED to indicate the charge state. This does mean that the pre-attached circuit will need to be removed as part of the build process.
Battery Protection
DW01: The DW01 provides additional protection for the battery mostly when it is being used. It features over-discharge protection, over-charge protection, short-circuit protection, and over-current protection. The MCP73831 provides over-charge protection already, but the additional over-charge protection on the DW01 acts as a convenient redundancy in case of a failure on the charge controller. When it comes to a device I am planning to wear around, I’d rather be safe than sorry.
Battery Disconnect Switch
This is simply a slide switch that disconnects the battery before the power supply switch. Having this will allow the Comms Badge to be turned off and on at-will to save battery power when you don’t intend to use it for a while.
Power Supply Switch
TPS2115A: The Comms Badges will be able to be powered either by battery, as when worn, or by USB power such as during charging. This switch is necessary in order to safely switch to whichever power source has the higher voltage and, in addition, provides a status as to which power supply is being used. This status will be used to automatically determine whether the voice assistant function is activated by touch or by wake-word detection.
DC-DC Converter
TPS62026: No matter which power supply is being used, it will be necessary to convert the voltage to 3.3V to power the microcontroller and most of the peripherals. The TPS62026 is capable of taking voltages from 2.5 - 6.0V and outputting a fixed voltage of 3.3V. This means that it is capable of converting not only the USB power but the full range of the battery from full to low charge.
Antenna
2450AT42E010BE
This chip antenna is unusual in that it is intended to be used with a copper layer underneath. The brass plate making up the front of the Comms Badge will obviously be an impediment to an antenna and, therefore, the WIFI signal. My hope is that this antenna will be able to be used in conjunction with the brass plate on the front side instead of a copper layer on the back side to be able to have a stable signal with a decent range that will at least allow it to be functional within the confines of my house. If it fails, alternatives include using a wire antenna poking through the case as an external antenna or replacing the brass plate with a 3D-printed part painted to look like brass then either adding an electrode underneath for use as the touch sensor or making use of the wire mesh instead.
Status LED
SK6805-ED20
A rather tiny 2x2mm in dimension, this baby cousin to the popular Neopixel, WS2812B, and SK6812 provides the benefit of an addressable LED while taking up little space where space is a premium. It may be a bit small for some people’s tastes, but the PCB could be finagled to fit a slightly larger SK6812-mini if someone really wanted. Ultimately, because of the wearable nature of the device, the LED will be difficult to see during use, so I don’t see much of a need for a larger option to complicate things.
So why not just use a smartwatch?
TL;DR
A wearable device like a smartwatch makes a lot of sense for use with a voice assistant. It’s small, rechargeable, and can travel around with you so you don’t need to pepper your house with satellites in order to have complete coverage.Unfortunately, Assist is not yet quite able to replace all the functions of more standard voice assistants and is much less useful outside of the house where I tend to wear my smartwatch. Instead, it makes much more sense to use a purpose built device that would only work locally at home, where Assist is really in its element.
The Long Story
Yes, I have a smartwatch. Yes, I have Home Assistant and, therefore, Assist installed on it. No, it is not convenient.
The feature that I have been waiting for the most since the start of the Year of the Voice is a full integration between Google Assistant and Assist that can be used from my already existing smart speakers. As it currently stands, you can basically use one or the other and miss out on a number of benefits that are mutually exclusive. Sure, I can ask Google Assistant to activate my lights and switches, but I can’t ask it for status reports or design automations triggered by specific commands. I can do those with Assist, but then I lose out on the ability to search for information on the internet, such as a measurement conversion when I’m cooking. Until the two can work better together, my only option is to use both, right? Not so fast.
In order to use both, I would have to pepper my house with satellites. Each room, or at least each room in which they would be useful, would have to have two satellites. That’s two more IP addresses each on my WIFI, too. I’ve been moving away from WIFI smart devices because my network is beginning to look a bit cluttered, and Home Assistant is perfectly capable of handling remote capabilities without a company banking off my data acting in between. Zigbee is faster and local and generally only gets better when you add more devices to your net. I can’t see adding almost a couple dozen more devices to my WIFI network just so that I have complete coverage for any voice assistant needs I have.
So, we’re back to wearables. These make a lot of sense. Something small, rechargeable, easy to activate, and it can go anywhere with me around my house, even areas where I don’t normally have need of a voice assistant. I also only need to have as many as there are people in my household that will use them (namely me but maybe a couple extra for fun for guests). Perfect!
Why, then, not a smartwatch? Well, as pretty as my smartwatch is, it’s not really all that comfortable to wear constantly at home. The metal band sticks to my skin a lot and sometimes it gets pushed too far up my arm and really digs in. Most importantly, it interferes with my laptop when I’m typing, and I don’t want to scratch up either of them. They were just too expensive and time consuming to obtain in the first place. Besides, Assist hasn’t been working very well on my smartwatch so far. I’ve had a few foibles pop up since I upgraded to WearOS 3; one of which is that certain programs—like Assist—seem to get bogged down an awful lot. I also can’t set Assist to be my default voice assistant over Google Assistant because it’s not as useful out and about, which is when I usually wear my watch. Instead, I have to scroll to a tile and press a button on the screen to (attempt to) activate it. It all adds up to a rather terrible user experience.
Ultimately, a purpose built device wins out for utility.
Which brings us to this project. I like geeky things. I love the droid smart speaker and the HAL-9000; they’re both fantastic. But I needed something small and wearable, something not too niche that no one would have an interest in, something attractive enough that I would want to wear it. First thought? Star Trek. Of course, a Star Fleet badge came to mind; it was the obvious choice. Maybe a bit too obvious? I eventually decided that it wasn’t going to be optimum. The shape isn’t all that friendly to start with, there are multiple styles that would have to be chosen from, the size could be a problem, and it had sort-of been done before in the form of a Bluetooth communicator for use with a cellphone.
Back to the drawing board. I figured my best bet was to stick to the sci-fi/space genre where technological advances like comms badges are very common. I then turned to Farscape, a particular favorite of mine that I knew had badges. Upon examination, they’re of a decent size and a simple shape that is totally workable. They are also attractive with a lovely brass plate and wire mesh in the keyhole. The color of what I decided should be speaker fabric could be customized to demarcate badges for different people. Plus, over the years, I have found that more people know of and enjoy Farscape than I was under the impression of as a kid watching the show on Sunday afternoons. Eureka! I had found my inspiration.
And so began the saga of developing the hardware for my local, wearable voice assistant satellite. It shall be the answer to my problem and spark an epic journey into the world of Assist.
Goals for the Future
- Make it work!
- I know this should be obvious, but once I receive my PCBs and components, I still have to make sure that the design will actually work. This will involve testing and fiddling and, likely, revisions. This part has to be done first before I can move on to other goals.
- Make it smaller!
- I feel like this is always the goal anymore, and while the XY dimensions won’t change in order to best fit the original intention to mimic the Farscape comms badges, I did think of a couple of ways that I could possibly shrink the device thickness, which comes out to a somewhat clunky ~1/2", not including the pin.
- Make other designs
- The first choice in series to base my idea of a wearable voice assistant is, of course, Star Trek. I didn’t choose to pursue it as part of my final first design in part because it was too obvious, but primarily, it was that there are several different styles of Star Trek badges, none of which are especially friendly shapes to start from. My goal was to make a working design that could then be adapted into other shapes, and I fully intend to work on a Star Trek variant or two down the line.
- Bluetooth, maybe?
- I have seen the warning in the ESPHome documentation. I added 16Mb of flash and PSRAM each to my initial design in the hopes of leaving room for future expansion of capabilities. I have no real frame of reference, but I assume it’s a bit overpowered for regular use. I reasoned that that extra overhead might make it possible to use the Comms Badge Voice Assistant with Bluetooth instead of WIFI, which I would personally prefer in most cases. It may or may not be possible, but I’d like to try eventually.
Audio and voice components consume a significant amount of resources (RAM, CPU) on the device.
**Crashes are likely to occur** if you include too many additional components in your device’s configuration. In particular, Bluetooth/BLE components are known to cause issues when used in combination with Voice Assistant and/or other audio components.
- Customization options
- This may include custom voices or responses (who wouldn’t want a response from Pilot on Moya), custom LED routines, custom initialization tones, basically whatever in the realm of possibilities people can think of that they might want to choose for themselves. Once we have a functional device, we can get into adding options for how it works.