Hello,
I am interested in dabbling in computer vision (CV) with Hassio and have finally found a good use case for a project for myself.
Rather that use other sensors (I have a xiamoi tilt sensor working well on my bedroom blind, not shown in pic below), I am interested in using CV to determine if my 3 blinds are open or closed.
I see some of the other CV threads, but I thought I would start a new thread for this, poke some of the experts for a steer on state of the art for a CV rooky, then document the project here if it gets legs.
I was especially wondering if @robmarkcole and maybe @keesschollaart81 might make a few suggestions/pointers on approach and components etc. Or it would be tops if you just point me to the most relavant threads/posts if I’ve missed stuff.
Q’s on my mind:
- Which platform/component for a rooky?
- Will the CV handle day/night/cloudy/lights on/lights off?
Thanks all…
My suggestion is that you could place an IR reflective marker on the blind and track that using classical CV approach
Thanks! I was also thinking something along those lines at one point actually. I was thinking like dots or shapes etc, but reflective marker could be more robust!
Any particular components/add-ons etc that you’d recommend for rooky & use case?
I’m looking at upgrading to a Pi 4 shortly, so might have enough resources for local processing (I don’t think I’d really need a very frequent update interval). I dunno what’s really required at this point though.
You can probably use that reflective material cyclists wear. This is a research project so you might have to try a few approaches out. You can probably use the OpenCV integration
Cool. Actually I’m a cyclist and have tape & material! ha ha. Happy to experiment.
Project may not move for a little bit because I don’t actually have camera’s that integrate with hassio and will probably look at some cheap ESPHome/ESP32 ones for the project which will probably ship from China.
You might want an IR camera like this one
Thanks Robin. I was definitly looking for one with IR and tossing up whether I wanted an on board or seperate PIR. I’m currently wading through some of the cam threads, and a bit overwhelmed by which cheap camera’s are the best fit for the job, and trying to understand pros and cons of ESPHome Cam, Pi Cams, ONVIF and rtsp.
I have already have 2 x dedicated Xiaomi camera’s that I got some time ago that don’t integrate with HA that are still good for general “notifications of movement” and “viewing on demand”.
I’m thinking the cam for this project would probably be pretty dedicated for the task, and would probably just take and process snapshots:
- a short period after my 433mz RF blinds are triggered to open and close (offset the snapshot by the time it takes blinds to change position) and
- at some infrequent period for extra double checking (maybe half hourly) and
- maybe also when motion is detected (via other PIR sensors in my place)
Would you recommend a Dericam for this?
Are there some CV benefits to using a Pi cam like linked?
Any thoughts on the cam below?
Other comments/thoughts?
Thank you!
Well I use a Dericam, it works OK, although a second one died. I think whichever you choose it should be OK. There are many threads already on camera selection
Progress #1: Blinds automated
- Blinds now automated via broadlink rm pro plus and one of these. The seller also sells “couplers” that allow you to turn two adjacent blinds with one motor. This worked for my use case and halfs your blind motor cost. At the moment it’s spinning blinds 1 & 2 together. I’m very happy with the motor so far. It’s a lot quieter than the battery powered one in my bedroom (went with battery for that one as there is no power outlet near the blinds)
After chatting to my sparky brother, I used one of these and a cut extention lead to connect to power.
Update #2: Got this cheap camera integrated pretty easily. Bit laggy, but should ok for the project though I reckon.
@robmarkcole , did you ever find a solution/workaround for this?
I’m making progress with my trained cascade classifier (will post more shortly), but am hitting this issue.
Thank you.
I can take a look into it
1 Like
Ta! I’m not too sure if it’s that important for me yet. But if the OpenCV component uses defaults if this isn’t populated, then it might be affecting my results. I need to detect some relatively small images. Cheers.
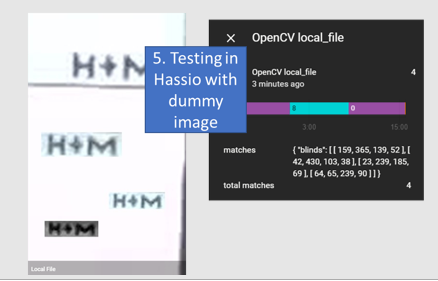
I’m making some progress! Here’s my steps so far.
-
Make something easy for the computer to see:
- After trialling a few different approaches, I’m currently using some black tape on the white blinds as my object to detect. I think its too hard just to ask OpenCV to figure out if the blinds are open or closed, especially because my blinds still let a little light through, and day/night is so different.
- Because the camera has IR, the tape shows up pretty good night and day. The light that comes though the blinds during the day actually helps with getting good contrast too.
- But I might revise this all later now that I’ve got the hang of things.
-
Use the Camera proxy to automate positve/negative image generation:
- Create a bunch of positive images §
- Create a bunch of negative images (n)
- Create a more focussed/targeted camera area to monitor.
- Now you’re basically ready for training.
-
Train an OpenCV cascade:
- I fell at the first hurdle trying to take a more DIY approach (Python + OpenCV), so I ended up just using this useful and easy software (https://amin-ahmadi.com/cascade-trainer-gui/)
- You can train and test your cascade file (.xml) pretty easily.
-
Deploy cascade classifier to Home Assistant:
- The configuration documentation is a bit patchy. The below worked for me.
- At the moment the image processing fetches the image from a snapshot from a proxy camera which is written locally and then pulled back in as a local file camera. I’ll probably revise that later.
Tips so far:
- Make it “easy for the computer to see” if you are just starting out. Crop the image area to one that contains some ‘key indicators’. Consider adding some simple visual indicators if you are struggling to detect something.
- Do play with the sample width & height parameters in OpenCV when training. They made a big difference. Do also play with the scale and neighbours parameters. They also made a big difference. The Cascade Trainer GUI made it easy to iterate and see what is going on.
- Automate collecting positive § and negative (n) samples to be used in training by dumping cropped images to directories. I think it’s good to do across different day/night light levels etc.
In config for cropping
- platform: proxy
  entity_id: camera.digoom1z_nr_1
  name: Blind Watch Area
  mode: crop
  image_top: 300
  # image_top: 270
  max_image_height: 130
  image_left: 300
  max_image_width: 80
  image_quality: 100
  image_refresh_rate: 30.0
the OpenCV part.
  - platform: opencv
    # name: LivingRoom
    source:
      # - entity_id: camera.blind_watch_area
      - entity_id: camera.local_file
    scan_interval: 120
    classifier:
      blinds:
        file: /config/mb_haarcascade_blinds_20191201_1102.xml
        neighbors: 10
        # min_size: (15, 15)
        # max_size: (100, 100)
        scale: 1.01
Inside the classifier:
<?xml version="1.0"?>
<opencv_storage>
<cascade>
  <stageType>BOOST</stageType>
  <featureType>HAAR</featureType>
  <height>9</height>
  <width>24</width>
  <stageParams>
    <boostType>GAB</boostType>
    <minHitRate>9.9500000476837158e-01</minHitRate>
    <maxFalseAlarm>5.0000000000000000e-01</maxFalseAlarm>
    <weightTrimRate>9.4999998807907104e-01</weightTrimRate>
    <maxDepth>1</maxDepth>
    <maxWeakCount>100</maxWeakCount></stageParams>
  <featureParams>
    <maxCatCount>0</maxCatCount>
    <featSize>1</featSize>
    <mode>BASIC</mode></featureParams>
  <stageNum>2</stageNum>
  <stages>
    <!-- stage 0 -->
    <_>
      <maxWeakCount>1</maxWeakCount>
      <stageThreshold>9.9926578998565674e-01</stageThreshold>
      <weakClassifiers>
        <_>
          <internalNodes>
            0 -1 0 4.1405640542507172e-02</internalNodes>
          <leafValues>
            -9.9900001287460327e-01 9.9926578998565674e-01</leafValues></_></weakClassifiers></_>
    <!-- stage 1 -->
    <_>
      <maxWeakCount>1</maxWeakCount>
      <stageThreshold>1.</stageThreshold>
      <weakClassifiers>
        <_>
          <internalNodes>
            0 -1 1 -7.9159937798976898e-02</internalNodes>
          <leafValues>
            1. -1.</leafValues></_></weakClassifiers></_></stages>
  <features>
    <_>
      <rects>
        <_>
          6 1 2 8 -1.</_>
        <_>
          7 1 1 8 2.</_></rects>
      <tilted>0</tilted></_>
    <_>
      <rects>
        <_>
          16 2 3 6 -1.</_>
        <_>
          16 4 3 2 3.</_></rects>
      <tilted>0</tilted></_></features></cascade>
</opencv_storage>
3 Likes
This is excellent progress! Would be great to see a write up on Hackster if you have time - its a great medium for these kinds of articles and would surely help out others interested in this technique
1 Like
Thank you! Ok, I’ve never used hackster and feel like I’m still a total novice to it all, but I’ll have a go once it’s sorted.
1 Like


