Original post:https://smarthomepursuits.com/control-roku-tv-from-home-assistant/

In this guide, I’m going to show you how to control your Roku TV directly from Home Assistant. This setup will allow you to adjust your Roku TV volume, change sources, navigate up, down, left right, or even create smart TV “shortcuts” to apps you use all the time, such as Plex or Netflix.
To do this, we are making use of several integrations, including a Roku Lovelace card that will act as your remote. I am also making use of Conditional cards, or Lovelace cards that only show up once something happens. (i.e when you turn a TV on, the remote for your Roku TV will appear) This is great because you don’t need a remote to show up on your dashboard all the time – only once your TV has already powered on.
I know what you’re thinking – “I can already control my Roku TV from the Home Assistant integration!” And to that I say yes and no. When you add the default integration, you can add a TV as a media-player item to turn on, off, play, or pause. However, if you want to adjust the volume, switch to a different media app, or navigate up, down, left – then you have to go through multiple clicks to get there.
Here’s how the basic Roku integration works (no conditional cards, no navigation control, requires multiple clicks)
And here’s how things will work after following this guide:
Prerequisites:
This guide assumes:
- You have Home Assistant already installed
- HACS (the Home Assistant Community Store) installed
- Roku Integration installed
Once you have those installed, you can continue following along. Setup time is around 15 minutes for this.
Step 1: Find your Roku TV Entity Names
Once the Roku TV integration is installed, it will create 2 entities per TV. You can find these under Configuration > Entities > search for “Roku”. The media_player entity shows what is playing, and the remote is a separate entity you can use to control it.
Make note of these, you will need them several times.

Step 2: Install the Roku-Card Frontend integration via HACS
Open HACS > Frontend > search for “Roku Card”. Install the integration and refresh the page. No additional setup is needed on the HACS screen.

Step 3: Create Button Cards to Turn TV on and Off
First, you need to create a button to turn on each TV. I am using a nested grid solution. Basically, a grid card inside a grid card.
Add a new card > Grid. Set columns to 1 and untoggle “render cards as squares”. Then, click the + button and choose Grid again, this time setting the column to 2 (or however many TV’s you have). I am using the Button-Card HACS integration because I like the entire button to change color, rather than just the icon, but adding two regular buttons would work fine as well.
If you decide to use the Button-Card as well, the yaml for it is:
type: custom:button-card
entity: remote.65_tcl_roku_tv
size: 50px
color: auto
color_type: card
tap_action:
  action: toggle
name: Living Room TV
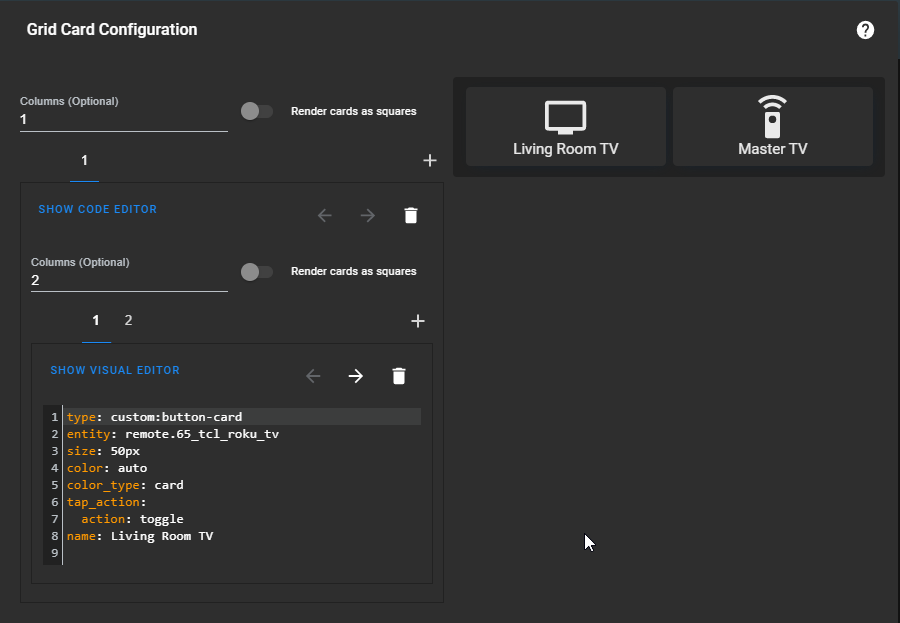
Each TV button will get added from this + button, as you can see my Living Room TV is gridspace 1 and my Master Bedroom TV is in 2. You will use the remote.roku_tv entity that you found from Step 1.

Step 4: Create Conditional Access card to display Roku Remote
Now that you have confirmed you can turn your TV on and off, you need to create two Lovelace cards – 1 Media Player card to show what is playing, and another that shows the Roku remote only when the TV is turned on.
Card 1: Roku Media Control Player
Click the + button (on the parent ‘grid’) to create a new card. Add a new card. Search for “conditional”.
Under Conditions, choose your media player entity and set the state to home.
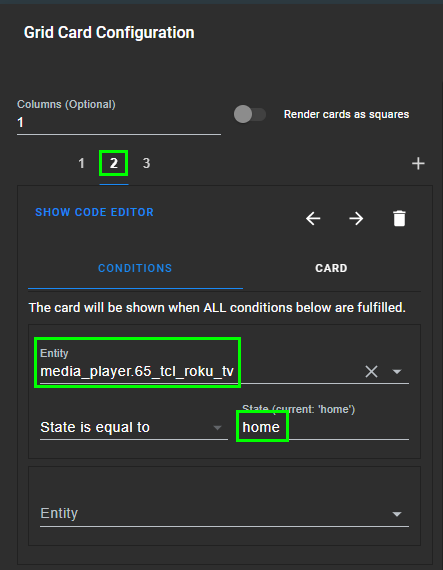
Under Card, search for Media Control. You will see what is playing on your TV only when your TV is on. Turn your TV on and off to confirm.

Card 2: Roku Remote Card
Click the + button again (on the parent ‘grid’) to create a new card. Search for “conditional”.
You will now see two tabs: Conditions and Card.
Under Conditions, search for the media_player entity. Set the state to home.
You can also change from “home” to “idle” or “standby” if you’d like.

Under Card, search for Manual and paste the yaml below.
- Blue: change to your remote entity name
- Orange: Change to your media player entity name
- Green: Change path to icons folder (Step 4.1 below)
name: Living Room Remote
type: custom:roku-card
entity: remote.65_tcl_roku_tv
tv: true
apps:
  - image: /local/icons/plex.png
    app: Plex
    tap_action:
      action: call-service
      service: media_player.select_source
      service_data:
        source: Plex - Free Movies & TV
        entity_id: media_player.65_tcl_roku_tv
  - image: /local/icons/netflix2.png
    app: Netflix
    tap_action:
      action: call-service
      service: media_player.select_source
      service_data:
        source: Netflix
        entity_id: media_player.65_tcl_roku_tv
volume_up:
  tap_action:
    action: call-service
    service: remote.send_command
    service_data:
      entity_id: remote.65_tcl_roku_tv
      command: volume_up
volume_down:
  double_tap_action:
    action: call-service
    service: remote.send_command
    service_data:
      entity_id: remote.65_tcl_roku_tv
      command: volume_down
There are a lot of additional items and options you can configure from the Roku Card github page.
Step 4.1: Upload Icons for Media Apps
If you created shortcuts or hotkeys to specific apps like Plex, Disney+, Netflix, Hulu, etc, you will probably want to see the icon for those right?
To do this, open File Editor. Click the folder at the top.

Scroll down to the www folder. Click inside it. If you don’t already have a folder for custom icons, click the New Folder button at the top and create a folder called icons.

Click into the folder and upload your images. There a ton of images you could use from here. Once uploaded, you can change the path in your roku remote card to this: /local/icons/hulu.png or whatever your image is named.
Optional: Step 5 – Multiple Conditions
Do you want a specific card to show if it is Idle, Standby, Home, and Playing?
I wish I had a better answer for you, but the only way I could get this working was by creating a new conditional card for each state. So I have 1 state for “home”, another one for “playing”, and another one for “paused”.
You could experiment with the state_not = to “off” or “standby”, if you’d like. You may run into the same issue though, where you need to create multiple conditional cards for standby and another for off.

I posted in the HA Community Forums and confirmed that you can’t use an OR state in a conditional card unfortunately. So, you can’t have 1 card that will display if it is Playing, Paused, or Idle. However, feel free to click this link to my post to view a couple workarounds, one of which is to create a binary template sensor and add the states to that, and then use that in your card instead of your media_player entity.