To the international users who don't know: We germans have some common blinds called "Rolladen". See e.g. here: https://youtu.be/PCudaPpwoAM?t=76
Prologue
The Superrollo series is pretty affordable (~95€ for Motor and Remote) electric replacement for the which. By opening the remote and soldering 5 wires to some ESP8266 we can use it within home assistant ![]()
First of all, video proof:
")
Components
Howto
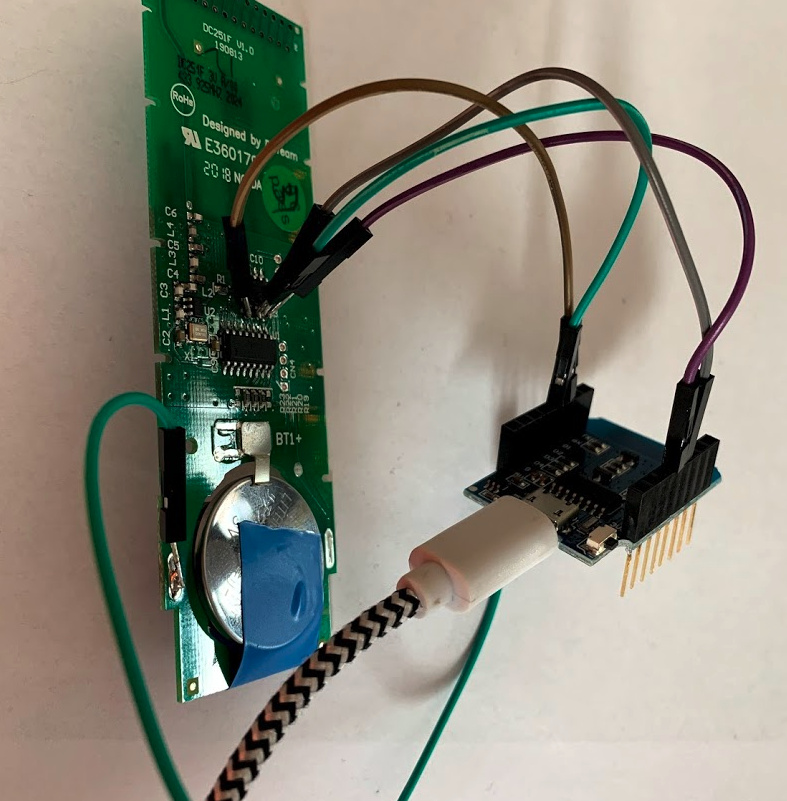
To archive this we gonna strip down the Remote and attach some ESP8266. We will use Tasmota to send the right commands to the HCS361 chip via MQTT.
Step 1: Soldering
You need to attach 4 cables to the HCS361. Pictures can be found too in the posting of the FHEM board too: Superrollo GW60 mit Funkmodul ZB40 in FHEM einbinden
Please go easy with comments on my soldering skills. I know they are bad, and this was just some rapid prototyping ![]()

As i had no thin enough cable i simply soldered breadboard cables onto the chip. I would clearly not recommend that, but as I already ordered more shutter motors (each one comes with one remote) I was reaching for success, not beauty.
Soldering is pretty easy, just attach 4 cables to the S0 - S3 pin of the HCS362 Encoder. More info in the datasheet: http://ww1.microchip.com/downloads/en/DeviceDoc/40146F.pdf
Then attach some additional GND cable between ESP8266 and the remote. I used some battery holder points.
In total it looked like this:
Step 2: Programming the ESP8266 with Tasmota
Getting tasmota on the ESP8266 can be easily archived via Tasmotizer (GitHub - tasmota/tasmotizer: ESP... The time has come to... Tasmotize! · GitHub).
After you can access the Web interface you need to configure the outputs.
I choose to follow the posting and reverse enumerate my pins.
(Looking at the pictures again there might be some wrong wiring when i took them).
But basically I did:
S0 - D1
S1 - D2
S3 - D5
S4 - D6
This is my device config:

This looks like some light bulb when looking at the web interface. This doesn't matter at all.
Step 3: Home Assistant config
We now can reach the ESP8266 and its connected Superrollo Remote via MQTT.
This is the command table, thx again to the FHEM community. I enhanced it with the related tasmota terminal command for easier testing:
Bit       3 2 1 0

all up    0 0 0 1  Backlog Color 000000FF; Color 00000000;
all down  0 0 1 0  Backlog Color 0000FF00; Color 00000000;
all stop  0 0 1 1  Backlog Color 0000FFFF; Color 00000000;

1 up   	  0 1 0 1  Backlog Color 00FF00FF; Color 00000000;
1 down 	  0 1 1 0  Backlog Color 00FFFF00; Color 00000000;
1 stop    0 1 1 1  Backlog Color 00FFFFFF; Color 00000000;

2 up   	  1 0 0 1  Backlog Color FF0000FF; Color 00000000;
2 down 	  1 0 1 0  Backlog Color FF00FF00; Color 00000000;
2 stop 	  1 0 1 1  Backlog Color FF00FFFF; Color 00000000;

3 up   	  1 1 0 1  Backlog Color FFFF00FF; Color 00000000;
3 down 	  1 1 1 0  Backlog Color FFFFFF00; Color 00000000;
3 stop 	  1 1 1 1  Backlog Color FFFFFFFF; Color 00000000;
As Tasmota can be controlled via MQTT, we set the correct server and also enabled the home assistant auto-discovery option by setting SetOption19 1 in the console.
To have the best expirence we use the MQTT Cover (MQTT Cover - Home Assistant) as configuration. Mine looks like this:
cover:
  - &superrollo_template
    platform: mqtt
    name: Superrollo 1-3
    unique_id: a324823e-786a-407d-a7a8-60729cf89650
    payload_open: Color 000000FF; Color 00000000;
    payload_close: Color 0000FF00; Color 00000000;
    payload_stop: Color 0000FFFF; Color 00000000;
    command_topic: cmnd/tasmota_55D0FD/Backlog
    availability_topic: tele/tasmota_55D0FD/LWT
    payload_available: Online
    payload_not_available: Offline

  - name: Superrollo 1
    unique_id: 8645186d-c217-4d01-8772-886e272ff525
    payload_open: Color 00FF00FF; Color 00000000;
    payload_close: Color 00FFFF00; Color 00000000;
    payload_stop: Color 00FFFFFF; Color 00000000;
    <<: *superrollo_template

  - name: Superrollo 2
    unique_id: 260319c8-619f-4710-b971-f93510039f12
    payload_open: Color FF0000FF; Color 00000000;
    payload_close: Color FF00FF00; Color 00000000;
    payload_stop: Color FF00FFFF; Color 00000000;
    <<: *superrollo_template

  - name: Superrollo 3
    unique_id: 70562e1a-bae6-43db-8971-ae0e65727377
    payload_open: Color FFFF00FF; Color 00000000;
    payload_close: Color FFFFFF00; Color 00000000;
    payload_stop: Color FFFFFFFF; Color 00000000;
    <<: *superrollo_template
Note: You might want to use other ids and set the right command topic for your ESP. The & and <<: stuff is called YAML Anchors end helps to reduce redundant config stuff.
Step 4: Profit

Epilog
I hope this will help others to set this up. As I did this a few days ago I hope everything is correct.
I do not take any guarantee ![]()
Credits
- Big thanks to all the contributors on Superrollo GW60 mit Funkmodul ZB40 in FHEM einbinden for the idea and how the HCS361 works
- Thanks to the Tasmota discord, they were extremely helpful by pushing me towards the PWM stuff
