When researching, I couldn’t find any integration or blueprint that can control Shelly devices in a remote network, for example in a holiday apartment. This blueprint makes that possible.
Thanks for this, saved me a lot of trouble as i just installed 5 shellys remotely.
Just tried on a Shelly Pro EM-50 and it works wonderfully.
Here is my code to get the EM-50 stats if interested:
It pulls wifi signal, relay status and Power/Energy from each of the two sensors.
I didnt bother to get the rest for now.
rest:
  - resource: https://shelly-xx-eu.shelly.cloud/device/status
    method: POST
    payload: auth_key=xxx&id=xxx
    scan_interval: 5
    headers:
      User-Agent: Home Assistant
      Content-Type: application/x-www-form-urlencoded
    sensor:
      - name: RVN Big Shelly RSSI
        value_template: "{{ value_json.data.device_status.wifi.rssi }}"
        unit_of_measurement: "dBm"
        device_class: signal_strength
      - name: RVN Big House Power
        value_template: '{{ value_json.data.device_status["em1:0"].act_power }}'
        unit_of_measurement: "W"
        device_class: power
      - name: RVN Big House Energy
        value_template: '{{ value_json.data.device_status["em1data:0"].total_act_energy }}'
        unit_of_measurement: "kWh"
        device_class: energy
        state_class: total_increasing
      - name: RVN Big WaterHeater Power
        value_template: '{{ value_json.data.device_status["em1:1"].act_power }}'
        unit_of_measurement: "W"
        device_class: power
      - name: RVN Big WaterHeater Energy
        value_template: '{{ value_json.data.device_status["em1data:1"].total_act_energy }}'
        unit_of_measurement: "kWh"
        device_class: energy
        state_class: total_increasing
    binary_sensor:
      - name: RVN Big Waterheater Status
        value_template: '{{ value_json.data.device_status["switch:0"].output }}'
The last part of the code reports the status of the actual switch, so you dont have to guess.
I created a dummy switch that controls your automation.
And finally a template switch that swithces the dummy switch on and off (to control the relay) gets its value from {{states.binary_sensor.rvn_big_waterheater_status.state}} so it reflects the true state of the relay.
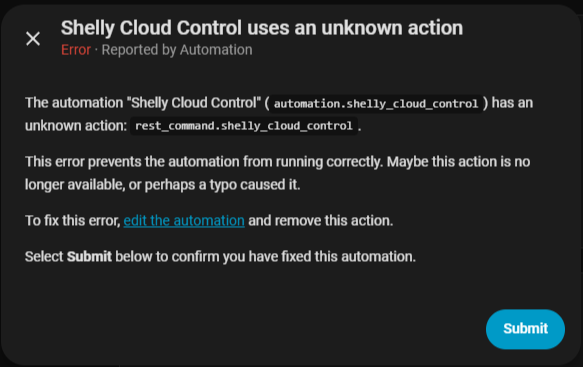
It would be great if someone with enough knowledge could pack all these into an integration that would work with just the url/api key / device id
Thanks so much for your kind words—really glad the post helped and that your Shelly Pro EM-50 setup is working smoothly!
Just a heads-up: Shelly also provides a WebSocket API that allows you to receive real-time events (like instant status updates without polling). However, Home Assistant currently only supports this via a custom integration, so the process is a bit more complex and not as plug-and-play as one might hope.
If anyone wants to build on the blueprint I shared, feel free to use it, modify it, and even publish your version in the forum. The more people benefit from it, the better
And if you’re ever interested in packaging this into a proper integration—where you just enter the URL, API key, and device ID—I’d be happy to help brainstorm or collaborate!
That would be super cool if someone took the time to turn this into a proper integration
Honestly, it was one of the (not few) times where i searched something and found exactly what i was looking.
So thanks again
I have no serious coding skills, but i believe a remote-shelly integration would be rather usefull, as their popularity increases constantly.
For now i worked on my own code for the devices I have (two PM-50, a gen1 and two smoke detectors) that unfortunately is too specific to help someboday else.
Let’s hope someone with the correct knowledge has the same need aswell
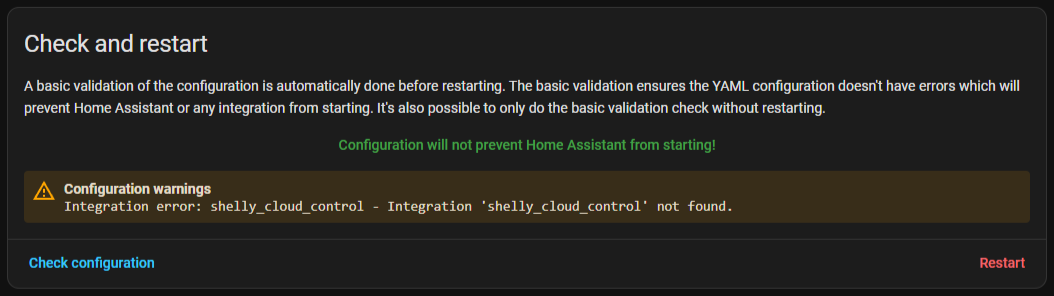
When I re-open the blueprint, all the fields are empty again. I tried re-filling them and saving again, but upon re-opening it, they again are empty. Then realized this somehow adds a new block of configurations to the automations.yaml each time. So i deleted all but one block.
What am I doing wrong? I have never before used a blueprint and have no clue about programming.
Do I understand correctly, that toggle helper would then be the switch that remotely controls the shelly? …and also feeds back its state if locally switched?
How (if at all) would i be able to read out the power measurement (it is a 1PM Gen4)?
 Prerequisites
 Setup Steps
 Notes
Notes