First off, this is a well documented api and Im sure someone with programming experience could easily pull this info into a nice component for Home Assistant. I have basically 0 programming skills so this method works for me.
Second, thanks to @ludeeus for help in getting the value template nailed down.
Last thing before we get started, if you are a CTA ‘L’ rider, there is a train API also, Im sure this can be adapted to track train arrival times rather easily.
The API and requesting an API key
The API is documented at https://www.transitchicago.com/developers/bustracker/. Follow the instructions on that page to request an API key which should come via e-mail pretty quickly.
There is a limit of 10,000 api calls a day so be cautious of how often you update, especially when creating multiple sensors. The example below is setup to call every 60 seconds. (60 seconds is 60 times an hour and 1440 times a day for example)
Assemble your route and stop ID
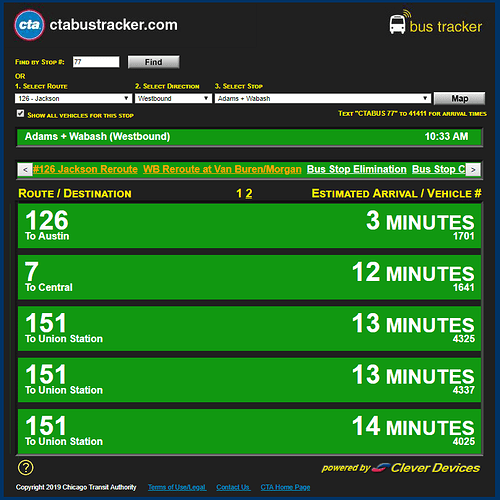
I am assuming you know the route you want to track if you are interested in using this. To find your stop ID, go to http://www.ctabustracker.com/bustime/eta/eta.jsp.
If you fill in the route, direction and stop, the stop ID will populate in the upper right hand corner. (Stop 77 in the example below.
Setting Up the Rest Sensor in Home Assistant
The Home Assistant Rest sensor documentation is located at: https://www.home-assistant.io/components/sensor.rest/
Put the following under the sensor: section of your configuration. In the resource URL example below:
key is the API key you received via email.
rt is the route you are looking to monitor.
stpid is the stop ID you pulled above.
You can paste this URL into a browser and view what is returned. Some buses will have multiple listings, others may have none or only 1. If nothing is returned, the sensor will show unknown. An example api response is here: https://pastebin.com/EVMMEBW1
  - platform: rest
    resource: http://ctabustracker.com/bustime/api/v2/getpredictions?key=supersecretapikey&rt=151&stpid=77&format=json
    name: 151First
    scan_interval: 60
    value_template: "{{ value_json['bustime-response']['prd'][0]['prdctdn'] }}"

  - platform: rest
    resource: http://ctabustracker.com/bustime/api/v2/getpredictions?key=supersecretapikey&rt=151&stpid=77&format=json
    name: 151Second
    scan_interval: 60
    value_template: "{{ value_json['bustime-response']['prd'][1]['prdctdn'] }}"
As always with new sensor, save the file, check your config and restart home assistant.
Displaying the sensors
Using the example sensors above, you should have two new sensors. sensor.151first and sensor.151second which are the first and second bus to arrive at the stop specified.
Adding them into lovelace can be done as follows:
      - type: entities
        title: Adam's & Wabash Bus Times
        show_header_toggle: false
        entities:
          - entity: sensor.151first
            name: First 151 Bus
            icon: mdi:bus-clock
          - entity: sensor.151second
            name: Second 151 Bus
            icon: mdi:bus-clock
Which returns a card which looks like this:

Go Automate it!
I don’t normally ride the bus as I prefer the walk. However, if you regularly ride the bus an automation could easily be setup to send you future bus times at the time you normally leave work. I would be interested in seeing automation anyone comes up with so post them up.
If I add automations for this ill add them to my Github repo which is here:
This forum often locks the first post after a few responses so I may not be able to add them here.

