Custom Atmega 1284 Board With 8 Opto-Isolated Inputs, 8 A/D I/O, SPI, I2C, 2xUART, W5100 Ethernet and PoE, OTA, MQTT

In my home automation project almost everything comes down to taking inputs and switching relays, so my first I/O board based on an Arduino Nano and W5100 Ethernet module is deployed all over my house taking inputs from switches, buttons, contacts and providing outputs to control relays, etc. using MQTT. They have been very reliable (I can’t ever recall a crash) however the Nano started to become limiting. With only 2K of RAM (half of which used for libraries) and 16 usable I/O (without multiplexing, etc.) I have run out of space as I started to want to hang sensors off of it. Additionally without program space, OTA was out of the question.

I wanted an SMD project, so I designed these new boards based on the Atmega 1284 and Wiznet W5100 Ethernet controller.

The specs are:

  • Atmega 1284 w/128KB flash, 16KB RAM, 4K EEPROM, 16MHz
  • Wiznet W5100 10/100 Ethernet
  • 8 Opto-Isolated active high digital inputs on PD4-PD7, PC6/7, PB 0/1 (big terminal block)
  • PA0-7 broken out for analog input and digital/analog output (small terminal block)
  • SPI, I2C, 2xUART broken out to headers
  • 6 remaining “spare” digital I/O broken out to header
  • 2 x WS2812B LEDs for status and general fun
  • Silvertel AG9700 PoE module
  • 3 pin terminal for power supply or power source: 5V, 3V, ground
  • Lots of filter capacitors, like an excessive amount

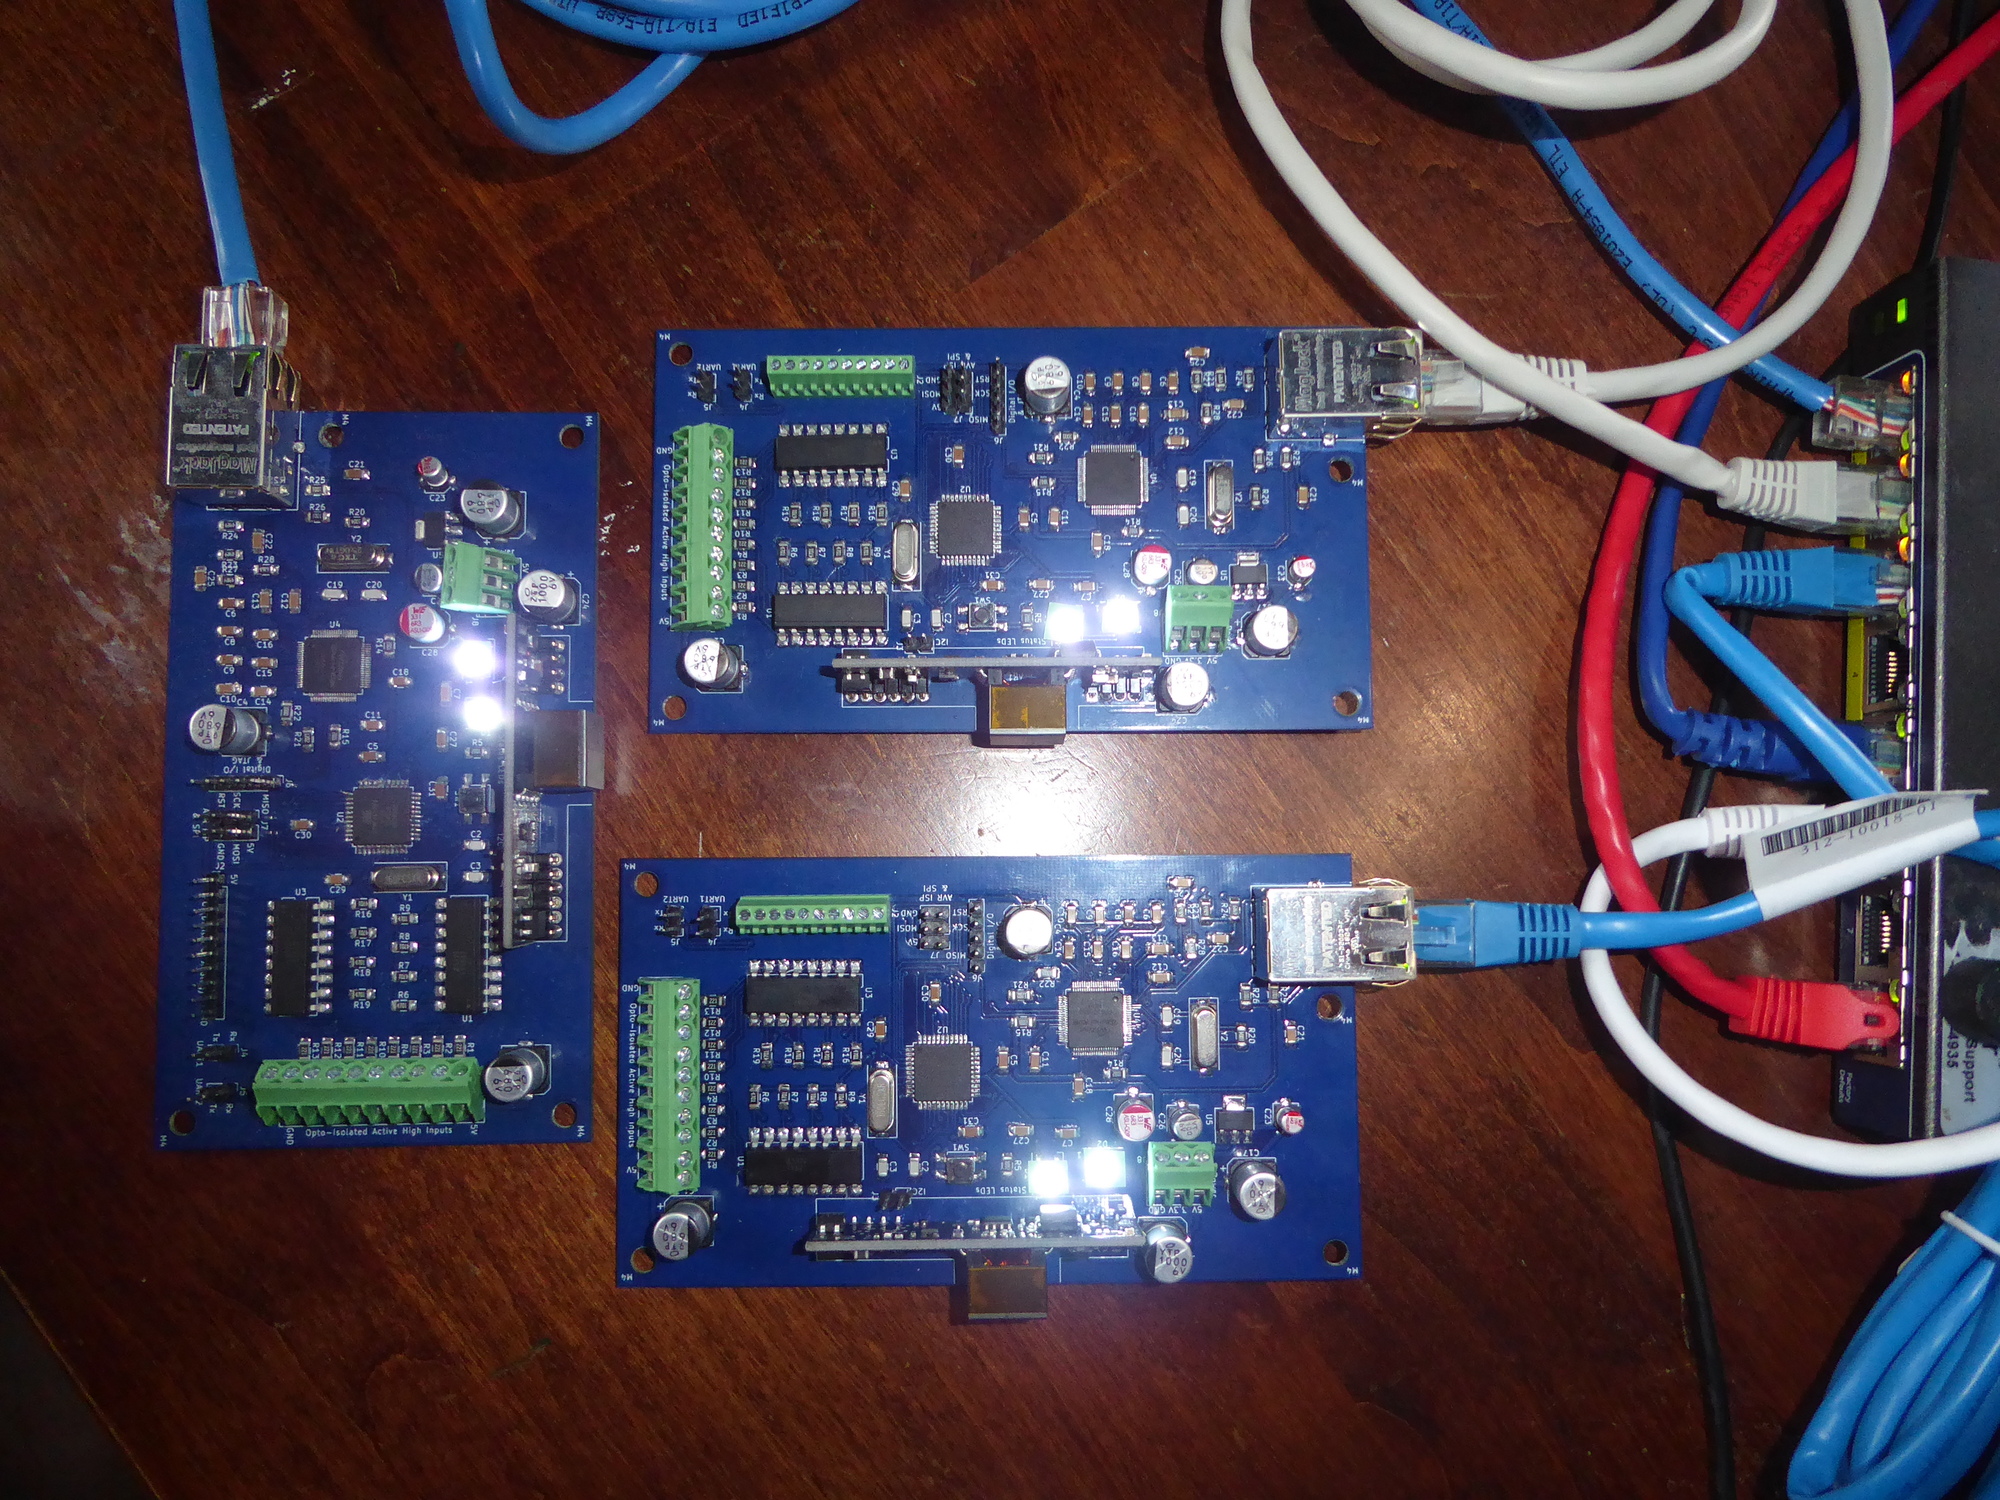
The leftmost board is my first prototype which I soldered manually with too large a soldering iron. Once I got to the Ethernet section I started using hot air soldering and continued for the rest of the boards. The layout of the boards could be more compact however with this being my first real SMD project I wanted it to be as easy as possible.

Software wise, I don’t have the code in a state worth posting (but I will if asked). Using PubSubClient for MQTT communication with Home Assistant. Nearly everything in my house is MQTT based as I have standardized upon it as the preferred protocol. The board pulls an IP address via DHCP, connects to the MQTT broker then just sends a topic on an input, or responds to a topic by changing outputs.

The software is mostly input agnostic. Can handle buttons, switches and contacts with input state detection as well as long/short press detection. An MQTT topic is sent when an input changes indicating state and another when the state changes again within a configurable timeout, providing the length of change.

My goal is to continue to expand the software to support a standard set of sensors and functions such as DHT, BMP280, RFID (UART), ec. sensors which are then activated by MQTT topics as required if the sensors are plugged into the board. I’m using the ArduinoOTA library to provide OTA firmware updates as these boards are often installed in inconvenient locations.

You may have noticed a mistake I made with the board layout. I accidentally stuck a capacitor in front of the power terminals. Oops. I also forgot the pullup resistor on the CS line so I have to make sure to manually pull it up the first time loading firmware, or load the firmware before soldering on the W5100.

3 Likes

This looks great! How much do they cost to manufacture? Also have you thought about making a web-based configuration page to allow configuration from a browser (MQTT settings etc)?

1 Like

Thank you!

Off the cuff, they cost about $40 in parts to make, excluding time of course. At this point I’m down to about 1 hour to assemble a unit which I don’t think is too bad. If I shopped around or bought in bulk I could probably get the BOM cost much lower. For these initial units I just bough everything from DigiKey with the exception of the Silvertel modules and the boards made at PCBWay.

There are definitely plans to build a basic web administration interface to allow basic settings and show/control I/O states. I sort of add features as I need them and haven’t needed a web interface yet. Another option I’ve been considering is using DHCP options to send MQTT server info. As long as the board can connect to MQTT, it could receive its configuration.

Sounds good. I think the web admin would be much more user friendly for most users.

Here’s an example of one of these boards in use (in my bathroom). Powered by a small 5V DC supply this time, not PoE. The bottom row of I/O being used to drive relays to control overhead lights, vanity lights, vent fan. The opto-isolated inputs connected to switches around the room. I haven’t added any sensors yet however at minimum there will be a DHT22 and a motion sensor added.

The nice thing, at least in my opinion, about a system like this is the centralized nature of having one device to all the “fundamental” functions of a room like switches and lights. The reliability of Ethernet (in over 2 years I have never had to reset one of these boards…well, the previous version as I am just switching to these new ones… nor had one disconnect), one network device representing the basics of a room, and my own MQTT based code that I control. And the versatility. All switches are just inputs to the system, so an MQTT message that a switch has been toggled is sent, and HA can do whatever it wants with that input. And the outputs can be anything from a light to a relay coupled with the Generic Thermostat integration co control a heater.

Yes, the wiring is a bit messy right now mainly because the room is undergoing renovation. I have some covers which snap in place to block out the ugly behind and below the DIN rails.

@AaronCake nice setup. I’m creating something similar that I’m calling ROOM-HUB but with ESP32 with ethernet ans I2C extender to be able to use I2C devices at greater distances, like 5 meters.

I will share all the schematics and source code.

Do you mind to share your source code and schematics? Are you using EasyEDA or other pcb designing software?

I do intend to share all this eventually on my website in a big home automation writeup I’m currently working on which will have all the relevant detail as well as the PCB patterns and project available to download.

I used KiCad and it isn’t straightforward to share the project as there are custom libraries and packages needed for a few of the parts. That’s something I’m going to clean up when I share it.

For now though, here’s a straight schematic export of the current version 1.1. This was actually my first experience with KiCad so if it is a bit messy, that’s why.

I tried to add the code but this stupid forum (I HATE this ridiculous software) told me the post was too big, AFTER I spent a bunch of my time commenting the code.

So you can see an earlier version of the code already posted here:

Updating my own topic here. Here’s my HA writeup containing the schematics, source and how I use these boards:
https://www.aaroncake.net/house/automation/index.asp