Developing a complex entity for a custom integration

I am currently contributing to a custom integration for Goodwe solar inverters and batteries using their web API.

One of the features I want to add is a set of entities to set time-of-use schedules. In the Goodwe app’s UI, it looks like this:

As can be seen, it contains the following options:

  • Time start
  • Time end
  • List of months
  • List of days (in a week)
  • Charge cut off SoC
  • Charging power (this can be negative or positive to signify charge or discharge)
  • Enable or disable this schedule

If each of these options are implemented as separate entities, then they map almost perfectly to home assistant entities:

  • Time start - Time
  • Time end - Time
  • Months:
    • January - Switch
    • ,
    • December - Switch
  • Days:
    • Monday - Switch
    • Sunday - Switch
  • Charge cut off SoC - Number
  • Charging power - Number
  • Enable / Disable - Switch

The problem is that all these options should be considered as one unit. The API call to update the schedule also updates all the options together in 1 go, rather than make multiple calls (and risk hitting rate limits).

I am quite new to HA development, so not quite sure what to do here. How would you design an entity for this use-case?

Home Assistant entities are objects with a state value. State values are held internally as strings and can only be primitive data values such as a number or string. Even ‘boolean’ values are held as string-pair representations such as ‘on’ and ‘off’.

Entity objects also hold other values including an attribute, as an object, which can hold almost anything you like. Entity attributes are secondary values in Home Assistant and can be more difficult to work with. The dashboard entities card for example expects to show the entity-state value of each entity, but can also show a named attribute value.

Inverter settings like timed charge do require a complex set of values maintained as a ‘unit’. It is possible to create entities and group them using ‘device’, but this is more associated with something like a smart plug. The plug is the ‘device’ and there can be several entities associated with it, such as switch, temperature, WIFI signal strength. One solution would therefore be to group individual entities under a pseudo device.

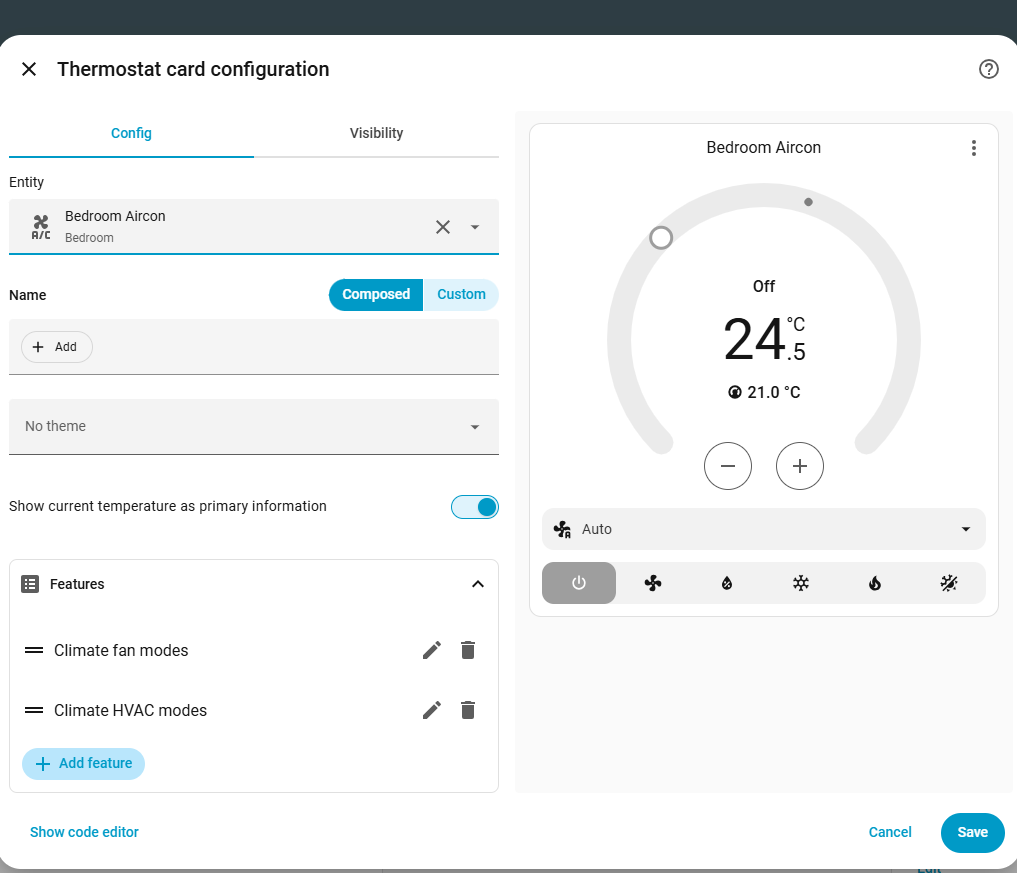
The model for HVAC climate devices such as air conditioners is perhaps more useful. Any a/c unit will have several values representing both read only monitoring such as power used, energy consumed, and room temperature. There will be several settings for control, such as mode, fan speed, set temperature, and perhaps time control.

If you look at the HA generic climate integration, which is a building-block integration used to support real-world HVAC integrations, you will find that there is just one entity per a/c unit, with the entity attribute holding something like the following data structure.

hvac_modes:
  - "off"
  - heat
  - dry
  - cool
  - fan_only
  - heat_cool
min_temp: 16
max_temp: 31
target_temp_step: 0.5
fan_modes:
  - auto
  - "1"
  - "2"
  - "3"
  - "4"
  - "5"
swing_modes:
  - auto
  - 1_up
  - "2"
  - "3"
  - "4"
  - 5_down
  - swing
swing_horizontal_modes:
  - auto
  - 1_left
  - "2"
  - "3"
  - "4"
  - 5_right
  - split
  - swing
current_temperature: 24
temperature: 21
fan_mode: auto
swing_mode: auto
swing_horizontal_mode: "3"
vane_horizontal: "3"
vane_horizontal_positions:
  - auto
  - 1_left
  - "2"
  - "3"
  - "4"
  - 5_right
  - split
  - swing
vane_vertical: auto
vane_vertical_positions:
  - auto
  - 1_up
  - "2"
  - "3"
  - "4"
  - 5_down
  - swing
icon: mdi:air-conditioner
friendly_name: Bedroom Aircon
supported_features: 937

The only ‘HA standard’ attribute properties are the icon and friendly_name, used by HA in almost every entity. The remaining properties have been constructed and are maintained by the a/c integration I use.

The entity state value, in this case, is the current active mode, which is “off” at the moment, or will be “cool” when running (in that mode).

The challenge is not in developing one entity with a set of associated attribute properties, but rather in being able to manipulate the attributes correctly from within HA. Since Home Assistant is focused on entity-state, the climate entities require a special dashboard card that brings everything together as one.

The thermostat card is associated with just one entity, but brings all the entity-attributes for climate control into the one card. Modifying any one value brings about the necessary Action (service call) by the HA integration to make the necessary change(s). Here, changing the set-temperature is simply a single Action to set-temperature with the new value.

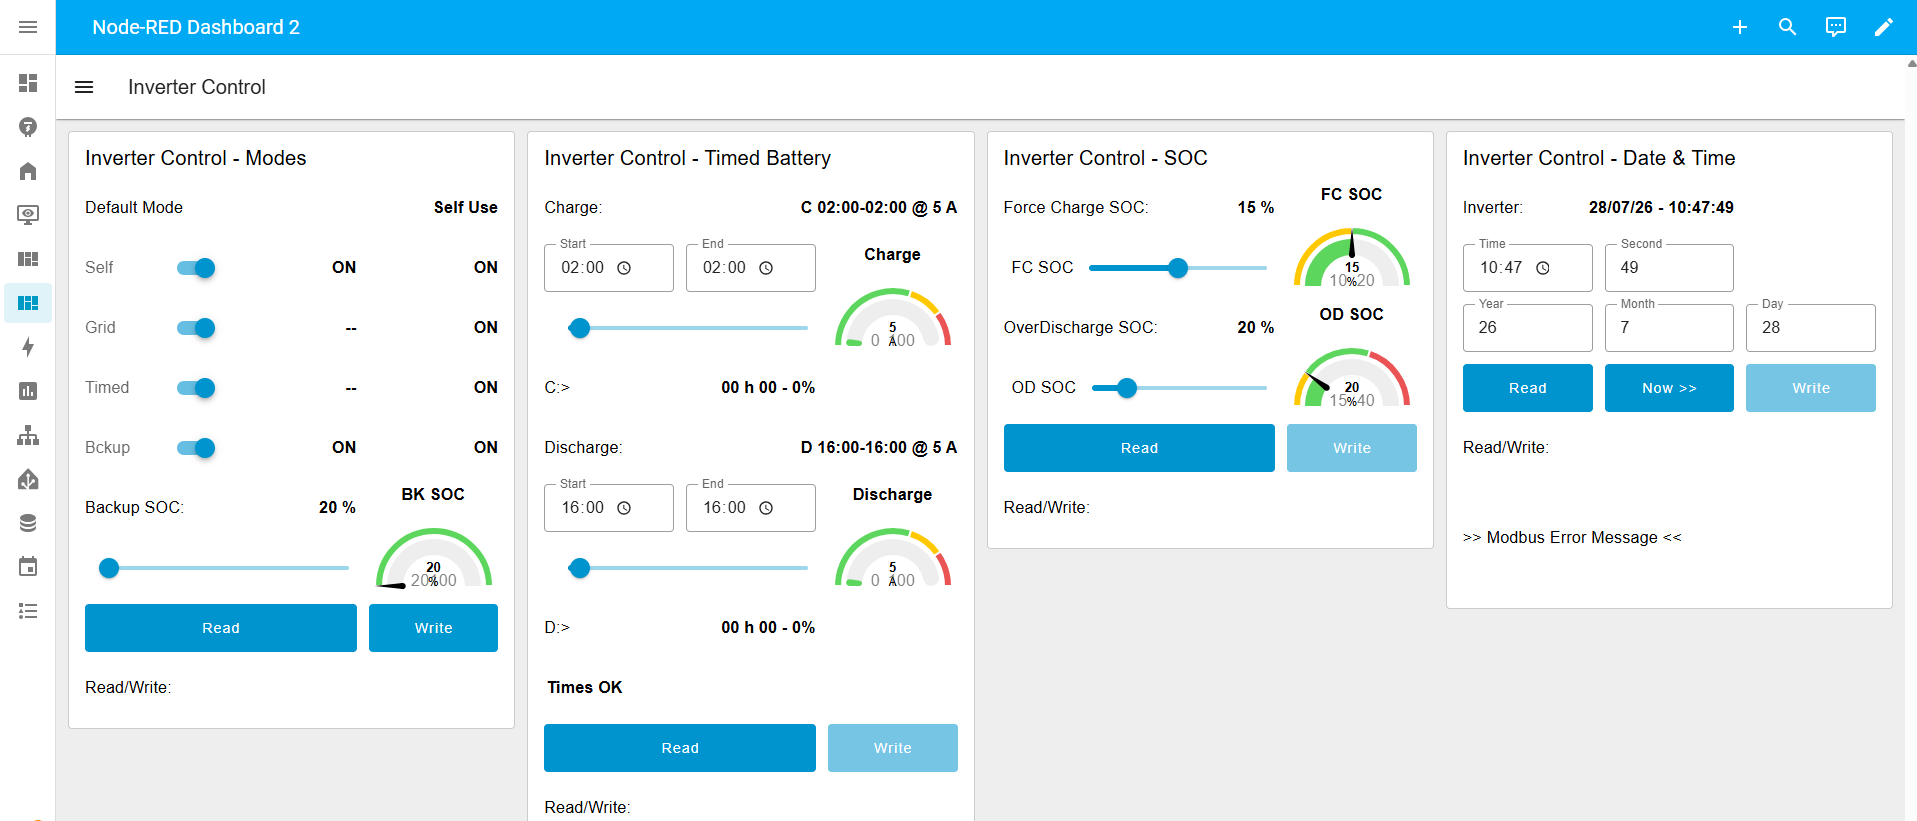
For something like an inverter timed-charge setting, you may need to consider the interaction between settings, and have a single ‘post-update’ button so as to pass the entire (new) setting ‘as one’.

You might actually end up with an HA dashboard card that looks rather like the Goodwe app UI

Happy developing.

Thanks for the write up! I’ve been looking at the code for the climate entity and what you’ve explained makes a lot of sense.

I am not 100% sure whether the “save” or “post-update” approach would work in this case though. With the base entities I’ve used/created, the state of the entity will also update if the value was changed elsewhere, e.g. the manufacturer’s app or another web interface.

If I put all the configuration the entity’s attributes, updating the state/attributes from the remote source will be tricky. If someone changes the attributes and state, it’s possible for the coordinator to update and change the attributes and state before they have a chance to save. However, if we do not have the coordinator updating the state, then the state/attributes will drift if the device is also controlled using its own app/interface.

Home Assistant is, fundamentally, a state-machine.

The concept is simple. Hold a ‘copy’ of the ‘state’ of ‘entities’ out there in the real world. For read-only, keep the copy updated in line with the real world. For writeable, permit HA automations to change the copy state and also update the real world state.

Quite how this works depends on the integration. For things like covers (blinds and curtains) some integrations [eg Somfy RTS] are ‘write without feedback’. Pressing “open” on my blind control button in HA causes the open command to be sent to the blind, and the blind hopefully opens, but HA does not get feedback and has to assume the action was successful.

For things like Somfy io, there is feedback, so the integration sends the “open” command, and will update the blind entity state to “open” only if the state-read-feedback responds with “blind state is open”.

For any HA integration there is always the issue that something else - a remote / device app / manual button also has control over the device. Just as with any computer database, some form of access management has to be arranged.

HA is not set up for situations with multiple and competing control points, and will clearly get out of sync. The most basic option, without formal locking, is to perform a ‘read’, permit change of settings, then perform a ‘write’, with an optional post-write read with validation check. The write will only be deemed successful if the post read returns the same as the proposed changes.

This is how I have written my manual inverter control. I did this first using Node-RED. Each block of variables must be first read, with the read-value on the left. Then the proposed (write) values can be set. Where any change has been made between the ‘read’ and the ‘write’, the WRITE button becomes active. Write action sends all changed values to the inverter, and then performs a post-write-read for visual confirmation.

I have written a more sophisticated system using a text-based ICL (Inverter Command Language) to set any inverter setting, so my timed charge control would be done by issuing

TC now+120 50A !grid+ !time+

which is parsed to the necessary inverter register writes to set grid charge and timed charge on, with the timed charge starting ‘now’ for 2 hours at 50 amps. Behind this, the code first reads the current settings, selects only the differences, and then writes the differences, performs a read-back, and confirms that the post-write-read settings agree with the proposed write settings. I have not implemented a transaction roll-back on write-failure as it is all complicated enough.

This is all done by holding the ‘read’, the ‘write’ and the ‘validate’ values. Whilst Home Assistant is a great state-machine, I find it easier to do such work in Node-RED where I can more easily store data values and perform the required data manipulation.