Thanks for this really detailed sharing.
For my need, i no need thermostat. I just need temperature setting point.
I tried to break the “Generic Thermostat” to answer my needs but it appears that I failed.
in here my post on my needs: Generic Temperature setting point · home-assistant/frontend · Discussion #17028 · GitHub
On thing I don’t like is that Generic Thermostat doesn’t have persistent data on hvac_mode and the temperature setting point. I even don’t know if it’s a feature in HA.
It means that on HA restart, your setpoint and your hvac mode is back to initial values in your config file.
Sorry to ressurect this thread but I am so glad that I have stumbled accross as it seems to cover exactly what I am looking to do.
I currently have a Y Plan system.
The heating is set to constantly on and this is connected to a digital thermostat in my hallway. All the scheduling is done via the thermostat.
The hot water is set to come on once in the morning and once in the evening but we find it really difficult to find a schedule that constantly works - we always seem to be running out of water.
My main goal is to somehow add a temperature sensor to the hot water tank and then have HA turn on the water earlier than its usual schedule if it senses that it has less hot water in it than usual.
One other thing I would say is that I am looking to move house in the next 18 months or so, so I am wary that I should be able to replace the timer and thermostat easily when needed.
Any advice on where to start would be much appreciated - I note that the SONOFF CH4 PRO seems to be a good place to start.
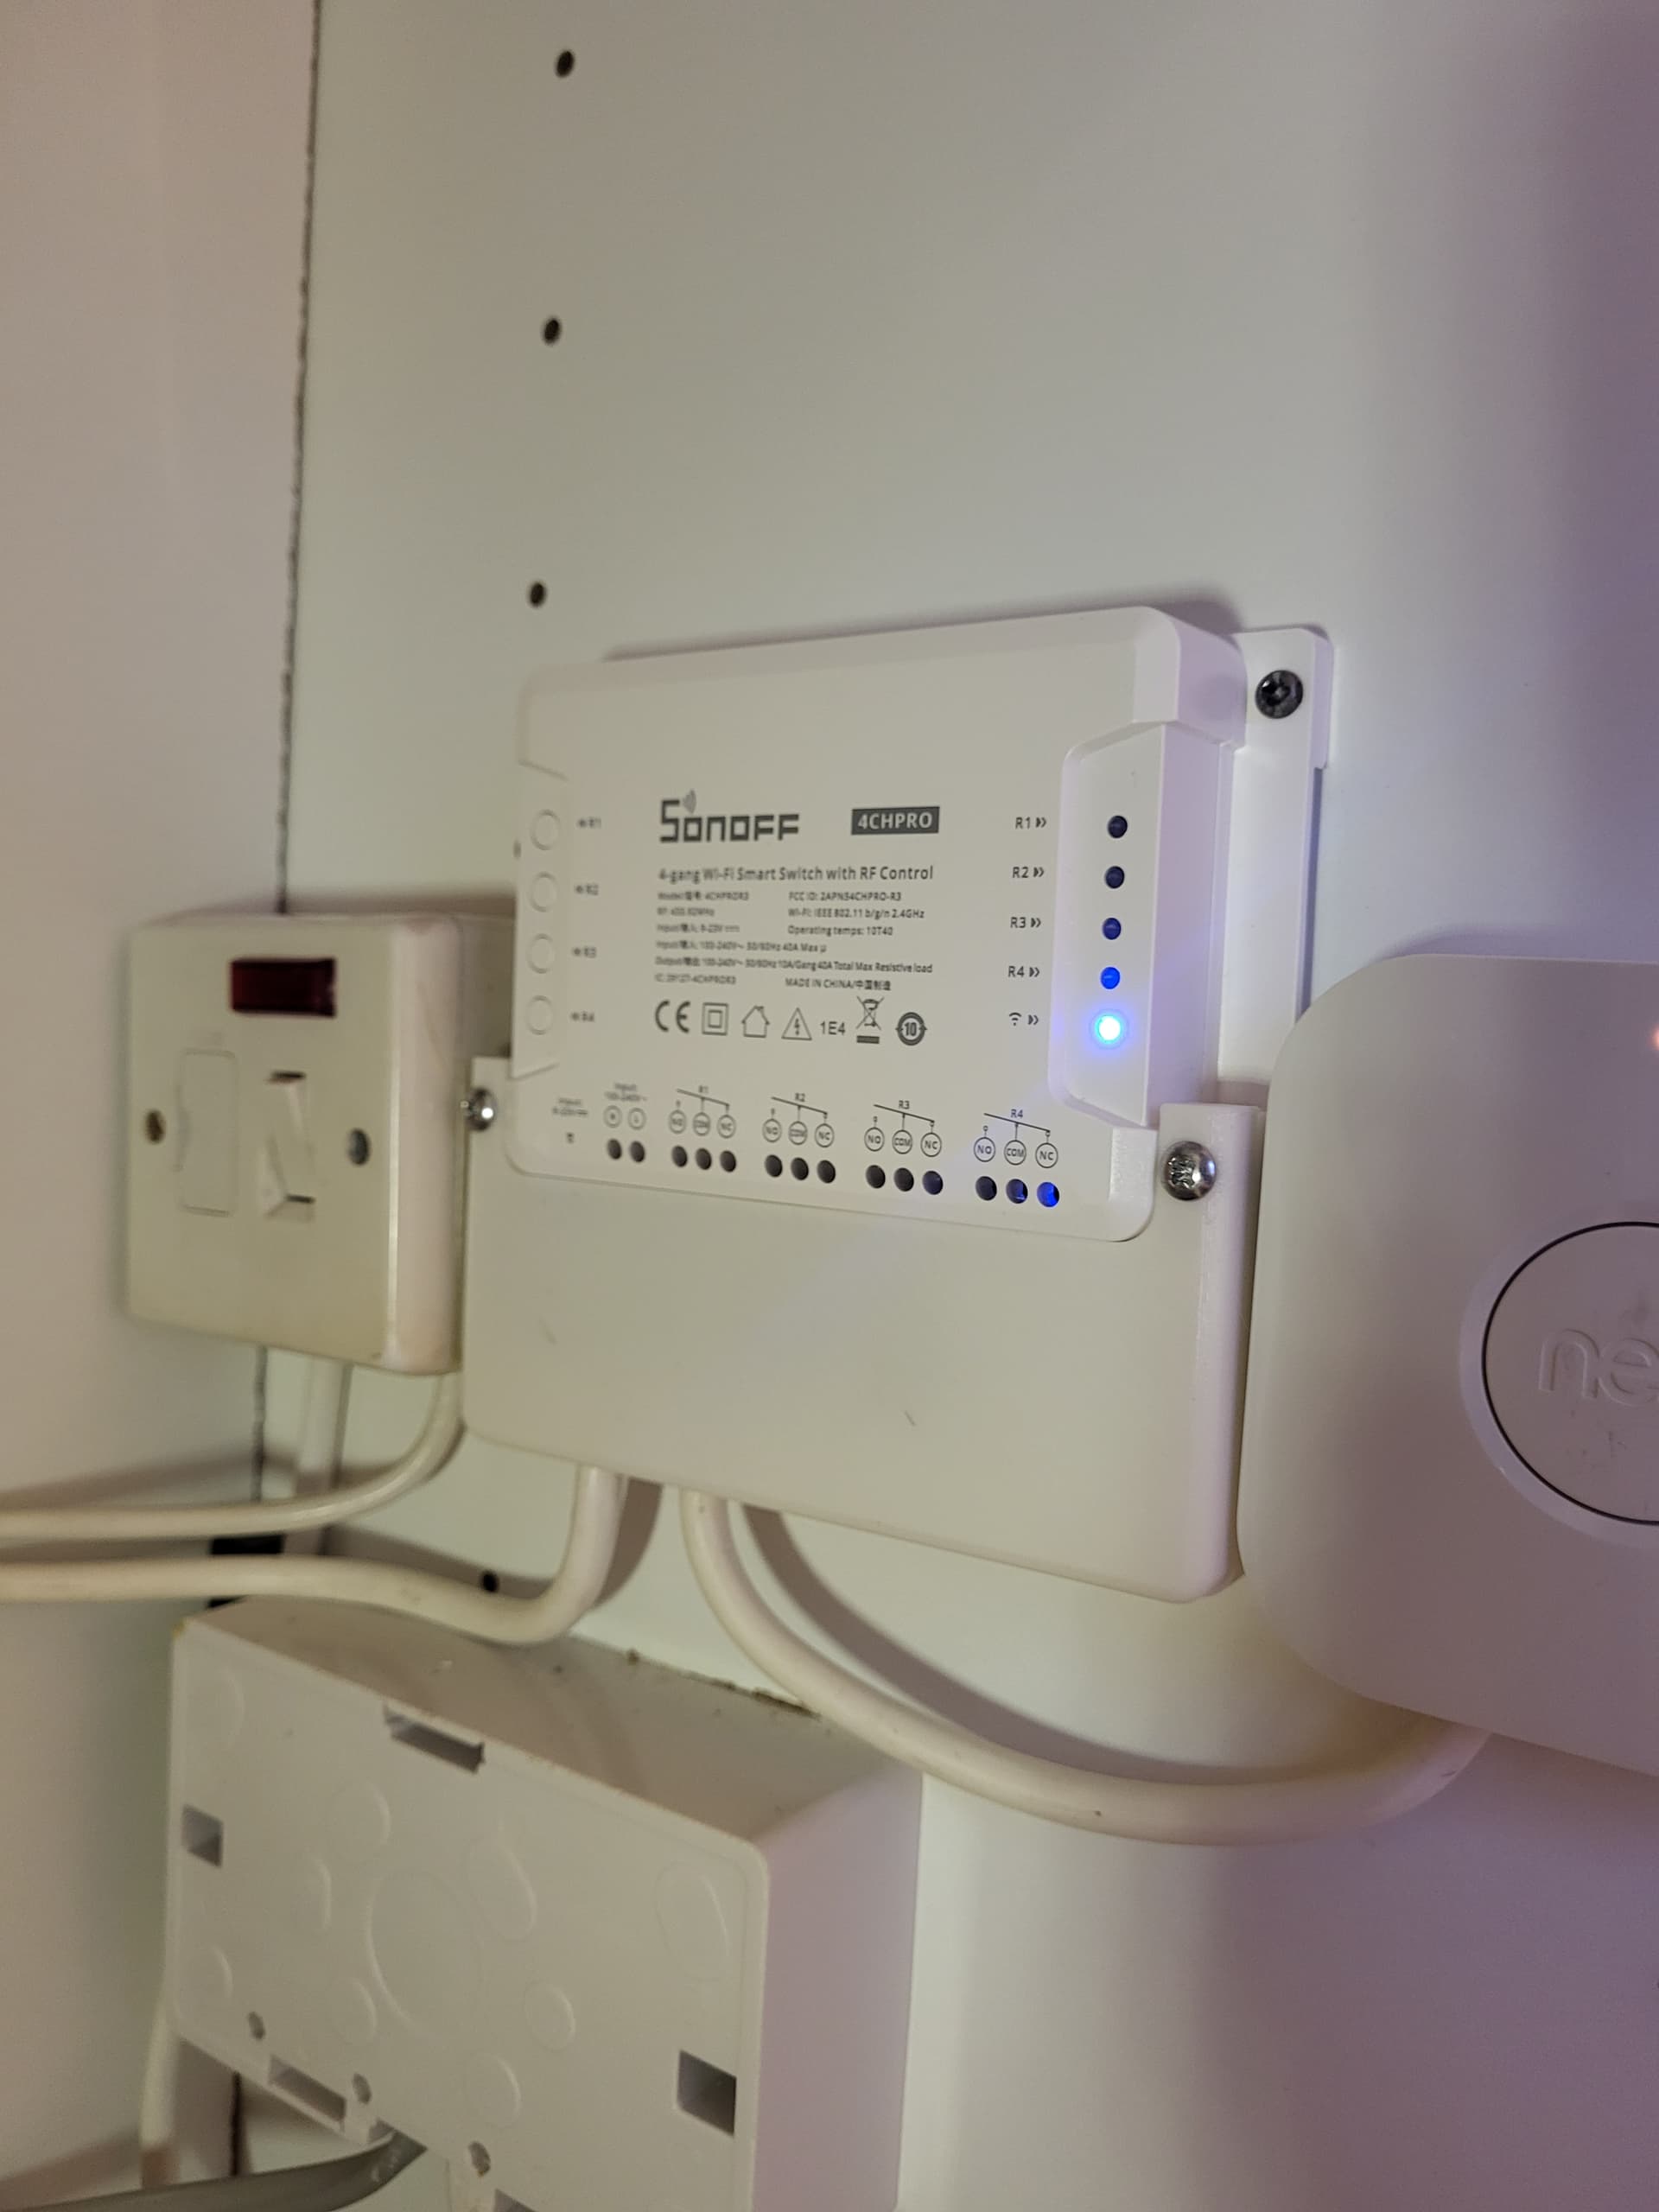
A Nest thermostat for controlling/scheduleing the heating and then a Shelly 1PM with temperature probe to measure the temperature on the hot water tank. The hot water is turned on/off via an automation when it goes below or above a set temperature via a SONOFF 4CHPROR3.
If and when I get time I would like to replace the Nest with more complex automations with room temperature sensors (I currently have Z-wave TVRs in the rooms); plus replace the Shelly with the temperature probe directly with the SONOFF 4CHPROR3.
I have done lots more research (including watching LOADS of Youtube videos) to really get my head round how the Y-Plan heating system works.
However, the separate HW ON and HW Off relay update is still a bit confusing. I would love just to replicate everything above (I will be using an ESP32, rather than an ESP8626) but I prefer to fully understand everything before I implement it.
You can have “HW ON” and “HW OFF” on the normally open and normally closed respectively, for a SPDT relay.
The problem is however, that with some, and certainly my heating system, is when “HW OFF” is set, it holds the 3-way value in place ready for when only central heating is required. Whilst it doesn’t use much power but it does make the valve motor hot and causes more frequent failures.
So using extra logic of when I know “CH ON” isn’t active, it’s safe to turn “HW OFF” off, to extend life of the 3-way valve.
I posted code per my original post, then edited to my current config file, so in revisions tab you can see diff of changes. Basically, just the startup stuff if only change.
I’ll caveat that my controller is using 2022.12.1 version of ESPHome, so some stuff may have changed. I should probably update it. I’ll post 3rd revision on that Gist if I change anything.
I’ve attached a diagram of how I think the Sonoff 4CHPRO should be wired to the existing NL1234 terminals for my Y plan, using both NO and NC on R1 for HW off & on.
This is a very interesting project, but I be aware that switching 240V with the relay modules you can buy off the shelf is highly dangerous. They do not have the electrical isolation or anti-tracking on the boards to do this. You can use the same project, but instead use low voltage switching in this box to then switch a proper isolated electrical contactor rated for the job.
Other than that, absolutely love looking over this project. It’s quite well thought out
I’d agree that secondary insulation (use a plastic box with cable glands) is needed to meet UK BS7671, however Shelly and Sonoff aren’t the usual craptacular manufacturers.
I have used Sonoff 4CH & 4CHPRO for industrial and residential control applications as they DO meet EU & UK standards, and DO have decent isolation with anti-tracking slots on the PCB.
Well… I see that someone else has some style and taste like i do based on your selection of those stainless steel buttons w/led!!
Im quite fond of those too and i dont like sharing so, you’re going to need to remove those and use something else! ; )
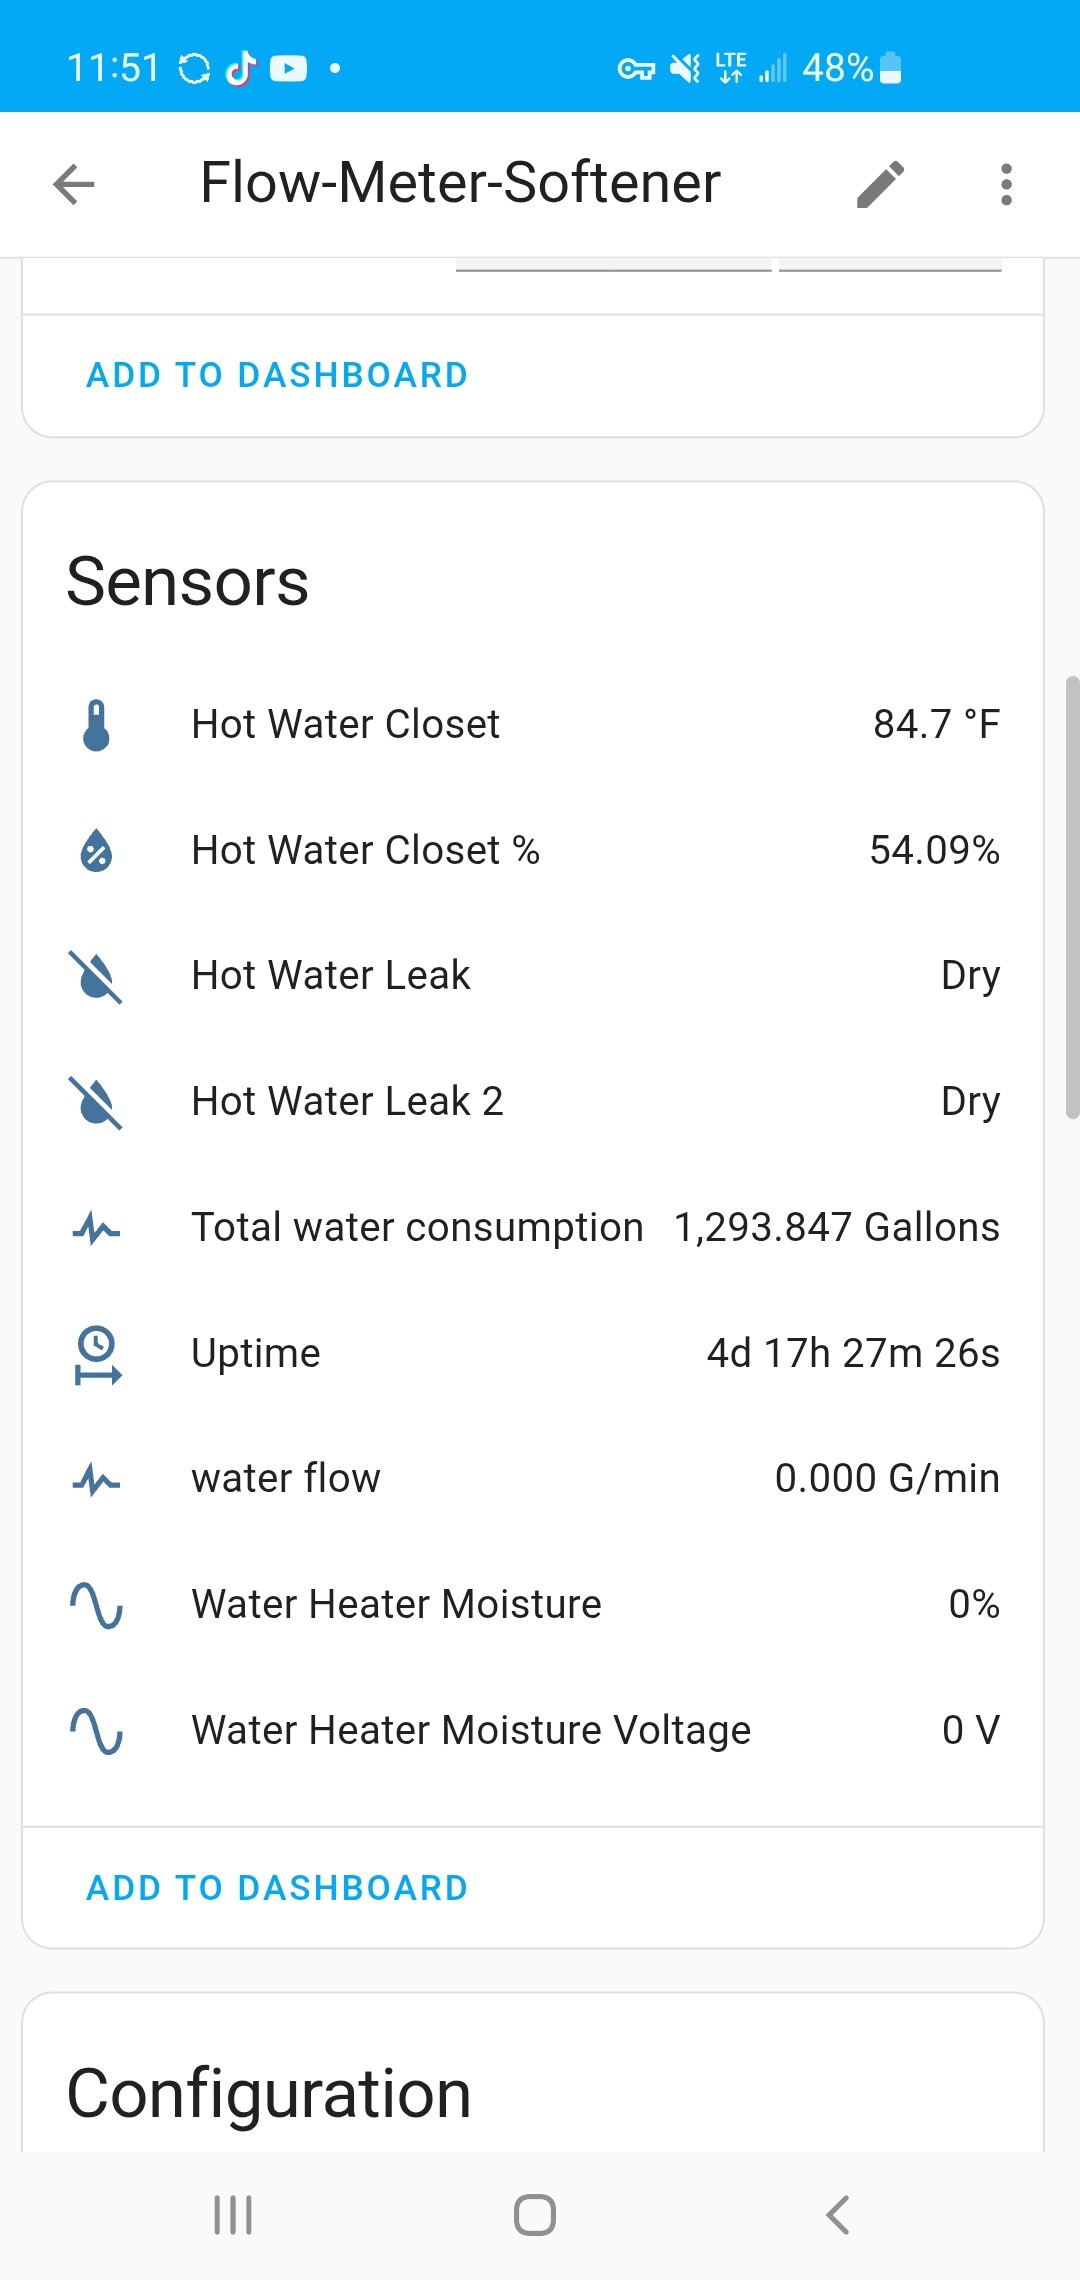
JK man. Your project looka very cool and just a suggestion from my own experience. If your hot water heater isnt somewhere easily visable to where a leak will be detected quickly, then id also suggests adding some leak sensors around and/or underneath it.
Mine is in a little “utility closet” that no one ever goes into and leaks can become a nightmare without any sensors.
After the last flood i went all out in there! Multuple leak sensors, moisture sensor, temp/humidity sensor and a flow meter…
Ive just installed a 4ch controller, controlling 2 heating channels and 1 HW. To save all the confusion of rewiring etc, i just paralelled the 3 NO contacts of the traditional controller with 3 relays. I can leave the old controller as is, albeit not functioning as a controller and use the new relays to switch each channel on.
All works great however, im relatively new to the HA automation so the automation is quite clunky. Using the built in HA scheduling which is fine but id like to program a boost function for 1 and 2 hours, button to advance the current point in the program to the next on / off, and importantly, i have a condition to enable based on temperature if the time is correct, but it does not stop if the temperature is reached.