DIY Heating and Hot Water Controller

Background

I was looking to upgrade my dated central heating and hot water controller/programmer (a circa 1980’s Switchmaster 9000 :smile:) to something smarter for integrating with Home Assistant.

Y-Plan-Wiring

This is for a Y-Plan heating system with a hot water cylinder, common in older houses in the UK. Whilst on the face of it, it’s quite complex, it’s fundamentally controlled by two relays; one for central heating (CH), and one for hot water (HW) on/off on normally open/closed.

I did look at options such as Nest, Hive, etc. but thought it’d be a lot more fun (and cheaper) to create something myself, as it is just a couple of relays after all :sweat_smile:

Hardware

I didn’t need any new sensors or the existing heating/room thermostat, as I could use my temperature sensors and thermostat card of Home Assistant. The cylinder thermostat is still required, and whilst I could use something smarter for measuring the cylinder temperature, the trusty mechanical thermostat is fine for now, and is a nice safety feature.

One issue with Y-Plan heating system, is when everything is “off”, a permanent live feeds the motor of the mid position valve from ‘HW Off’. This can wear the motor out over time as it sits in one position getting fairly hot (I’ve previously had to replace the motor). Therefore, I decided to use 3 relays so I could truly turn everything off when not using heating and hot water. I found a ESP-12f based 4 relay board on AliExpress, which could be powered direct from 240V AC, with extra GPIO pins exposed on headers :thumbsup:

I don’t have a 3D printer to make my own box, but I was able to find a pre-made project box, at 125x100x52mm, which looked just large enough for the relay board and extra space/depth for wiring. The manufacturer mounting points didn’t quite line up with PCB mount points, so I simply countersunk some bolts flush through the back of the box.

I also wanted local control, that if my router or Home Assistant went offline, that I could manually operate the heating and hot water. A couple of LED momentary switches were ideal, to be wired to the extra GPIO headers.

Overall cost of parts was around 22 GBP (~30 USD) with delivery/VAT.

Now to control it all, this was super simple, as ESPHome is excellent at making projects like this easy. I configured the Thermostat Climate Controller component for the heating, using a temperature sensor from Home Assistant, and then just a switch component for the hot water relay. This was flashed onto the relay before starting the build.

Build

So after safely isolating power (:warning: 230V AC) I began replacing old controller.

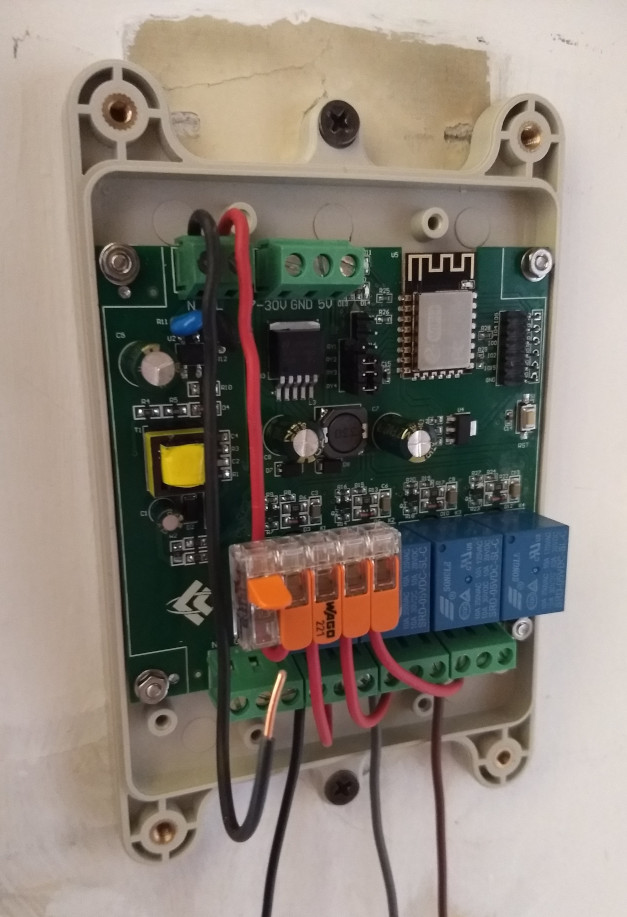
So the relay board fitted perfectly inside the case :sunglasses:. I used a Wago 221 connector to join the common live feeds (I did move this higher up, seen in later pictures, to give more space for other connectors).

Cables enter the box via rubber grommeted holes I made (note one T&E cable for the pump is missing in this picture), and switches soldered with wires with DuPont connectors.

Final connections before closing lid: I used seven Wago 221 connectors in all to connect everything (obscured from view in lid…sorry for bad picture: difficult to get camera angle once switches connected)

Final complete construction :partying_face: (pending labels and some cable clips), showing hot water enabled by solid yellow light on 2nd switch (which also toggles hot water when pressed). 1st switch pulses LED when heating on but not actively heating, solid light when actively heating. Again switch toggles heating on/off, and I plan to add a double or long press option, which to enable heating, ignoring the thermostat (backup in case of loss of connection to Home Assistant or temperature sensor fails).

Home Assistant Setup

With ESPHome integration, the thermostat and hot water switch appeared straight away in Home Assistant without any hassle, making that step super simple!

In terms of setting up timings for hot water and heating, I’ve used the excellent Scheduler integration and card, using person entities to detect when I’m working from home:

This card offers a much more family friendly interface than automations to set up timers. Imagine I’ll be playing around with schedules, etc. some more, but probably have to wait until winter when I’m using the heating to experiment :lab_coat: :test_tube:

8 Likes

That’s a really nice project you’ve done. Any chance you could share the esphome code you used ?

Sure. Has some complications for dealing with turning off mid position valve, dealing with LEDs, and having the double press to force heating on (fall back if losing connection to WiFi/temperature senors). I’m sure if could be improved, but working for now :grinning_face_with_smiling_eyes:

esphome:
  name: heating-controller
  platform: ESP8266
  board: esp12e
  on_boot:
    priority: 800.0
    then:
      - climate.control:
          id: heating_controller
          mode: "OFF"

# Enable logging
logger:
  baud_rate: 0

# Enable Home Assistant API
api:
  reboot_timeout: 0s

ota:

wifi:
  ssid: !secret wifi_ssid
  password: !secret wifi_password
  power_save_mode: none
  reboot_timeout: 0s

  # Enable fallback hotspot (captive portal) in case wifi connection fails
  ap:
    ssid: "Heating-Controller"
    password: !secret fallback_password

captive_portal:

status_led:
  pin:
    number: GPIO5
    inverted: True

switch:
  - platform: gpio
    pin: GPIO16
    id: relay1
  - platform: gpio
    pin: GPIO14
    id: relay2
  - platform: gpio
    pin: GPIO12
    id: relay3
    interlock: [relay4]
  - platform: gpio
    pin: GPIO13
    id: relay4
    interlock: [relay3]

  - platform: template
    id: heating
    lambda: |-
      if (id(relay2).state) {
        return true;
      } else {
        return false;
      }
    turn_on_action:
      then:
        - switch.turn_on: relay2
        - if:
            condition:
              switch.is_off: hot_water
            then:
              - switch.turn_on: relay4
    turn_off_action:
      then:
        - switch.turn_off: relay2

  - platform: template
    name: "Hot Water"
    id: hot_water
    lambda: |-
      if (id(relay3).state) {
        return true;
      } else {
        return false;
      }
    turn_on_action:
      then:
        - switch.turn_off: relay4
        - switch.turn_on: relay3
        - light.turn_on: hot_water_led
    turn_off_action:
      then:
        - switch.turn_off: relay3
        - if:
            condition:
              or:
                - switch.is_on: heating
                - lambda: |-
                    if (id(heating_controller).mode) {
                      return true;
                    } else {
                      return false;
                    }
            then:
              - switch.turn_on: relay4
        - light.turn_off: hot_water_led

output:
  - platform: esp8266_pwm
    id: heating_led_output
    pin: GPIO4
  - platform: gpio
    id: hot_water_led_output
    pin: GPIO15

light:
  - platform: monochromatic
    id: heating_led
    output: heating_led_output
    effects:
      - pulse:
      - pulse:
          name: pulse_fast
          transition_length: 0.5s
          update_interval: 0.5s
  - platform: binary
    id: hot_water_led
    output: hot_water_led_output

binary_sensor:
  - platform: gpio
    id: heating_button
    pin:
      number: GPIO0
      inverted: true
      mode: INPUT_PULLUP
    filters:
      - delayed_off: 10ms
    on_multi_click:
      - timing:
          - ON for at most 1s
          - OFF for at most 1s
          - ON for at most 1s
          - OFF for at least 0.2s
        then:
          if:
            condition: # heating & mode OFF
              and:
                - switch.is_off: heating
                - lambda: |-
                    if (id(heating_controller).mode) {
                      return false;
                    } else {
                      return true;
                    }
            then:
              - switch.turn_on: heating
              - light.turn_on:
                  id: heating_led
                  effect: pulse_fast
      - timing:
          - ON for at most 1s
          - OFF for at least 0.5s
        then:
          - if:
              condition:
                or: # Heating or mode ON
                  - switch.is_on: heating
                  - lambda: |-
                      if (id(heating_controller).mode) {
                        return true;
                      } else {
                        return false;
                      }
              then:
                - if:
                    condition: # heating mode OFF
                      lambda: |-
                        if (id(heating_controller).mode) {
                          return false;
                        } else {
                          return true;
                        }
                    then:
                      - switch.turn_off: heating
                      - switch.turn_off: relay4
                      - light.turn_off: heating_led
                - climate.control:
                    id: heating_controller
                    mode: "OFF"
              else:
                - climate.control:
                    id: heating_controller
                    mode: "HEAT"
  - platform: gpio
    id: hot_water_button
    pin:
      number: GPIO2
      inverted: true
      mode: INPUT_PULLUP
    filters:
      - delayed_off: 10ms
    on_press:
      then:
        - switch.toggle: hot_water

sensor:
  - platform: homeassistant
    id: hall_temperature
    entity_id: sensor.hall_temperature

climate:
  - platform: thermostat
    id: heating_controller
    name: "Heating Controller"
    sensor: hall_temperature
    default_target_temperature_low: 20.0 °C
    visual:
      min_temperature: 16.0 °C
      max_temperature: 24.0 °C
      temperature_step: 0.5 °C
    min_heating_off_time: 0s
    min_heating_run_time: 0s
    heat_overrun: 0.5 °C
    heat_deadband: 0.2 °C
    heat_action:
      - switch.turn_on: heating
      - light.turn_on:
          id: heating_led
          brightness: 100%
          effect: None
    min_idle_time: 0s
    idle_action:
      - switch.turn_off: heating
      - light.turn_on:
          id: heating_led
          effect: pulse
    off_mode:
      - switch.turn_off: heating
      - switch.turn_off: relay4
      - delay: 0.2s  # Clashes with going idle
      - light.turn_off: heating_led
    heat_mode:
      - light.turn_on:
          id: heating_led
          effect: pulse


Hi, this is the wiring diagram of my heat pump. Do you think something similar can be done?

Looks orders of magnitude more complicated, with a number of additional parts and sensors. I’d suggest probably better to look at modifying the existing user controller, or even look at CN1/CN2 inputs if you could reverse engineer the protocol.

For me is impossible :pensive::face_with_raised_eyebrow:
Thank you for reply

I just starting today to look around for such a project. This is great…

@kwirk are you happy with the EST board ? If so, I’m probably going to get the same one. I was hoping to put some redundancy into place… maybe next year :slight_smile:

@belanger I’ve had no issues with it. Been working great. WiFi seems stable, maintaining connection to Home Assistant, which I was little worried about given lots of metal pipework around where I installed it.

They now make an ESP32 version, which has Bluetooth, so may be useful if you have BLE temperature sensors, so could have remote sensor(s) that don’t need to go via Home Assistant (even if as fall back). I think I’d try that out if I was making it again.

Very glad to hear that board has been working great. The ESP can likely last for years but the remaining of the board is what worries me most, so the reason to have in mind “redundancy”. I can be away for many weeks.

Not sure if your code is almost “plug n play” to ESP32, if so great. I had in mind to hard wire a T probe but BLE is great idea actually, no need to pass any wire. Perhaps hard wire for outdoor T/humidity and BLE for inside?!? In my area during winter, humidity sensor can be useful to turn on the central humidifier.

I’m not working on any of this within the next ~6-12 weeks, until then will thicker.

Should be, other than probably needing to change GPIO pin numbers. ESPHome does all the hard work for you.

I use the Xiaomi LYWSD03MMC sensors throughout the house, so those within range would be picked up easily enough. But I’m happy with ESP8266 board and sending temperature from Home Assistant for now.

I have also built a HA-based system for hot water and central heating on a Y-Plan system. However I kept it simple by just replacing the old timer with a SONOFF CH4 PRO switch. It has 4 channels but I only use two: one for hot water and one for central heating. You need the PRO because you need two-way switching of hot water for Y-Plan. One reason I did this is that a future owner of the house could still easily go back to a conventional timer if required.

I use a SONOFF temperature sensor for the hot water cylinder and a cheap temperature sensor in the living room for the central heating (as the living room is the warmest place). Both are controlled with the HA generic thermostat integration.

The ‘last port of call’ motor energisation when not in use happens if you turn off central heating and hot water at the same time. The valve is deigned to cope with this, but to avoid it, an automation could be written that ensures the central heating is turned off at least 10 seconds after the hot water – to allow the valve time to revert to its default hot water only position. That cannot be difficult, but I have not actually done it yet.

1 Like

Hi Andy,

I am looking to do something similar. I want to keep all my old fashion controls but retrofit them with Shelly 1 relays.

I’ve managed to create an override for the room thermostat by placing a Shelly 1 relay with temperature sensor inline with the switch line and added automation to modulate the CH.

What I’m struggling with is the HW. I havent managed to work out how to control that using a Shelly 1. All I suceeded in doing is turning it all off rather than just the HW.

How did you achieve this with the sonoff?

Many thanks,

Tim

@kwirk still all working ok? This is exactly what I’m looking for, probably going to go with a 4 channel relay board and ESP32 NodeMCU separate, but pretty much the same product.

Yeah, still working fine without any issues :grinning_face_with_smiling_eyes:

Only thing I’d change if making again, as mentioned in a previous comment, is using the ESP32 version of the board so could communicate to BLE temperature sensors direct in case of WiFi or Home Assistant issues.

2 Likes

@TimDog If you have a y-plan valve then it is important to wire both HW on and HW off – so you need relays with both NO and NC accessible (on and off respectively). The latter makes sure that the CH still works if you do not have HW on, otherwise tuning HW off also turns off the CH. I don’t think the Shelly relays have this. I used the SONOFF CH4PRO, which does have NO and NC accessible.
I found this YouTube video helpful Y plan wiring - made simple - YouTube

1 Like

Having looked further into this, I’ve gone the Sonoff CH4 Pro R3 route like you @AndySymons i’ve just flashed the CH4 with ESPHome and have managed to add a string of dallas temperature sensors to the spare GPIO2 on the PCB so I can measure boiler flow/return, cylinder temp etc.

1 Like

@fuzzyfelt I look forward to hearing how you do. I did not bother with ESPHome in this case (though I use it elsewhere) since SONOFF works with eWelink and is picked up for local control in the SONOFF LAN integration.

Hi @kwirk I’m using a similar set up as per my reply above and have used a lot of the ESPHome code that you’ve used (thanks!). Would you mind expanding a bit on the control logic and how you’ve wired the mid position valve? As using 3 relays slightly complicates it from the standard Y plan.

Thanks.

So my mid-position valve I have has two live feed inputs, one for “heating on” (white) and one for “hot water off” (grey). The problem occurs, when not using heating or hot water, that live feed on “hot water off” keeps valve open, and the motor gets hot. But when using the heating, the the “hot water off” has to be live (if hot water off), so need to manage it if you want to remove all power when not in use.

The logic in the ESPHome, if I configured it correctly, should be that the “hot water off” will turn off only if the heating is off (and obviously the hot water is off as well). If the heating is on, “hot water off” will be live…but regardless, when you want hot water, that “hot water off” must be off, as “hot water on” is live. You’ll see I have interlock on relay 3 and 4 to prevent having both live. (The thermostat on the hot water tank, is what then feeds the “hot water on” live to valve grey wire when tank is hot enough)

Here’s is a diagram I made which I have alongside the controller (just in case someone needs to know how’s it wired…including me!). The “LT” and “HT” are the low temperature and high temperature from hot water tank thermostat.

Hope this helps. Happy to clarify or answer more questions.

1 Like

Great, thanks! This is extremely helpful, now it’s finding the time to have a tinker! Will report back when I’ve got it working.