Should I see a color in the temperature label? it remains black…?

I don’t think I’ve ever used state-label sorry
@sender your problems are with the basic usage of card mod. Please head over there to get something simple like an override color working. Once you have that going, then you can plug in my template code, since it just outputs a CSS colour.
Fabulous. How can I template/decluttering_templates/card_mod this so I do not need to copy paste this on every page for every temperature badge?
Unfortunately, I don’t use those, so I can’t say. Maybe others here can help. That said, I think you might be able to do it with YAML anchors.
EDIT: Clarification: Of course I use card mod  , but I don’t use its templating feature.
1 Like
@parautenbach - Thanks, YAML anchors worked well.
Hi all,
may I ask again since I am ending up in this topic for the same question.
how may I use the code from the top start to see “entities” coloring from let’s say 0-300. I would love to create a dashboard with my PV panels coloring with the amount off Watts produced.
Is this code strictly for the lovelace dashboard or can it be reused in the sensor: config also?
Adjust the colour stops in the map to cover a bigger range. The map is temperature and colour value pairs, but the temperature keys can really be anything. You can also have fewer or more stops. You’ll need to experiment to get it to your liking, but start by keeping the 4 colors and changing the “temperatures” for those colours (e.g. to 50, 125, 200 and 275).
I like your use case. I might just do the same when my PVs get installed soon.
You can certainly use it in a template sensor, because it’s just Jinja, but I’m not sure how you would use it, since the output is an RGB value. The original idea is to display it on a dashboard, yes.
Do you have an example of yaml?
Of what precisely? What you’re asking isn’t something I do for myself. Have you tried my advice and can you show what you’ve tried? Try to respond in more detail.
HI Pieter, what I am trying to accomplish is a dashboard with some “entities” that color depending on their value. In my case 0-300 (or 400 or whatever). As a start from there I hope I can build out further.
But I am having problems on how to get started. I think I have 2 options basically:
- via lovelace (I believe this is what the code above is about).
- via a template sensor.
I prefer to created template sensors (for now) as I can create more specific sensors that act consistently in my entire home assistant system and I can reuse in multiple dashboard.
So my detailed question for a start is:
Can you please help me with the correct syntax for a template sensor in YAML to color the icon where I can play with a value from 0-300/400.
I do not have any working example as I truly do not know on how to get started with this (hence my question for an example).
Thanks!
Ok cool, I hear you, so lets see what we can do…
I’m going to assume your PV sensor is called sensor.pv_power.
We’re going to create a template sensor which has the same value, but with an attribute for colour. The attribute will be a piece of text containing a CSS colour.
I’m going to use the new style template sensor format. I’m not testing any of this though, so keep that in mind.
Note that the macro in the template is like an (inline) function – mostly for readability. It’s the line before the endmacro directive that “returns” the value – e.g. rgb(255, 0, 0) which is red or #ff0000. I’m renaming the references from my original post from temp to value to make it more generic.
This line is where we reference the sensor value from your PVs:
{%- set value = states('sensor.pv_power') | float(0) -%}
This is (one option for) a new map of colours:
          {%- set value_map = {
                                50: "3498db",
                                125: "70a03c",
                                200: "ff9800",
                                275: "e74c3c"
                              }  -%}
The keys are the watt values, so 50 will map to #3498db. Values below that will be the same colour, because this is the lowest value. Between 50 and 125, the colour will be a gradient between #3498db and #70a03c. When you hit the highest value (275) or higher (300), the colour will be #e74c3c.
Here is the full sensor definition:
- sensor:
    - name: PV With Color
      state: "{{ states('sensor.pv_power') }}"
      attributes:
        color: >-
          {%- macro interpolate(value, start, stop) -%}
            {%- set (start_value, start_color) = start -%}
            {%- set (stop_value, stop_color) = stop -%}
            {%- set (start_r, start_g, start_b) = (int(start_color[0:2], base=16), int(start_color[2:4], base=16), int(start_color[4:6], base=16)) -%}
            {%- set (stop_r, stop_g, stop_b) = (int(stop_color[0:2], base=16), int(stop_color[2:4], base=16), int(stop_color[4:6], base=16)) -%}
            {%- set s = ((value - start_value)/(stop_value - start_value)) -%}
            {# some channels might be negative; most browsers are probably tolerant, but in case not #}
            {%- set r = max(int(start_r + s*(stop_r - start_r)), 0) -%}
            {%- set g = max(int(start_g + s*(stop_g - start_g)), 0) -%}
            {%- set b = max(int(start_b + s*(stop_b - start_b)), 0) -%}
            rgb({{ r }}, {{ g }}, {{ b }});
          {%- endmacro -%}
          {%- set value = states('sensor.pv_power') | float(0) -%}
          {%- set value_map = {
                                50: "3498db",
                                125: "70a03c",
                                200: "ff9800",
                                275: "e74c3c"
                              }  -%}
          {%- set keys = value_map | sort -%}
          {%- set index = keys | select("lt", value) | list | length -%}
          {%- if index == 0 -%}
            #{{ value_map[keys | first] }}
          {%- elif index == keys | length -%}
            #{{ value_map[keys | last] }}
          {%- else -%}
            {%- set start = (keys[index - 1], value_map[keys[index - 1]]) -%}
            {%- set stop = (keys[index], value_map[keys[index]]) -%}
            {{ interpolate(value, start, stop) }}
          {%- endif -%}
Next, if you tell me which card you’re going to use to visualise this, we can look at how to apply that colour, but that might be a topic for a card-mod thread. Either way, you should see the new sensor with it’s attribute in your dev tools or by using a template such as {{ state_attr('sensor.pv_with_color', 'color') }}.
Ok, it was some hassle and it went late before last night. But I have some output…:

now next step is to get this on a dashboard… (the visualisation part). I envsion something like a picture elements card with my sattelit house view where I can add squares with the accompanied colors
And also here no clue
Something like this:

I’m glad there’s progress.
You might want to add a device class to that template sensor. I didn’t include that: device_class: power.
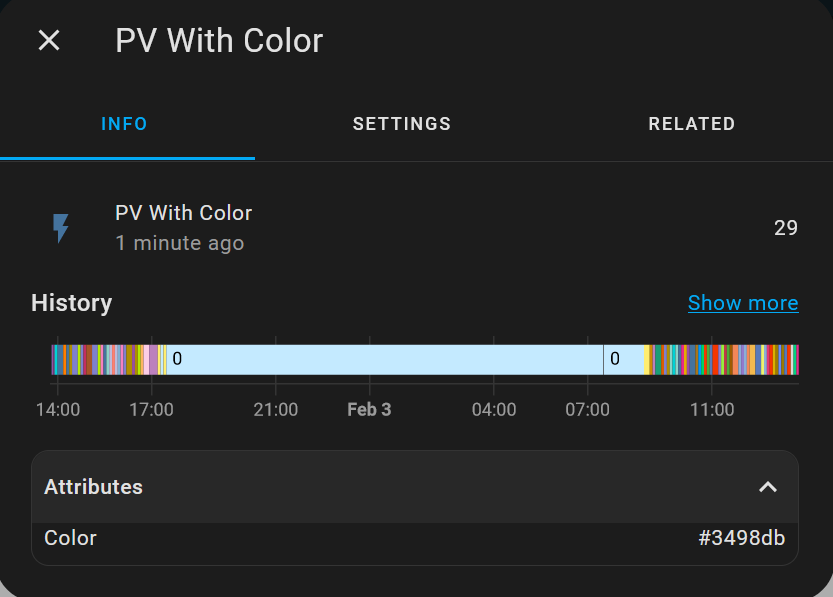
Can you show the attributes section too? The colours you see under history and the result of the template sensor’s code: It’s because HA doesn’t see it as numerical data.
As for the visualisation part, I’d be happy to help with something simple like colour an icon on an entity card. From there you should be able to find your way or start a new thread with that specific application to ask for help. Personally I just don’t have the time to design a full picture elements card and I find it just too fiddly and not scalable for mobile displays.
But, for testing, I’d say put a badge on a dashboard, then you can use the code from the first post, tweaked slightly:
badges:
  - entity: sensor.pv_with_color
    name: PV Power
    card_mod:
      style: |
        :host {
          --label-badge-text-color:
              {{ state_attr('sensor.pv_with_color', 'color') }}
        }
Looks good. Perhaps you can try my example in my previous post next.


Badges - Home Assistant (home-assistant.io)
You need to give more info, like what the status and attributes are for what you’re showing. Is the sensor’s value 18? What’s the colour value?

Entity sensor.pv_with_color (<class ‘homeassistant.components.template.sensor.SensorTemplate’>) is using native unit of measurement ‘None’ which is not a valid unit for the device class (‘power’) it is using; expected one of [‘kW’, ‘W’]; Please update your configuration if your entity is manually configured, otherwise create a bug report at Issues · home-assistant/core · GitHub