(As a new user I can only put 2 links in this post, hence lack of functioning hyperlinks)
I recently came across the new TRMNL devices (usetrmnl.com) and was very excited to try them out. But before dropping a good chunk of money on some new hardware, I wanted to test their claim about dedication to open-source and see if I could make use of an old e-reader I have lying around. While there is no denying they deliver on providing open source variants of their software, it is definitely not as polished as I’d hoped. Let me share my experience of getting a BYOD (Kobo Clara HD) and BYOS (Terminus (github.com/usetrmnl/byos_hanami) without spending any money on hardware or licences.
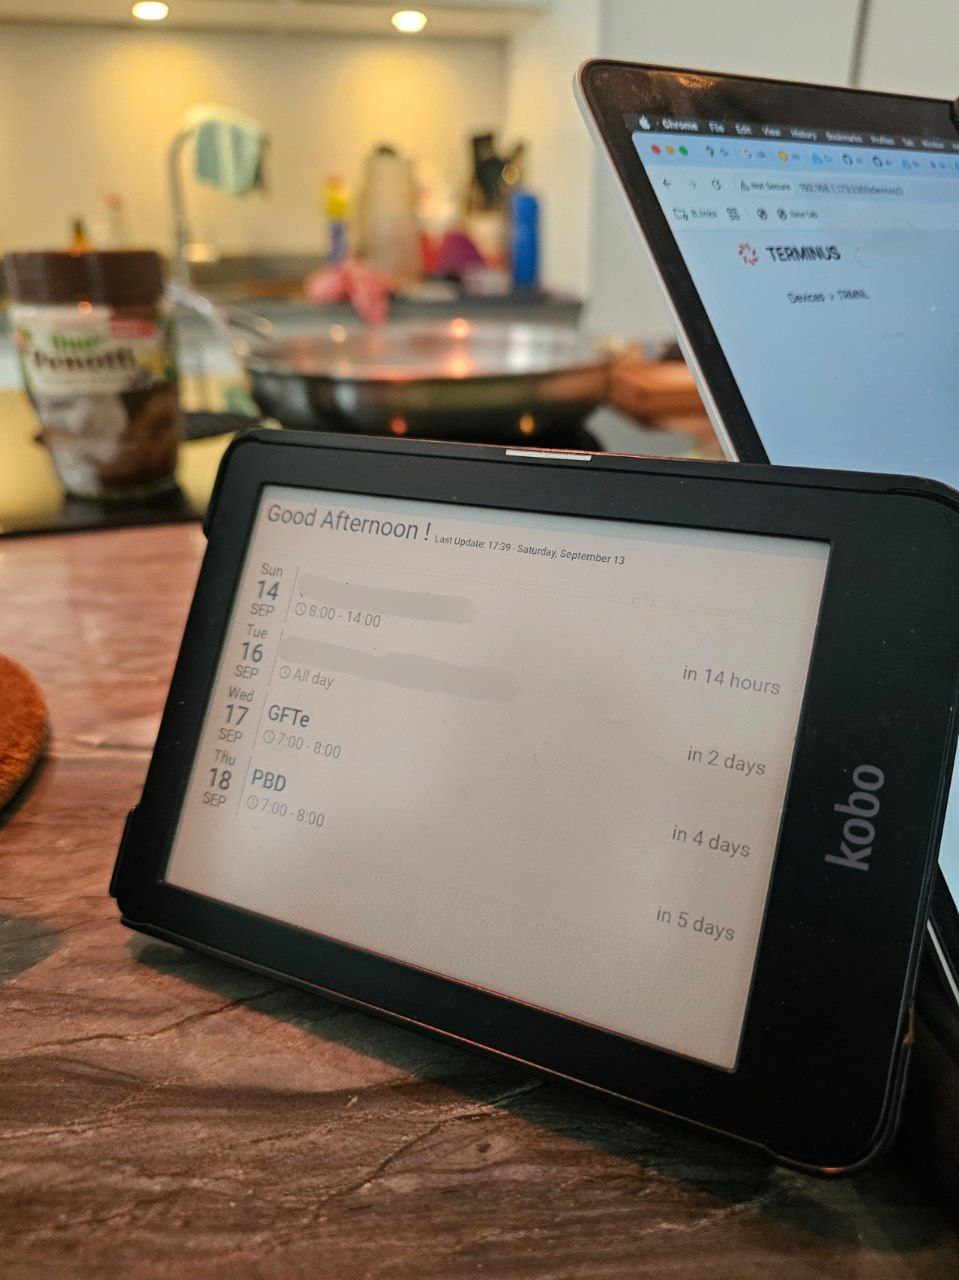
The final state of this project is a Kobo Clara HD that can still be used as a regular e-reader, but when not in use functions as a TRMNL dashboard showing a Home Assistant Dashboard of choice (in my case with family calendar events and reminders). All while consuming minimal power (once per hour updates).
Let me walk you through the steps I took to get this dashboard going. I’m running Home Assistant on a Raspberry PI 5 (4gb) in docker compose.
- Step 1: Setting up Terminus (BYOS)
- Step 2: Preparing Your Kobo (BYOD)
- Step 3: Setting up the Screenshot Service (Puppeteer)
- Step 4: Creating Home Assistant rest commands for Terminus
- Step 5: Automatically sending a snapshot of your dashboard to your Kobo
- Step 6 (Optional): Dashboard yaml
The first two steps are relatively easy. TRMNL provides a stripped down open source version of their software, complete with instructions to install in docker. Setting this up was straightforward.
https://github.com/usetrmnl/byos_hanami
The second step is to set-up the community provided trmnl-kobo project. This was a bit more difficult. The general instructions are great, but please (please!) don’t forget that you factory reset your kobo when the power button is pressed for 10 seconds while plugged into a computer. Once TRMNL is started, it is a bit difficult to restart your kobo and I accidentally did a factory reset twice (Good reminder to backup your Kobo if you want to keep using it as an e-reader as well).
Also, before adding your kobo to Terminus, I recommend to creating a custom device using these instructions.
It took me some fiddling to get the config right (forgot to add /api to the end of the api url ![]() )
)
{
    "TrmnlId": "<KOBO_MAC_ADDRESS_IN_CAPS>",
    "TrmnlToken": "<TOKEN>",
    "TrmnlApiUrl": "http://192.168.1.100:2300/api",
    "DebugToScreen": 0,
    "LoopMaxIteration": 0,
    "ConnectedGracePeriod": 5,
    "ImageFormat": "png"
}
https://github.com/usetrmnl/trmnl-kobo
After setting these two projects up, I realised that the only way to get all the fancy plugins that were advertised by TRMNL, you need to either buy a device or pay a one-time fee. So, I started browsing around for some projects I could use to work around this.
I took quite some inspiration from homeplate (github.com/lanrat/homeplate), but felt it would be smoother to work this out by myself.
Essentially there are three extra steps needed to get this working…
You need to set-up puppeteer(github.com/balloob/home-assistant-addons/blob/main/puppet/README.md), a Home Assistant add-on that can make screenshots of any screen/dashboard in your Home Assistant UI. You can install puppeteer together with Home Assistant in your docker-compose by cloning https://github.com/balloob/home-assistant-addons/tree/main in your Home Assistant root directory and then adding the following to your docker-compose.yml.
  hass-screenshot:
    container_name: ha-puppet
    image: balloob_ha_puppet
    build: balloob_addons/puppet
    pull_policy: never
    # Without the right timezone, all my calendar events were showing incorrectly.
    environment:
      - TZ=Europe/Amsterdam
    deploy:
      resources:
        limits:
          memory: 1G
    restart: unless-stopped
    volumes:
      - ./puppet_config.json:/data/options.json:ro
    depends_on:
      - homeassistant
    # this section is optional, if homeassistant should resolve to a different IP, specify it here
    extra_hosts:
      - "homeassistant:host-gateway"
    ports:
      - 10000:10000
Additionally, you need to create a file named puppet_config.json and add a long-lived access token (I made it from a spare non-admin user account), at profile/security in your home assistant UI.
{
  "access_token": "<token>",
  "keep_browser_open": false
}
Please note that Puppeteer by itself does not have any security, so if you expose this port outside of your home network anyone with the url can screenshot anything in your home assistant UI (bad idea).
You should now be able to fetch PNG images of your dashboards by going to
http://<your_ip>:10000/<your_dashboard>?viewport=1050x780&eink=8&format=png
Which in my case was:
http://192.168.1.100:10000/dashboard-trmnl?viewport=1050x780&eink=8&format=png
Now, the next two steps were a bit of hacking back and forth.
TRMNL is a bit of a quirky setup, where you need to create screens (essentially images) that become part of playlists that are displayed on devices. Luckily, Terminus exposes a rest API that allows you to directly create screens by pointing to the url of puppeteer like this.
curl -X POST "http://192.168.1.100:2300/api/screens" \
-H "Content-Type: application/json" \
-d '{
  "screen": {
    "label": "TRMNL",
    "name": "ha-dashboard-trmnl",
    "file_name": "ha-dashboard-trmnl.png",
    "model_id": "14",
    "uri": "http://192.168.1.100:10000/lovelace/lights?viewport=1400x1050&eink=8&format=png"
  }
}'
Note that model_id=14 comes from the custom created model type mentioned in github.com/usetrmnl/trmnl-kobo/issues/17#issuecomment-3237420484.
Now the tricky part is that Terminus does not allow you to overwrite screens yet, and neither does it expose an official REST API to add screens to playlists. Hence the hacky next steps.
First, I created a few rest_commands to the config/configuration.yaml file.
# This sensor fetches the list of screens from your Terminus server every 5 minutes.
rest:
  - resource: http://192.168.1.100:2300/api/screens
    scan_interval: 300
    sensor:
      - name: "Terminus Screens"
        # The sensor's state will be the number of screens found.
        value_template: "{{ value_json.data | count }}"
        # The full list of screens is stored in the 'data' attribute.
        json_attributes:
          - data

# These are the three actions our automation will use.
rest_command:
  # COMMAND 1: Deletes a screen by its ID.
  delete_trmnl_screen:
    url: "http://192.168.1.100:2300/api/screens/{{ id }}"
    method: "DELETE"
  # COMMAND 2: Creates a new screen by fetching a screenshot.
  update_trmnl_screen:
    url: "http://192.168.1.100:2300/api/screens"
    method: "POST"
    timeout: 60
    headers:
      Content-Type: "application/json"
    payload: >
      {
        "screen": {
          "label": "TRMNL-{{ unique_id }}",
          "name": "ha-dashboard-trmnl-{{ unique_id }}",
          "file_name": "ha-dashboard-trmnl-{{ unique_id }}.png",
          "model_id": "14",
          "uri": "{{ states('input_text.trmnl_screenshot_uri') }}"
        }
      }
  # COMMAND 3: Adds a screen to a specific playlist.
  add_screen_to_playlist:
    url: "http://192.168.1.100:2300/playlists/{{ playlist_id }}/items"
    method: "POST"
    headers:
      Content-Type: "application/x-www-form-urlencoded"
    payload: "playlist_item[screen_id]={{ screen_id }}"
The first rest config creates a sensor that obtains all the current Terminus screens, to be used to identify the last screen that was pushed to Terminus. The delete_trmnl_screen can then be used to delete this screen (and delete the screen from the playlist), update_trmnl_screen creates a new screen from the Puppeteer url and add_screen_to_playlist uses the unofficial end-point from the UI to add the screen to an existing playlist that is connected to our device.
In my setup, I created a Home Assistant helper input_text.trmnl_screenshot_uri to easily change the puppeteer URL (eg. to change the dashboard or resolution).
Finally, I combine everything in a single automation:
alias: Update TRMNL Screen Every 5 Minutes
description: Finds, creates, adds, and then deletes the HA dashboard screen.
triggers:
  - minutes: /30
    trigger: time_pattern
conditions: []
actions:
  - target:
      entity_id: sensor.terminus_screens
    action: homeassistant.update_entity
    data: {}
  - delay:
      seconds: 2
  - variables:
      old_screen_id: |
        {% set screen = state_attr('sensor.terminus_screens', 'data')
            | selectattr('name', 'search', 'ha-dashboard-trmnl')
            | sort(attribute='id') | list | first %}
        {{ screen.id if screen else 'none' }}
  - variables:
      unique_id: "{{ now().strftime('%Y%m%d%H%M%S') }}"
  - data:
      unique_id: "{{ unique_id }}"
    action: rest_command.update_trmnl_screen
  - delay:
      seconds: 30
  - target:
      entity_id: sensor.terminus_screens
    data: {}
    action: homeassistant.update_entity
  - delay:
      hours: 0
      minutes: 0
      seconds: 3
      milliseconds: 0
  - variables:
      new_screen_id: |
        {% set screen = state_attr('sensor.terminus_screens', 'data')
            | selectattr('name', 'eq', 'ha-dashboard-trmnl-' ~ unique_id)
            | list | first %}
        {{ screen.id if screen else 'none' }}
  - if:
      - condition: template
        value_template: "{{ new_screen_id != 'none' }}"
    then:
      - data:
          playlist_id: 1
          screen_id: "{{ new_screen_id }}"
        action: rest_command.add_screen_to_playlist
  - if:
      - condition: template
        value_template: "{{ old_screen_id != 'none' }}"
    then:
      - data:
          id: "{{ old_screen_id }}"
        action: rest_command.delete_trmnl_screen
mode: single
The key insights here are that the puppeteer screenshot takes some time to process, and therefore we first create the new screen and add it to the playlist, before deleting the old screen. When skipping this step, your screen could go blank when your ereader is polling for updates (which I set to every hour) at the same time as Home Assistant is pushing the update. While the Kobo pulls updates every hour, you can easily push screen updates to Terminus more frequently (every 30 minutes in my case).
While this would work with any dashboard, I think it’s worth sharing my current setup: a fairly simple dashboard with the last update time (useful to see if everything is still running) together with a simple Google Calendar sync inside a calendar-card-pro (github.com/alexpfau/calendar-card-pro) card.
title: TRMNL
views:
  - path: default_view
    title: Home
    panel: true
    cards:
      - type: vertical-stack
        cards:
          - type: markdown
            style: |
              ha-card {
                background: none;
                border: none;
                box-shadow: none;
                text-align: center;
                padding: 20px 0;
              }
            content: >
              <font size="+6">{% if now().hour < 4 %} Good Night {% elif
              now().hour < 12 %} Good Morning {% elif now().hour < 18 %} Good
              Afternoon {% else %} Good Evening {% endif %}! <font size="+1">
              Last Update: {{ now().strftime('%-H:%M') }} - {{
              now().strftime('%A, %B %-d') }}</font>
          - entities:
              - calendar.huis_agenda
              - entity: calendar.afvalkalender_meerlanden
            days_to_show: 7
            title_font_size: '60'
            weekday_font_size: 30px
            day_font_size: 50px
            month_font_size: 30px
            show_countdown: true
            event_font_size: 40px
            time_24h: true
            time_font_size: 30px
            time_icon_size: 30px
            weather:
              position: date
              date:
                show_conditions: true
                show_high_temp: true
                show_low_temp: false
                icon_size: 14px
                font_size: 12px
                color: var(--primary-text-color)
              event:
                show_conditions: true
                show_temp: true
                icon_size: 14px
                font_size: 12px
                color: var(--primary-text-color)
            type: custom:calendar-card-pro
All-in-all, this is a fun addition to my Home Assistant setup and a great way to give old hardware a new purpose. While it required a few workarounds, the end result is a highly customizable, low-power, functional dashboard. Hopefully, this guide helps you build your own!